| 일 | 월 | 화 | 수 | 목 | 금 | 토 |
|---|---|---|---|---|---|---|
| 1 | 2 | 3 | 4 | 5 | 6 | 7 |
| 8 | 9 | 10 | 11 | 12 | 13 | 14 |
| 15 | 16 | 17 | 18 | 19 | 20 | 21 |
| 22 | 23 | 24 | 25 | 26 | 27 | 28 |
- 예외미루기
- abstract
- 환경설정
- cursor문
- 어윈 사용법
- 제네릭
- 정수형타입
- 대덕인재개발원
- 컬렉션프레임워크
- 예외처리
- 생성자오버로드
- 인터페이스
- Java
- 오라클
- NestedFor
- 참조형변수
- exception
- 다형성
- EnhancedFor
- 메소드오버로딩
- 집합_SET
- 자동차수리시스템
- 추상메서드
- 한국건설관리시스템
- oracle
- 컬렉션 타입
- 객체 비교
- GRANT VIEW
- 자바
- 사용자예외클래스생성
- Today
- Total
거니의 velog
(6) 모델2 방식으로 효율적으로 개발하기 4_답변형 게시판 구현 3 본문
(2) 게시판 글쓰기 구현
* 게시판 글쓰기 기능을 구현하는 과정은 다음과 같다.

(1) 글 목록창(listArticles.jsp)에서 글쓰기창을 요청한다.

(2) 글쓰기창에서 글을 입력하고 컨트롤러에 /board/addArticle.do로 글쓰기를 요청한다.

(3) 컨트롤러에서 Service 클래스로 글쓰기창에서 입력한 글 정보를 전달해 테이블에 글을 추가한다.

(4) 새 글을 추가하고 컨트롤러에서 다시 /board/listArticles.do로 요청하여 전체 글을 표시한다.
* 글 추가는 한 개의 글을 추가하므로 /addArticle.do 이고,
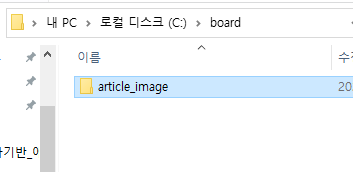
글 목록에 출력하는 경우는 여러 개의 글을 조회하므로 /listArticles.do 이며 s가 붙는다.* 클래스와 JSP를 구현하기 전에 프로젝트의 WebContent\lib 폴더에 파일 업로드와 관련된 라이브러리를 미리 복사해 붙여 넣는다. 그리고 파일 저장소인 C:\board\article_image 폴더를 만든다.

* 그럼 지금부터 실제 클래스와 JSP로 글쓰기창에서 글과 이미지 파일을 업로드할 수 있는 기능을 구현해 보자.
1. sec03.brd02 패키지를 만들고 클래스 파일들을 추가한다. 그리고 board02 폴더와 관련된 JSP 파일들을 추가한다.

2. 컨트롤러를 담당하는 BoardController 클래스를 다음과 같이 작성한다. action 값이 /articleForm.do면 글쓰기창을 브라우저에 표시하고, action 값이 /addArticle.do면 다음 과정으로 새 글을 추가한다. upload() 메서드를 호출해 글쓰기창에서 전송된 글 관련 정보를 Map에 key/value 쌍으로 저장한다.
파일을 첨부한 경우 먼저 파일 이름을 Map에 저장한 후 첨부한 파일을 저장소에 업로드한다. upload() 메서드를 호출한 후에는 반환한 Map에서 새 글 정보를 가져온다. 그런 다음 Service 클래스의 addService() 메서드 인자로 새 글 정보를 전달하면 새 글이 등록된다.
package sec03.brd02;

import java.io.File;
import java.io.IOException;
import java.util.ArrayList;
import java.util.HashMap;
import java.util.List;
import java.util.Map;

import javax.servlet.RequestDispatcher;
import javax.servlet.Servlet;
import javax.servlet.ServletConfig;
import javax.servlet.ServletException;
import javax.servlet.annotation.WebServlet;
import javax.servlet.http.HttpServlet;
import javax.servlet.http.HttpServletRequest;
import javax.servlet.http.HttpServletResponse;

import org.apache.commons.fileupload.FileItem;
import org.apache.commons.fileupload.FileUploadException;
import org.apache.commons.fileupload.disk.DiskFileItemFactory;
import org.apache.commons.fileupload.servlet.ServletFileUpload;

@WebServlet("/board/*")
public class BoardController extends HttpServlet {

	// 글에 첨부한 이미지 저장 위치를 상수로 선언한다.
	private static String ARTICLE_IMAGE_REPO = "C:\\board\\article_image"; // 글에 첨부한 이미지 저장 위치를 상수로 선언한다.
	BoardService boardService;
	ArticleVO articleVO;

	public void init(ServletConfig config) throws ServletException {
		boardService = new BoardService();
		articleVO = new ArticleVO();
	}

	protected void doGet(HttpServletRequest request, HttpServletResponse response)
			throws ServletException, IOException {
		doHandle(request, response);
	}

	protected void doPost(HttpServletRequest request, HttpServletResponse response)	throws ServletException, IOException {
		doHandle(request, response);
	}

	private void doHandle(HttpServletRequest request, HttpServletResponse response) throws ServletException, IOException {
		String nextPage = "";
		request.setCharacterEncoding("utf-8");
		response.setContentType("text/html; charset=utf-8");
		String action = request.getPathInfo();
		System.out.println("action:" + action);
		try {
			List<ArticleVO> articlesList = new ArrayList<ArticleVO>();
			if (action == null) {
				articlesList = boardService.listArticles();
				request.setAttribute("articlesList", articlesList);
				nextPage = "/board02/listArticles.jsp";

			} else if (action.equals("/listArticles.do")) {
				articlesList = boardService.listArticles();
				request.setAttribute("articlesList", articlesList);
				nextPage = "/board02/listArticles.jsp";

			} else if (action.equals("/articleForm.do")) { // action 값 /articleForm.do로 요청 시 글쓰기창이 나타난다.
				nextPage = "/board02/articleForm.jsp";

			} else if (action.equals("/addArticle.do")) { // /addArticle.do로 요청 시 새 글 추가 작업을 수행한다.
				Map<String, String> articleMap = upload(request, response); // 파일 업로드 기능을 사용하기 위해 upload()로 요청을 전달한다.
				String title = articleMap.get("title");
				String content = articleMap.get("content");
				String imageFileName = articleMap.get("imageFileName"); // articleMap에 저장된 글 정보를 다시 가져온다.

				articleVO.setParentNO(0); // 새 글의 부모 글 번호를 0으로 설정한다.
				articleVO.setId("hong"); // 새 글 작성자 ID를 hong으로 설정한다.
				articleVO.setTitle(title);
				articleVO.setContent(content);
				articleVO.setImageFileName(imageFileName);
				boardService.addArticle(articleVO); // 글쓰기 창에서 입력한 정보를 ArticleVO 객체에 설정한 후 addArticle()로 전달한다.
				nextPage = "/board/listArticles.do";

			}else {
				nextPage = "/board02/listArticles.jsp";
			}

			RequestDispatcher dispatch = request.getRequestDispatcher(nextPage);
			dispatch.forward(request, response);
		} catch (Exception e) {
			e.printStackTrace();
		}
	}

	private Map<String, String> upload(HttpServletRequest request, HttpServletResponse response) throws ServletException, IOException {

		Map<String, String> articleMap = new HashMap<String, String>();
		String encoding = "utf-8";
		File currentDirPath = new File(ARTICLE_IMAGE_REPO); // 글 이미지 저장 폴더에 대해 파일 객체를 생성한다.
		DiskFileItemFactory factory = new DiskFileItemFactory();
		factory.setRepository(currentDirPath);
		factory.setSizeThreshold(1024 * 1024);
		ServletFileUpload upload = new ServletFileUpload(factory);

		try {
			List items = upload.parseRequest(request);
			for (int i = 0; i < items.size(); i++) {
				FileItem fileItem = (FileItem) items.get(i);
				if (fileItem.isFormField()) {
					System.out.println(fileItem.getFieldName() + "=" + fileItem.getString(encoding));
					articleMap.put(fileItem.getFieldName(), fileItem.getString(encoding)); // 파일 업로드로 같이 전송된 새 글 관련 매개변수를 Map에 (key.value)로 저장한 후 반환하고, 새 글과 관련된 title, content를 Map에 저장한다.
				} else {
					System.out.println("파라미터명:" + fileItem.getFieldName());
					//System.out.println("파일명:" + fileItem.getName());
					System.out.println("파일크기:" + fileItem.getSize() + "bytes");
					//articleMap.put(fileItem.getFieldName(), fileItem.getName());
					if (fileItem.getSize() > 0) {
						int idx = fileItem.getName().lastIndexOf("\\");
						if (idx == -1) {
							idx = fileItem.getName().lastIndexOf("/");
						}

						String fileName = fileItem.getName().substring(idx + 1);
						System.out.println("파일명:" + fileName);
						articleMap.put(fileItem.getFieldName(), fileName);  // 업로드된 파일의 파일 이름을 Map에 ("imageFileName", "업로드파일이름")로 저장한다.
						File uploadFile = new File(currentDirPath + "\\" + fileName);
						fileItem.write(uploadFile);

					} // end if ==> 업로드한 파일이 존재하는 경우 업로드한 파일의 파일 이름으로 저장소에 업로드한다.
				} // end if
			} // end for
		} catch (Exception e) {
			e.printStackTrace();
		}
		return articleMap;

	}

}
3. BoardService 클래스의 insertNewArticle() 메서드를 호출하면서 글 정보를 인자로 전달한다.
package sec03.brd02;

import java.util.List;

public class BoardService {

	BoardDAO boardDAO;

	public BoardService() {
		boardDAO = new BoardDAO();
	}

	public List<ArticleVO> listArticles() {
		List<ArticleVO> articlesList = boardDAO.selectAllArticles();
		return articlesList;
	}

	public void addArticle(ArticleVO article){
		boardDAO.insertNewArticle(article);
	}

}
4. insertNewArticle() 메서드의 SQL문을 실행하기 위해 getNewArticleNo() 메서드를 호출해 새 글에 대한 글 번호를 먼저 가져온다.
[BoardDAO.java]
package sec03.brd02;

import java.sql.Connection;
import java.sql.Date;
import java.sql.PreparedStatement;
import java.sql.ResultSet;
import java.util.ArrayList;
import java.util.List;

import javax.naming.Context;
import javax.naming.InitialContext;
import javax.sql.DataSource;

public class BoardDAO {
	private DataSource dataFactory;
	Connection conn;
	PreparedStatement pstmt;

	public BoardDAO() {
		try {
			Context ctx = new InitialContext();
			Context envContext = (Context) ctx.lookup("java:/comp/env");
			dataFactory = (DataSource) envContext.lookup("jdbc/oracle");
		} catch (Exception e) {
			e.printStackTrace();
		}
	}

	public List<ArticleVO> selectAllArticles() {
		List<ArticleVO> articlesList = new ArrayList<ArticleVO>();
		try {
			conn = dataFactory.getConnection();
			String query = "SELECT LEVEL,articleNO,parentNO,title,content,id,writeDate" + " from t_board"
					+ " START WITH  parentNO=0" + " CONNECT BY PRIOR articleNO=parentNO"
					+ " ORDER SIBLINGS BY articleNO DESC";
			System.out.println(query);
			pstmt = conn.prepareStatement(query);
			ResultSet rs = pstmt.executeQuery();
			while (rs.next()) {
				int level = rs.getInt("level");
				int articleNO = rs.getInt("articleNO");
				int parentNO = rs.getInt("parentNO");
				String title = rs.getString("title");
				String content = rs.getString("content");
				String id = rs.getString("id");
				Date writeDate = rs.getDate("writeDate");
				ArticleVO article = new ArticleVO();
				article.setLevel(level);
				article.setArticleNO(articleNO);
				article.setParentNO(parentNO);
				article.setTitle(title);
				article.setContent(content);
				article.setId(id);
				article.setWriteDate(writeDate);
				articlesList.add(article);
			}
			rs.close();
			pstmt.close();
			conn.close();
		} catch (Exception e) {
			e.printStackTrace();
		}
		return articlesList;
	}

	private int getNewArticleNO() {
		try {
			conn = dataFactory.getConnection();
			String query = "SELECT  max(articleNO) from t_board "; // 기본 글 번호 중 가장 큰 번호를 조회한다.
			System.out.println(query);
			pstmt = conn.prepareStatement(query);
			ResultSet rs = pstmt.executeQuery(query);
			if (rs.next())
				return (rs.getInt(1) + 1); // 가장 큰 번호에 1을 더한 번호를 반환한다.
			rs.close();
			pstmt.close();
			conn.close();
		} catch (Exception e) {
			e.printStackTrace();
		}
		return 0;
	}

	public void insertNewArticle(ArticleVO article) {
		try {
			conn = dataFactory.getConnection();
			int articleNO = getNewArticleNO(); // 새 글을 추가하기 전에 새 글에 대한 글 번호를 가져온다.
			int parentNO = article.getParentNO();
			String title = article.getTitle();
			String content = article.getContent();
			String id = article.getId();
			String imageFileName = article.getImageFileName();
			String query = "INSERT INTO t_board (articleNO, parentNO, title, content, imageFileName, id)"
					+ " VALUES (?, ? ,?, ?, ?, ?)"; // insert문을 이용해 글 정보를 추가한다.
			System.out.println(query);
			pstmt = conn.prepareStatement(query);
			pstmt.setInt(1, articleNO);
			pstmt.setInt(2, parentNO);
			pstmt.setString(3, title);
			pstmt.setString(4, content);
			pstmt.setString(5, imageFileName);
			pstmt.setString(6, id);
			pstmt.executeUpdate();
			pstmt.close();
			conn.close();
		} catch (Exception e) {
			e.printStackTrace();
		}
	}

}
5. 다음은 글쓰기와 관련된 JSP 페이지를 작성할 차례이다. listArticles.jsp를 다음과 같이 작성한다.
<%@ page language="java" contentType="text/html; charset=UTF-8"
    pageEncoding="UTF-8"
    isELIgnored="false" %>
<%@ taglib prefix="fmt" uri="http://java.sun.com/jsp/jstl/fmt" %>
<%@ taglib prefix="c" uri="http://java.sun.com/jsp/jstl/core" %>
<c:set var="contextPath" value="${pageContext.request.contextPath}" />
<%
  request.setCharacterEncoding("UTF-8");
%>
<!DOCTYPE html>
<html lang="ko">

    <head>
        <meta charset="UTF-8">
        <title>글목록창</title>
        <style>
            .cls1 {
                text-decoration: none;
            }

            .cls2 {
                text-align: center;
                font-size: 30px;
            }
        </style>
    </head>

    <body>
        <table align="center" border="1" width="80%">
            <tr height="10" align="center" bgcolor="lightgreen">
                <td>글번호</td>
                <td>작성자</td>
                <td>제목</td>
                <td>작성일</td>
            </tr>
            <c:choose>
                <c:when test="${empty articlesList }">
                    <tr height="10">
                        <td colspan="4">
                            <p align="center">
                                <b><span style="font-size:9pt;">등록된 글이 없습니다.</span></b>
                            </p>
                        </td>
                    </tr>
                </c:when>
                <c:when test="${!empty  articlesList}">
                    <c:forEach var="article" items="${articlesList }" varStatus="articleNum">
                        <tr align="center">
                            <td width="5%">${articleNum.count}</td>
                            <td width="10%">${article.id }</td>
                            <td align="left" width="35%">
                                <span style="padding-right:30px"></span>
                                <c:choose>
                                    <c:when test='${article.level > 1 }'>
                                        <c:forEach begin="1" end="${article.level }" step="1">
                                            <span style="padding-left:10px"></span>
                                        </c:forEach>
                                        <span style="font-size:12px;">[답변]</span>
                                        <a class="cls1" href="${contextPath}/board/viewArticle.do?articleNO=${article.articleNO}">${article.title}</a>
                                    </c:when>
                                    <c:otherwise>
                                        <a class="cls1" href="${contextPath}/board/viewArticle.do?articleNO=${article.articleNO}">${article.title }</a>
                                    </c:otherwise>
                                </c:choose>
                            </td>
                            <td width="10%">
                                <fmt:formatDate value="${article.writeDate}" />
                            </td>
                        </tr>
                    </c:forEach>
                </c:when>
            </c:choose>
        </table>
        <%-- 글쓰기를 클릭하면 글쓰기 창인 articleForm.jsp가 나타난다. --%>
        <a class="cls1" href="${contextPath}/board/articleForm.do">
            <p class="cls2">글쓰기</p>
        </a>
    </body>

</html>
6. articleForm.jsp를 다음과 같이 작성한다. 쇼핑몰 게시판에 글을 쓸 때는 보통 사진을 첨부하는 경우가 많다. 이처럼 글쓰기 작업을 할 때 첨부 파일도 같이 업로드할 수 있도록 반드시 <form> 태그의 enctype 속성을 multipart/form-data로 설정한다.
<%@ page language="java" contentType="text/html; charset=UTF-8"
     pageEncoding="UTF-8"
    isELIgnored="false" %>
<%@ taglib prefix="fmt" uri="http://java.sun.com/jsp/jstl/fmt" %>
<%@ taglib prefix="c" uri="http://java.sun.com/jsp/jstl/core" %>
<%
  request.setCharacterEncoding("UTF-8");
%>
<c:set var="contextPath" value="${pageContext.request.contextPath}" />

<!DOCTYPE html>
<html lang="ko">

    <head>
        <meta charset="UTF-8">
        <title>글쓰기창</title>
        <script src="http://code.jquery.com/jquery-latest.min.js"></script>
        <script type="text/javascript">
            function readURL(input) {
                if (input.files && input.files[0]) {
                    var reader = new FileReader();
                    reader.onload = function(e) {
                        $('#preview').attr('src', e.target.result);
                    }
                    reader.readAsDataURL(input.files[0]);
                }
            } // 제이쿼리를 이용해 이미지 파일 첨부 시 미리 보기 기능을 구현한다.

            function backToList(obj) {
                obj.action = "${contextPath}/board/listArticles.do";
                obj.submit();
            }
        </script>
        <title>새글 쓰기 창</title>
    </head>

    <body>
        <h1 style="text-align:center">새글 쓰기</h1>
        <%-- action 값을 /addArticle.do로 해서 '새 글 등록'을 요청한다. --%>
        <form name="articleForm" method="post" action="${contextPath}/board/addArticle.do" enctype="multipart/form-data">
            <table border="0" align="center">
                <tr>
                    <td align="right">글제목: </td>
                    <td colspan="2"><input type="text" size="67" maxlength="500" name="title" /></td>
                </tr>
                <tr>
                    <td align="right" valign="top"><br>글내용: </td>
                    <td colspan="2"><textarea name="content" rows="10" cols="65" maxlength="4000"></textarea> </td>
                </tr>
                <tr>
                    <td align="right">이미지파일 첨부: </td>
                    <td> <input type="file" name="imageFileName" onchange="readURL(this);" /></td>
                    <td><img id="preview" src="#" width="200" height="200" /></td>
                </tr>
                <tr>
                    <td align="right"> </td>
                    <td colspan="2">
                        <input type="submit" value="글쓰기" />
                        <input type="button" value="목록보기" onclick="backToList(this.form)" />
                    </td>
                </tr>
            </table>
        </form>
    </body>

</html>
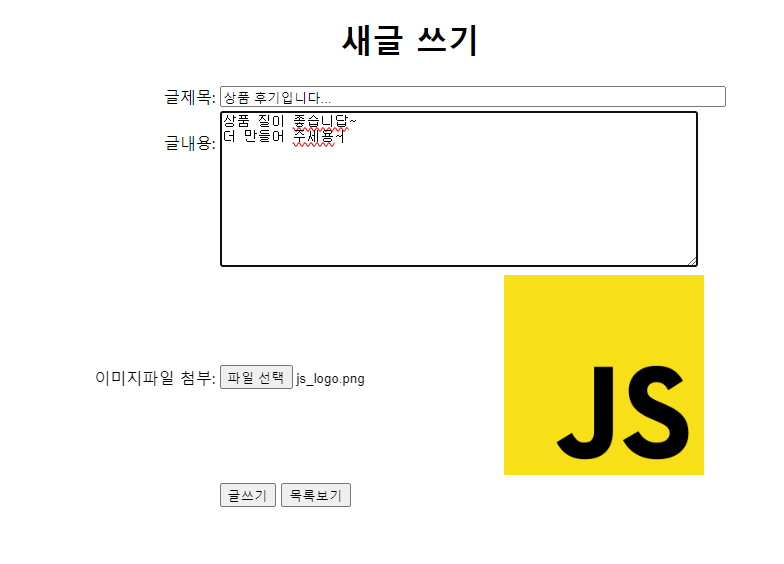
7. 다음 주소로 글 목록창을 요청한 후 다시 글쓰기를 클릭해 board/articleForm.do로 글쓰기 창을 요청한다. 그리고 글쓰기 창에서 "상품 후기입니다."라는 새 글을 작성하고 글쓰기를 클릭해 /board/addArticle.do로 요청한다.
- http://localhost:8090/pro17/board/listArticles.do

8. 글 목록에 새 글이 추가된 것을 볼 수 있다.

9. 글을 작성할 때 첨부한 파일은 로컬 PC의 다음 경로에 업로드 된다.

* 그런데 이 글쓰기 기능에는 한 가지 문제가 있다. 발견했는가?
* 바로 새 글에 첨부한 파일들이 같은 폴더에 저장된다는 점이다. 얼핏 보기엔 큰 문제가 아닌 것 같지만 이렇게 저장하면 다른 사용자가 첨부한 파일과 이름이 같아 구별하기가 어렵다.
* 따라서 이번에는 업로드한 파일이 각각의 글 번호를 이름으로 하는 폴더를 생성하고, 저장까지 할 수 있도록 구현해 보자. 과정은 다음과 같다.
(1) 글쓰기 창에서 새 글 전송 시 컨트롤러의 upload() 메서드를 호출해 새 글 정보를 Map으로 반환받고
    첨부한 파일은 임시로 temp 폴더에 업로드한다.

(2) 컨트롤러는 Service 클래스의 addNewArticle() 메서드를 호출하면서 새 글 정보를 인자로 전달해
    테이블에 추가한 후 새 글 번호를 반환 받는다.

(3) 컨트롤러에서 반환 받은 새 글 번호를 이용해 파일 저장소에 새 글 번호로 폴더를 생성하고
    temp 폴더의 파일을 새 글 번호 폴더로 이동한다.
1. 로컬 PC의 파일 저장소에 temp 폴더를 생성한다.

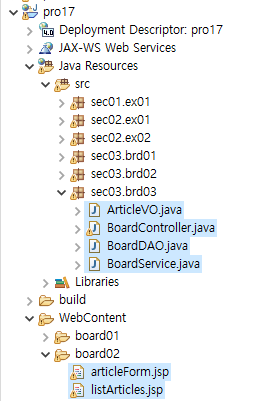
2. sec03.brd03 패키지를 만들고 다음과 같이 클래스 파일을 추가한다.

3. BoardController 클래스에 다음과 같이 작성한다. uplaod() 메서드를 호출해 첨부한 파일을 temp 폴더에 업로드한 후 새 글 정보를 Map으로 가져온다. 그리고 새 글을 테이블에 추가한 후 반환 받은 새 글 번호로 폴더를 생성하고 remp 폴더의 이미지를 새 글 번호 폴더로 이동한다.
package sec03.brd03;

import java.io.File;
import java.io.IOException;
import java.io.PrintWriter;
import java.util.ArrayList;
import java.util.HashMap;
import java.util.List;
import java.util.Map;

import javax.servlet.RequestDispatcher;
import javax.servlet.Servlet;
import javax.servlet.ServletConfig;
import javax.servlet.ServletException;
import javax.servlet.annotation.WebServlet;
import javax.servlet.http.HttpServlet;
import javax.servlet.http.HttpServletRequest;
import javax.servlet.http.HttpServletResponse;

import org.apache.commons.fileupload.FileItem;
import org.apache.commons.fileupload.disk.DiskFileItemFactory;
import org.apache.commons.fileupload.servlet.ServletFileUpload;
import org.apache.commons.io.FileUtils;


@WebServlet("/board/*")
public class BoardController extends HttpServlet {

	private static String ARTICLE_IMAGE_REPO = "C:\\board\\article_image";
	BoardService boardService;
	ArticleVO articleVO;

	public void init(ServletConfig config) throws ServletException {
		boardService = new BoardService();
		articleVO = new ArticleVO();
	}

	protected void doGet(HttpServletRequest request, HttpServletResponse response)
			throws ServletException, IOException {
		doHandle(request, response);
	}

	protected void doPost(HttpServletRequest request, HttpServletResponse response)	throws ServletException, IOException {
		doHandle(request, response);
	}

	private void doHandle(HttpServletRequest request, HttpServletResponse response) throws ServletException, IOException {
		String nextPage = "";
		request.setCharacterEncoding("utf-8");
		response.setContentType("text/html; charset=utf-8");
		String action = request.getPathInfo();
		System.out.println("action:" + action);
		try {
			List<ArticleVO> articlesList = new ArrayList<ArticleVO>();
			if (action == null) {
				articlesList = boardService.listArticles();
				request.setAttribute("articlesList", articlesList);
				nextPage = "/board02/listArticles.jsp";

			} else if (action.equals("/listArticles.do")) {
				articlesList = boardService.listArticles();
				request.setAttribute("articlesList", articlesList);
				nextPage = "/board02/listArticles.jsp";

			} else if (action.equals("/articleForm.do")) {
				nextPage = "/board02/articleForm.jsp";

			} else if (action.equals("/addArticle.do")) {
				int articleNO=0;
				Map<String, String> articleMap = upload(request, response);
				String title = articleMap.get("title");
				String content = articleMap.get("content");
				String imageFileName = articleMap.get("imageFileName");
				articleVO.setParentNO(0);
				articleVO.setId("hong");
				articleVO.setTitle(title);
				articleVO.setContent(content);
				articleVO.setImageFileName(imageFileName);
				articleNO= boardService.addArticle(articleVO); // 테이블에 새 글을 추가한 후 새 글에 대한 글 번호를 가져온다.

				if(imageFileName!=null && imageFileName.length()!=0) { // 파일을 첨부한 경우에만 수행한다.
				    File srcFile = new 	File(ARTICLE_IMAGE_REPO +"\\"+"temp"+"\\"+imageFileName); // temp 폴더에 임시로 업로드된 파일 객체를 생성한다.
					File destDir = new File(ARTICLE_IMAGE_REPO +"\\"+articleNO);
					destDir.mkdirs(); // CURR_IMAGE_REPO_PATH의 경로 하위에 글 번호로 폴더를 생성한다.
					FileUtils.moveFileToDirectory(srcFile, destDir, true); // temp 폴더의 파일을 글 번호를 이름으로 하는 폴더로 이동시킨다.
				}
				PrintWriter pw = response.getWriter();
				pw.print("<script>"
				         +"  alert('새글을 추가했습니다.');"
						 +" location.href='"+request.getContextPath()+"/board/listArticles.do';"
				         +"</script>"); // 새 글 등록 메시지를 나타낸 후 자바스크립트 location 객체의 href 속성을 이용해 글 목록을 요청한다.

				return;
			}else {
				nextPage = "/board02/listArticles.jsp";
			}

			RequestDispatcher dispatch = request.getRequestDispatcher(nextPage);
			dispatch.forward(request, response);
		} catch (Exception e) {
			e.printStackTrace();
		}
	}

	private Map<String, String> upload(HttpServletRequest request, HttpServletResponse response) throws ServletException, IOException {
		Map<String, String> articleMap = new HashMap<String, String>();
		String encoding = "utf-8";
		File currentDirPath = new File(ARTICLE_IMAGE_REPO);
		DiskFileItemFactory factory = new DiskFileItemFactory();
		factory.setRepository(currentDirPath);
		factory.setSizeThreshold(1024 * 1024);
		ServletFileUpload upload = new ServletFileUpload(factory);
		try {
			List items = upload.parseRequest(request);
			for (int i = 0; i < items.size(); i++) {
				FileItem fileItem = (FileItem) items.get(i);
				if (fileItem.isFormField()) {
					System.out.println(fileItem.getFieldName() + "=" + fileItem.getString(encoding));
					articleMap.put(fileItem.getFieldName(), fileItem.getString(encoding));
				} else {
					System.out.println("파라미터명:" + fileItem.getFieldName());
					//System.out.println("파일명:" + fileItem.getName());
					System.out.println("파일크기:" + fileItem.getSize() + "bytes");
					//articleMap.put(fileItem.getFieldName(), fileItem.getName());
					if (fileItem.getSize() > 0) {
						int idx = fileItem.getName().lastIndexOf("\\");
						if (idx == -1) {
							idx = fileItem.getName().lastIndexOf("/");
						}

						String fileName = fileItem.getName().substring(idx + 1);
						System.out.println("파일명:" + fileName);
						articleMap.put(fileItem.getFieldName(), fileName);
						File uploadFile = new File(currentDirPath + "\\temp\\" + fileName); // 첨부한 파일을 먼저 temp 폴더에 업로드 한다.
						fileItem.write(uploadFile);

					} // end if
				} // end if
			} // end for
		} catch (Exception e) {
			e.printStackTrace();
		}
		return articleMap;
	}

}
4. BoardService 클래스를 다음과 같이 작성한다. addArticle() 메서드의 반환 타입을 int로 변경한다. 그리고 BoardDAO의 insertNewArticle() 메서드를 호출해 새 글 번호를 받아서 반환한다.
package sec03.brd02;

import java.util.List;

public class BoardService {

	BoardDAO boardDAO;

	public BoardService() {
		boardDAO = new BoardDAO();
	}

	public List<ArticleVO> listArticles() {
		List<ArticleVO> articlesList = boardDAO.selectAllArticles();
		return articlesList;
	}

	public void addArticle(ArticleVO article){ // 새 글 번호를 컨트롤러로 반환한다.
		boardDAO.insertNewArticle(article);
	}

}
5. BoardDAO 클래스에서는 insertNewArticle() 메서드를 호출해 SQL문을 실행한 후 새 글 번호를 반환한다.
package sec03.brd02;

import java.sql.Connection;
import java.sql.Date;
import java.sql.PreparedStatement;
import java.sql.ResultSet;
import java.util.ArrayList;
import java.util.List;

import javax.naming.Context;
import javax.naming.InitialContext;
import javax.sql.DataSource;

public class BoardDAO {

	private DataSource dataFactory;
	Connection conn;
	PreparedStatement pstmt;

	public BoardDAO() {
		try {
			Context ctx = new InitialContext();
			Context envContext = (Context) ctx.lookup("java:/comp/env");
			dataFactory = (DataSource) envContext.lookup("jdbc/oracle");
		} catch (Exception e) {
			e.printStackTrace();
		}
	}

	public List<ArticleVO> selectAllArticles() {
		List<ArticleVO> articlesList = new ArrayList<ArticleVO>();
		try {
			conn = dataFactory.getConnection();
			String query = "SELECT LEVEL,articleNO,parentNO,title,content,id,writeDate" + " from t_board"
					+ " START WITH  parentNO=0" + " CONNECT BY PRIOR articleNO=parentNO"
					+ " ORDER SIBLINGS BY articleNO DESC";
			System.out.println(query);
			pstmt = conn.prepareStatement(query);
			ResultSet rs = pstmt.executeQuery();
			while (rs.next()) {
				int level = rs.getInt("level");
				int articleNO = rs.getInt("articleNO");
				int parentNO = rs.getInt("parentNO");
				String title = rs.getString("title");
				String content = rs.getString("content");
				String id = rs.getString("id");
				Date writeDate = rs.getDate("writeDate");
				ArticleVO article = new ArticleVO();
				article.setLevel(level);
				article.setArticleNO(articleNO);
				article.setParentNO(parentNO);
				article.setTitle(title);
				article.setContent(content);
				article.setId(id);
				article.setWriteDate(writeDate);
				articlesList.add(article);
			}
			rs.close();
			pstmt.close();
			conn.close();
		} catch (Exception e) {
			e.printStackTrace();
		}
		return articlesList;
	}

	private int getNewArticleNO() {
		try {
			conn = dataFactory.getConnection();
			String query = "SELECT  max(articleNO) from t_board "; // 기본 글 번호 중 가장 큰 번호를 조회한다.
			System.out.println(query);
			pstmt = conn.prepareStatement(query);
			ResultSet rs = pstmt.executeQuery(query);
			if (rs.next())
				return (rs.getInt(1) + 1); // 가장 큰 번호에 1을 더한 번호를 반환한다.
			rs.close();
			pstmt.close();
			conn.close();
		} catch (Exception e) {
			e.printStackTrace();
		}
		return 0;
	}

	public int insertNewArticle(ArticleVO article) {
		int articleNO = getNewArticleNO(); // 새 글을 추가하기 전에 새 글에 대한 글 번호를 가져온다.
		try {
			conn = dataFactory.getConnection();
			int parentNO = article.getParentNO();
			String title = article.getTitle();
			String content = article.getContent();
			String id = article.getId();
			String imageFileName = article.getImageFileName();
			String query = "INSERT INTO t_board (articleNO, parentNO, title, content, imageFileName, id)"
					+ " VALUES (?, ? ,?, ?, ?, ?)"; // insert문을 이용해 글 정보를 추가한다.
			System.out.println(query);
			pstmt = conn.prepareStatement(query);
			pstmt.setInt(1, articleNO);
			pstmt.setInt(2, parentNO);
			pstmt.setString(3, title);
			pstmt.setString(4, content);
			pstmt.setString(5, imageFileName);
			pstmt.setString(6, id);
			pstmt.executeUpdate();
			pstmt.close();
			conn.close();
		} catch (Exception e) {
			e.printStackTrace();
		}

		return articleNO; // SQL문으로 새 글을 추가하고 새 글 번호를 반환한다.
	}

}
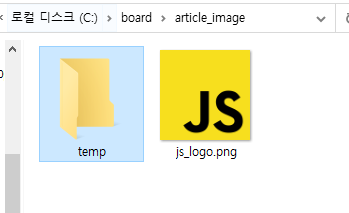
6. 다음 그림은 새 글 쓰기를 실행한 후 생성된 파일 저장소를 나타낸 것이다.
- http://localhost:8090/pro17/board/listArticles.do

* 임시로 저장하는 temp 폴더 외에도 각각의 글 번호에 대한 폴더가 만들어진 것을 볼 수 있다. 이러면 보다 관리하기가 편하다.
'Java > Java_JSP Model2' 카테고리의 다른 글
| (8) 모델2 방식으로 효율적으로 개발하기 4_답변형 게시판 구현 5 (0) | 2023.09.26 |
|---|---|
| (7) 모델2 방식으로 효율적으로 개발하기 4_답변형 게시판 구현 4 (0) | 2023.09.26 |
| (5) 모델2 방식으로 효율적으로 개발하기 4_답변형 게시판 구현 2 (0) | 2023.09.23 |
| (4) 모델2 방식으로 효율적으로 개발하기 4_답변형 게시판 구현 1 (0) | 2023.09.23 |
| (3) 모델2 방식으로 효율적으로 개발하기 3 (0) | 2023.09.23 |


