
| 일 | 월 | 화 | 수 | 목 | 금 | 토 |
|---|---|---|---|---|---|---|
| 1 | 2 | 3 | 4 | |||
| 5 | 6 | 7 | 8 | 9 | 10 | 11 |
| 12 | 13 | 14 | 15 | 16 | 17 | 18 |
| 19 | 20 | 21 | 22 | 23 | 24 | 25 |
| 26 | 27 | 28 | 29 | 30 | 31 |
- 오라클
- 객체 비교
- 생성자오버로드
- 제네릭
- abstract
- 한국건설관리시스템
- EnhancedFor
- 사용자예외클래스생성
- 컬렉션프레임워크
- 환경설정
- 다형성
- 대덕인재개발원
- Java
- 집합_SET
- 예외미루기
- GRANT VIEW
- 인터페이스
- oracle
- 메소드오버로딩
- 추상메서드
- cursor문
- 자동차수리시스템
- 자바
- 예외처리
- 어윈 사용법
- 참조형변수
- 정수형타입
- NestedFor
- 컬렉션 타입
- exception
- Today
- Total
거니의 velog
(15) 스프링으로 답변형 게시판 만들기 4 본문
9. 새 글 추가 시 여러 이미지 파일 첨부하기
* 새 글을 작성할 때 이미지를 한 개만 첨부하는 것이 아니라 원하는 개수만큼 첨부해서 업로드할 수 있다면 사용자 입장에서는 더 좋을 것이다. 여기에서는 여러 이미지 파일을 첨부하는 기능을 구현해 볼 것이다.
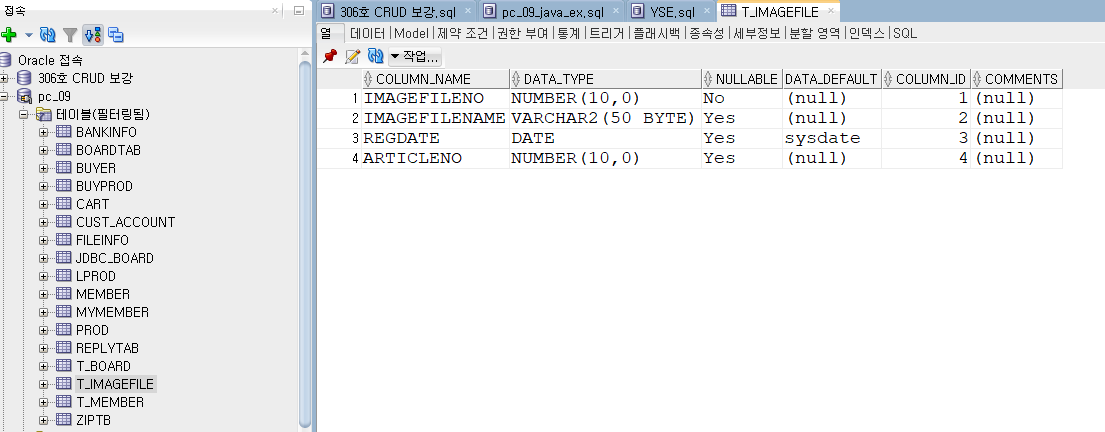
* 아래 그림과 같이 이미지 파일 정보를 따로 저장할 테이블이 필요하다.

* 이미지 테이블에는 글을 작성할 때 첨부한 파일 정보가 저장된다. 따라서 이미지 테이블에 저장된 파일 정보는 반드시 그 파일이 어떤 글에 첨부된 파일인지를 나타내는 글 번호(articleNO)가 있어야 한다.
* 그런데 이미지 테이블에 파일 정보를 추가할 때 게시판에 없는 글 번호라면 그 파일 정보는 게시판 테이블에 없는 글에 대한 파일 정보가 된다. 이런 오류가 발생하면 안 된다. 이런 오류를 '참조 무결성 오류'라고 한다. 따라서 이미지 테이블에 파일 정보를 추가할 때는 먼저 글 번호가 게시판에 존재하는 글 번호인지부터 확인해야 한다.
* 따라서 SQL 문으로 테이블에 값을 추가할 때는 항상 게시판 테이블의 글 번호를 참조하도록 만들어 주어야 한다. 더 자세한 내용은 데이터베이스 관련 서적을 참고하기 바란다.
< 이미지 정보 테이블 구조 >
| no | 컬럼 이름 | 속성 이름 | 자료형 | 크기 | 유일키 여부 | NULL 여부 | 키 | 기본값 |
| 1 | imageFileNo | 이미지 파일 번호 | number | 10 | Y | 기본키 | ||
| 2 | imageFileName | 이미지 파일 이름 | varchar2 | 50 | N | N | ||
| 3 | regData | 등록일자 | date | sysdate | ||||
| 4 | articleNO | 글 번호 | number | 10 | Y | N | 참조키 |
1. SQL Developer를 이용해 이미지 테이블을 생성한다. SQL문 실행 시 마지막에 게시판 테이블의 articleNO 컬럼을 참조하는 구문을 추가한다.
CREATE TABLE t_imageFile(
    imageFileNo number(10) primary key,
    imageFileName varchar2(50),
    regDate date default sysdate,
    articleNO number(10),
    CONSTRAINT FK_ARTICLENO FOREIGN KEY(articleNO)
    REFERENCES t_board(articleNO) ON DELETE CASCADE -- 게시판 글을 삭제할 경우 해당 글 번호를 참조하는 이미지 정보도 자동으로 삭제된다.
);
2. 매퍼 파일에 다음과 같이 SQL 문을 추가한다. 새 글 추가시 여러 개의 이미지 파일을 첨부할 수 있기 때문에 insert문에서 <foreach> 태그를 이용해 한꺼번에 추가할 수 있게 한다.
[board.xml]
	<!-- imageFileName 컬럼은 더 이상 사용하지 않으므로 null을 입력한다. -->
	<insert id="insertNewArticle" parameterType="java.util.Map">
		<![CDATA[
			insert into t_board(articleNO, id, title, content, imageFileName)
			values(#{articleNO}, #{id}, #{title}, #{content}, null)
		]]>
	</insert>

	<!-- 한꺼번에 여러 개의 레코드를 추가한다. -->
	<insert id="insertNewImage" parameterType="java.util.Map">
		<foreach item="item" collection="list" open="INSERT ALL" separator=" " close="SELECT * FROM DUAL">
		 INTO
			t_imageFile(imageFileNO, imageFileName, articleNO, regDate)
			VALUES (#{item.imageFileNO}, #{item.imageFileName}, #{item.articleNO}, sysdate)
		</foreach>
	</insert>

	<!-- 새로 추가할 이미지 정보의 이미지 번호를 가져온다. -->
	<select id="selectNewImageFileNO" resultType="int">
	    <![CDATA[
	      SELECT  nvl(max(imageFileNO),0) from t_imageFile
	    ]]>
	</select>
3. 이번에는 자바 파일을 수정할 차례이다. 컨트롤러에서 새 글 정보와 이미지 파일 정보를 가져오려면 먼저 upload() 메서드를 호출해서 첨부한 이미지 파일 이름이 저장된 fileList를 받아와야 한다. 그런 다음 fileList에서 이미지 파일 이름을 가져와 ImageVO 객체의 속성에 설정한 후 다시 imageFileList에 저장해야 한다. 마지막으로 imageFileList를 Map에 담아 서비스의 메서드를 호출하면서 전달한다.
[BoardControllerImpl.java]
	@Override
	@RequestMapping(value = "/board/addNewArticle.do", method = RequestMethod.POST)
	@ResponseBody
	public ResponseEntity addNewArticle(MultipartHttpServletRequest multipartRequest, HttpServletResponse response)
			throws Exception {
		multipartRequest.setCharacterEncoding("utf-8");
		String imageFileName = null;

		Map articleMap = new HashMap();
		Enumeration enu = multipartRequest.getParameterNames();
		while (enu.hasMoreElements()) {
			String name = (String) enu.nextElement();
			String value = multipartRequest.getParameter(name);
			articleMap.put(name, value);
		}

		// 로그인 시 세션에 저장된 회원 정보에서 글쓴이 아이디를 얻어와서 Map에 저장합니다.
		HttpSession session = multipartRequest.getSession();
		MemberVO memberVO = (MemberVO) session.getAttribute("member");
		String id = memberVO.getId();
		articleMap.put("id", id);
		articleMap.put("parentNO", 0);

		List<String> fileList = upload2(multipartRequest); // 첨부한 파일 이름을 fileList로 반환한다.
		List<ImageVO> imageFileList = new ArrayList<ImageVO>();
		if (fileList != null && fileList.size() != 0) {
			for (String fileName : fileList) {
				ImageVO imageVO = new ImageVO();
				imageVO.setImageFileName(fileName);
				imageFileList.add(imageVO);
			} // 전송된 이미지 정보를 imageVO 객체의 속성에 차례대로 저장한 후 imageFileList에 다시 저장한다.
			articleMap.put("imageFileList", imageFileList); // imageFileList를 다시 articleMap에 저장한다.
		}
		String message;
		ResponseEntity resEnt = null;
		HttpHeaders responseHeaders = new HttpHeaders();
		responseHeaders.add("Content-Type", "text/html; charset=utf-8");
		try {
			int articleNO = boardService.addNewArticle(articleMap); // articleMap을 서비스 클래스로 전달한다.
			if (imageFileList != null && imageFileList.size() != 0) {
				for (ImageVO imageVO : imageFileList) {
					imageFileName = imageVO.getImageFileName();
					File srcFile = new File(ARTICLE_IMAGE_REPO + "\\" + "temp" + "\\" + imageFileName);
					File destDir = new File(ARTICLE_IMAGE_REPO + "\\" + articleNO);
					// destDir.mkdirs();
					FileUtils.moveFileToDirectory(srcFile, destDir, true);
				} // 첨부된 이미지들을 for문을 이용해 업로드한다.
			}

			message = "<script>";
			message += " alert('새글을 추가했습니다.');";
			message += " location.href='" + multipartRequest.getContextPath() + "/board/listArticles.do'; ";
			message += " </script>";
			resEnt = new ResponseEntity(message, responseHeaders, HttpStatus.CREATED);

		} catch (Exception e) {
			if (imageFileList != null && imageFileList.size() != 0) {
				for (ImageVO imageVO : imageFileList) {
					imageFileName = imageVO.getImageFileName();
					File srcFile = new File(ARTICLE_IMAGE_REPO + "\\" + "temp" + "\\" + imageFileName);
					srcFile.delete();
				} // 오류 발생 시 temp 폴더의 이미지들을 모두 삭제한다.
			}

			message = " <script>";
			message += " alert('오류가 발생했습니다. 다시 시도해 주세요');');";
			message += " location.href='" + multipartRequest.getContextPath() + "/board/articleForm.do'; ";
			message += " </script>";
			resEnt = new ResponseEntity(message, responseHeaders, HttpStatus.CREATED);
			e.printStackTrace();
		}
		return resEnt;
	}

    // 이미지 파일 이름이 저장된 List를 반환한다.
	private List<String> upload2(MultipartHttpServletRequest multipartRequest) throws Exception {
		List<String> fileList = new ArrayList<String>();
		Iterator<String> fileNames = multipartRequest.getFileNames();
		while (fileNames.hasNext()) {
			String fileName = fileNames.next();
			MultipartFile mFile = multipartRequest.getFile(fileName);
			String originalFileName = mFile.getOriginalFilename();
			fileList.add(originalFileName); // 첨부한 이미지 파일의 이름들을 차례대로 저장한다.
			File file = new File(ARTICLE_IMAGE_REPO + "\\" + "temp" + "\\" + fileName);
			if (mFile.getSize() != 0) { // File Null Check
				if (!file.exists()) { // 경로상에 파일이 존재하지 않을 경우
					file.getParentFile().mkdirs(); // 경로에 해당하는 디렉토리들을 생성
					mFile.transferTo(new File(ARTICLE_IMAGE_REPO + "\\" + "temp" + "\\" + originalFileName)); // 임시로 저장된 multipartFile을 실제 파일로 전송
				}
			}
		}
		return fileList;
	}
4. Service 클래스와 DAO 클래스를 각각 다음과 같이 작성한다. 새 글과 이미지 파일 정보를 추가하려면 먼저 insertNewArticle() 메서드로 articleMap을 전달해 글 정보를 게시판 테이블에 추가해야 한다. 그런 다음 글 번호를 다시 articleMap에 저장하고 insertNewImage() 메서드를 호출하여 이미지 정보를 저장하는 식으로 구현한다.
	@Override
	public int addNewArticle(Map articleMap) throws Exception{
		int articleNO = boardDAO.insertNewArticle(articleMap); // 글 정보를 저장한 후 글 번호를 가져온다.
		articleMap.put("articleNO", articleNO);
		boardDAO.insertNewImage(articleMap);
		return articleNO;
	}
@Override
public int insertNewArticle(Map articleMap) throws DataAccessException {
int articleNO = selectNewArticleNO(); // 새 글에 대한 글 번호를 가져온다.
articleMap.put("articleNO", articleNO); // 글 번호를 articleMap에 저장한다.
sqlSession.insert("mapper.board.insertNewArticle", articleMap); // id에 대한 insert문을 호출하면서 articleMap을 전달한다.
return articleNO;
} // 글 정보를 게시판 테이블에 추가한 후 글 번호를 반환한다.
//다중 파일 업로드
@Override
public void insertNewImage(Map articleMap) throws DataAccessException {
List<ImageVO> imageFileList = (ArrayList) articleMap.get("imageFileList");
int articleNO = (Integer) articleMap.get("articleNO"); // articleMap이 글 번호를 가져온다.
int imageFileNO = selectNewImageFileNO(); // 이미지 번호를 가져온다.
for(ImageVO imageVO : imageFileList){
imageVO.setImageFileNO(++imageFileNO);
imageVO.setArticleNO(articleNO);
} // ImageVO 객체를 차례대로 가져와 이미지 번호와 글 번호 속성을 설정한다.
sqlSession.insert("mapper.board.insertNewImage",imageFileList);
}5. 이미지 테이블의 각 컬럼 이름에 대응하도록 ImageVO 클래스를 생성한다.
package com.myspring.pro30.board.vo;

import java.io.UnsupportedEncodingException;
import java.net.URLEncoder;
import java.sql.Date;

public class ImageVO {
	private int imageFileNO;
	private String imageFileName;
	private Date regDate;
	private int articleNO;

	public int getImageFileNO() {
		return imageFileNO;
	}
	public void setImageFileNO(int imageFileNO) {
		this.imageFileNO = imageFileNO;
	}
	public String getImageFileName() {
		return imageFileName;
	}

	public void setImageFileName(String imageFileName) {
		try {
			if(imageFileName!= null && imageFileName.length()!=0) {
				this.imageFileName = URLEncoder.encode(imageFileName,"UTF-8");
			}
		} catch (UnsupportedEncodingException e) {
			e.printStackTrace();
		}
	}

	public Date getRegDate() {
		return regDate;
	}
	public void setRegDate(Date regDate) {
		this.regDate = regDate;
	}
	public int getArticleNO() {
		return articleNO;
	}
	public void setArticleNO(int articleNO) {
		this.articleNO = articleNO;
	}

}
6. 이전의 다중 파일 업로드 기능을 참고하여 새 글 등록창에 파일 업로드를 할 수 있는 기능을 다음과 같이 자바스크립트로 구현한다.
[articleForm.jsp]
<%@ page language="java" contentType="text/html; charset=UTF-8"
     pageEncoding="UTF-8"
    isELIgnored="false" %>
<%@ taglib prefix="fmt" uri="http://java.sun.com/jsp/jstl/fmt" %>
<%@ taglib prefix="c" uri="http://java.sun.com/jsp/jstl/core" %>
<c:set var="contextPath" value="${pageContext.request.contextPath}" />
<%
  request.setCharacterEncoding("UTF-8");
%>

<head>
    <meta charset="UTF-8">
    <title>글쓰기창</title>
    <script src="http://code.jquery.com/jquery-latest.min.js"></script>
    <script type="text/javascript">
        function readURL(input) {
            if (input.files && input.files[0]) {
                var reader = new FileReader();
                reader.onload = function(e) {
                    $('#preview').attr('src', e.target.result);
                }
                reader.readAsDataURL(input.files[0]);
            }
        }

        function backToList(obj) {
            obj.action = "${contextPath}/board/listArticles.do";
            obj.submit();
        }

        var cnt = 1;
        function fn_addFile() {
            $("#d_file").append("<br>" + "<input type='file' name='file" + cnt + "' />");
            cnt++;
        } // 파일 업로드 기능을 동적으로 추가한다.
    </script>
    <title>글쓰기창</title>
</head>

<body>
    <h1 style="text-align:center">글쓰기</h1>
    <form name="articleForm" method="post" action="${contextPath}/board/addNewArticle.do" enctype="multipart/form-data">
        <table border="0" align="center">
            <tr>
                <td align="right"> 작성자</td>
                <!-- 로그인하면 작성자의 이름을 표시한다. -->
                <td colspan=2 align="left"><input type="text" size="20" maxlength="100" value="${member.name }" readonly /> </td>
            </tr>
            <tr>
                <td align="right">글제목: </td>
                <td colspan="2"><input type="text" size="67" maxlength="500" name="title" /></td>
            </tr>
            <tr>
                <td align="right" valign="top"><br>글내용: </td>
                <td colspan=2><textarea name="content" rows="10" cols="65" maxlength="4000"></textarea> </td>
            </tr>
            <tr>
                <td align="right">이미지파일 첨부: </td>
                <td> <input type="file" name="imageFileName" onchange="readURL(this);" /></td>
                <td><img id="preview" src="#" width=200 height=200 /></td>
                <!-- 파일 추가를 클릭하면 <div>에 동적으로 파일 업로드가 추가된다. -->
                <td align="right">이미지파일 첨부</td>
                <td align="left"> <input type="button" value="파일 추가" onClick="fn_addFile()" /></td>
            </tr>
            <tr>
                <td colspan="4">
                    <div id="d_file"></div>
                </td>
            </tr>
            <tr>
                <td align="right"> </td>
                <td colspan="2">
                    <input type="submit" value="글쓰기" />
                    <input type=button value="목록보기" onClick="backToList(this.form)" />
                </td>
            </tr>
        </table>
    </form>
</body>

</html>
10. 글상세창에 여러 이미지 표시하기
* 마지막으로 이번에는 글상세창에서 여러 개의 이미지를 볼 수 있는 기능을 스프링으로 구현해 보자. 방법은 지금까지 실습한 것과 비슷하다.
1. modelConfig.xml에 ImageVO에 대한 alias를 설정한다.
<?xml version="1.0" encoding="UTF-8" ?>
<!DOCTYPE configuration 	PUBLIC "-//mybatis.org//DTD Config 3.0//EN"
	"http://mybatis.org/dtd/mybatis-3-config.dtd">

<configuration>
	<typeAliases>
		<typeAlias type="com.myspring.pro30.member.vo.MemberVO"  alias="memberVO" />
		<typeAlias type="com.myspring.pro30.board.vo.ArticleVO"  alias="articleVO" />
		<typeAlias type="com.myspring.pro30.board.vo.ImageVO"  alias="imageVO" />
	</typeAliases>
</configuration>
2. 이미지 파일 정보를 저장할 resultMap을 imageVO를 이용해 설정한다.
  <resultMap id="imgResult" type="imageVO">
	  <result property="imageFileNO" column="imageFileNO" />
	  <result property="articleNO" column="articleNO" />
	  <result property="imageFileName" column="imageFileName" />
  </resultMap>

 ...

  <select  id="selectImageFileList" resultMap="imgResult" parameterType="int">
    <![CDATA[
      SELECT * from t_imageFile
      where articleNO=#{articleNO}
    ]]>
  </select>
3. JSP로 글 정보와 이미지 파일 정보를 한꺼번에 넘기도록 자바 파일을 수정하자. articleMap에 각 정보를 key/value로 저장하여 JSP로 전달한다.
[BoardControllerImpl.java]
	@RequestMapping(value="/board/viewArticle.do" ,method = RequestMethod.GET)
	public ModelAndView viewArticle(@RequestParam("articleNO") int articleNO,
			  HttpServletRequest request, HttpServletResponse response) throws Exception{
		String viewName = (String)request.getAttribute("viewName");
		Map articleMap=boardService.viewArticle(articleNO); // 서비스에서 조회한 글 정보와 이미지 파일 정보를 담은 Map을 가져온다.
		ModelAndView mav = new ModelAndView();
		mav.setViewName(viewName);
		mav.addObject("articleMap", articleMap); // articleMap을 JSP에 전달한다.
		return mav;
	}
4. 새 글과 이미지 파일 정보를 조회하도록 서비스 파일을 수정한다.
[BoardServiceImpl.java]
	@Override
	public Map viewArticle(int articleNO) throws Exception {
		Map articleMap = new HashMap();
		ArticleVO articleVO = boardDAO.selectArticle(articleNO); // 글 정보를 조회한다.
		List<ImageVO> imageFileList = boardDAO.selectImageFileList(articleNO); // 이미지 파일 정보를 조회한다.
		articleMap.put("article", articleVO);
		articleMap.put("imageFileList", imageFileList); // 글 정보와 이미지 파일 정보를 Map에 담는다.
		return articleMap;
	}
5. DAO 클래스는 다음과 같다.
[BoardDAOImpl.java]
	@Override
	public ArticleVO selectArticle(int articleNO) throws DataAccessException {
		return sqlSession.selectOne("mapper.board.selectArticle", articleNO);
	}

    ...

    @Override
	public List selectImageFileList(int articleNO) throws DataAccessException {
		List<ImageVO> imageFileList = null;
		imageFileList = sqlSession.selectList("mapper.board.selectImageFileList",articleNO);
		return imageFileList;
	}
6. JSP 파일에서는 이미지 파일 정보가 imageFileList로 전달되도록 설정한다. <c:forEach> 태그를 이용해 imageFileList에 저장된 ImageVO의 개수만큼 이미지를 표시한다.
[viewArticle.jsp]
<c:set var="article"  value="${articleMap.article}"  />
<c:set var="imageFileList"  value="${articleMap.imageFileList}"  />
// Map으로 넘어온 속성들의 이름을 다시 간단하게 설정한다.

...

 <c:if test="${not empty imageFileList && imageFileList!='null' }"> // imageFileList가 비어 있지 않으면 이미지를 표시한다.
     <c:forEach var="item" items="${imageFileList}" varStatus="status">
         <tr>
             <td width="150" align="center" bgcolor="#FF9933" rowspan="2">
                 이미지${status.count }
             </td>
             <td>
                 <input type="hidden" name="originalFileName" value="${item.imageFileName }" />
                 <img src="${contextPath}/download.do?articleNO=${article.articleNO}&imageFileName=${item.imageFileName}" id="preview" /><br>
             </td>
         </tr>
         <tr>
             <td>
                 <input type="file" name="imageFileName " id="i_imageFileName" disabled onchange="readURL(this);" />
             </td>
         </tr>
     </c:forEach> // forEach 태그를 이용해 이미지 개수만큼 반복해서 다운로드 한다.
 </c:if>
* 여기까지 스프링으로 답변형 게시판을 만들어 보았다. 여러 개의 이미지를 첨부한 글을 수정하는 기능, 답글을 쓰는 기능은 아직 구현하지 않았다. 이번에 실습한 내용을 참고하여 직접 구현해 보기 바란다. 한 번 더 나아가 글 조회 수를 확인하는 기능도 추가해 보자.
'Java > Java_Spring Framework part2' 카테고리의 다른 글
| (14) 스프링으로 답변형 게시판 만들기 3 (2) | 2023.11.22 |
|---|---|
| (13) 스프링으로 답변형 게시판 만들기 2 (1) | 2023.11.21 |
| (12) 스프링으로 답변형 게시판 만들기 1 (1) | 2023.11.20 |
| (11) 스프링 REST API 사용하기 2 (0) | 2023.11.20 |
| (10) 스프링 REST API 사용하기 1 (0) | 2023.11.16 |


