
| 일 | 월 | 화 | 수 | 목 | 금 | 토 |
|---|---|---|---|---|---|---|
| 1 | 2 | 3 | 4 | 5 | 6 | 7 |
| 8 | 9 | 10 | 11 | 12 | 13 | 14 |
| 15 | 16 | 17 | 18 | 19 | 20 | 21 |
| 22 | 23 | 24 | 25 | 26 | 27 | 28 |
| 29 | 30 | 31 |
- 사용자예외클래스생성
- 어윈 사용법
- 예외처리
- 인터페이스
- 컬렉션 타입
- cursor문
- 메소드오버로딩
- 객체 비교
- 제네릭
- 다형성
- 한국건설관리시스템
- 집합_SET
- 참조형변수
- exception
- 예외미루기
- 추상메서드
- 대덕인재개발원
- 컬렉션프레임워크
- EnhancedFor
- 환경설정
- GRANT VIEW
- abstract
- NestedFor
- 오라클
- 자동차수리시스템
- 자바
- oracle
- 정수형타입
- Java
- 생성자오버로드
- Today
- Total
거니의 velog
(7) 리액트 라우터로 SPA 개발하기 3 본문
6. 리액트 라우터 부가 기능
(1) History
* History 객체는 라우트로 사용된 컴포넌트에 match, location과 함께 전달되는 props 중 하나로, 이 객체를 통해 컴포넌트 내에 구현하는 메서드에서 라우터 API를 호출할 수 있다. 예를 들어 특정 버튼을 눌렀을 때 뒤로 가거나, 로그인 후 화면을 전환하거나, 다른 페이지로 이탈하는 것을 방지해야 할 때 history를 활용한다.
* 이 객체를 사용하는 예제 페이지를 한 번 작성해 보자. HistorySample 이라는 컴포넌트를 다음과 같이 만들어 보자.

[HistorySample.js]
import React, { Component } from "react";

class HistorySample extends Component {
  // 뒤로 가기
  handleGoBack = () => {
    this.props.history.goBack();
  };

  // 홈으로 이동
  handleGoHome = () => {
    this.props.history.push("/");
  };

  componentDidMount() {
    // 이것을 설정하고 나면 페이지에 변화가 생기려고 할 때마다 정말 나갈 것인지를 질문함
    this.unblock = this.props.history.block("정말 떠나실 건가요?");
  }

  componentWillUnmount() {
    // 컴포넌트가 언마운트되면 질문을 멈춤
    if (this.unblock) {
      this.unblock();
    }
  }

  render() {
    return (
      <div>
        <button onClick={this.handleGoBack}>뒤로</button>
        <button onClick={this.handleGoHome}>홈으로</button>
      </div>
    );
  }
}

export default HistorySample;
* React-Router v6 이후는 아래 접은 글을 참조하자.
import React, { useEffect } from "react";
import { useNavigate } from "react-router-dom";
function HistorySample() {
const navigate = useNavigate();
// 뒤로 가기
const handleGoBack = () => {
navigate(-1);
};
// 홈으로 이동
const handleGoHome = () => {
navigate("/");
};
useEffect(() => {
// componentWillUnmount 시점에서 실행될 정리(clean-up) 로직을 반환
return () => {
const result = window.confirm("정말 떠나실 건가요...? ㅠㅠ");
console.log("result : " + result);
if (!result) {
// If the user clicks Cancel, don't navigate away
console.log("아직 여기 있어요!");
navigate("/history");
}
// If the user clicks OK, you can perform additional cleanup logic
console.log("정말 떠나셨군요!");
};
}, []); // 빈 배열은 컴포넌트가 처음 마운트될 때만 실행되게 함
return (
<div>
<button onClick={handleGoBack}>뒤로</button>
<button onClick={handleGoHome}>홈으로</button>
</div>
);
}
export default HistorySample;
* 다 만든 뒤에는 App에서 /history 경로에 해당 컴포넌트가 보이도록 설정해 보자.
import React from "react";
import { Link, Route } from "react-router-dom/cjs/react-router-dom";
import Home from "./Home";
import About from "./About";
import Profiles from "./Profiles";
import HistorySample from "./HistorySample";

const App = () => {
  return (
    <div>
      <ul>
        <li>
          <Link to="/">홈</Link>
        </li>
        <li>
          <Link to="/about">소개1</Link>
        </li>
        <li>
          <Link to="/info">소개2</Link>
        </li>
        <li>
          <Link to="/profiles">프로필</Link>
        </li>
        <li>
          <Link to="/history">History 예제</Link>
        </li>
      </ul>
      <Route path="/" component={Home} exact={true} />
      <Route path={["/about", "/info"]} component={About} />
      <Route path="/profiles" component={Profiles} />
      <Route path="/history" component={HistorySample} />
    </div>
  );
};

export default App;
* React-Router v6 이후는 아래 접은 글을 참조하자.
import React from "react";
import { Link, Route, Routes } from "react-router-dom";
import About from "./About";
import Home from "./Home";
import Profiles from "./Profiles";
import HistorySample from "./HistorySample";
const App = () => {
return (
<div>
<ul>
<li>
<Link to="/">홈</Link>
</li>
<li>
<Link to="/about">소개</Link>
</li>
<li>
<Link to="/profiles">프로필</Link>
</li>
<li>
<Link to="/history">History 예제</Link>
</li>
</ul>
<hr />
<Routes>
<Route path="/" element={<Home />} />
<Route path="/about" element={<About />} />
<Route path="/info" element={<About />} />
{/* 서브 라우팅 */}
<Route path="/profiles/*" element={<Profiles />} />
<Route path="/history" element={<HistorySample />} />
</Routes>
</div>
);
};
export default App;
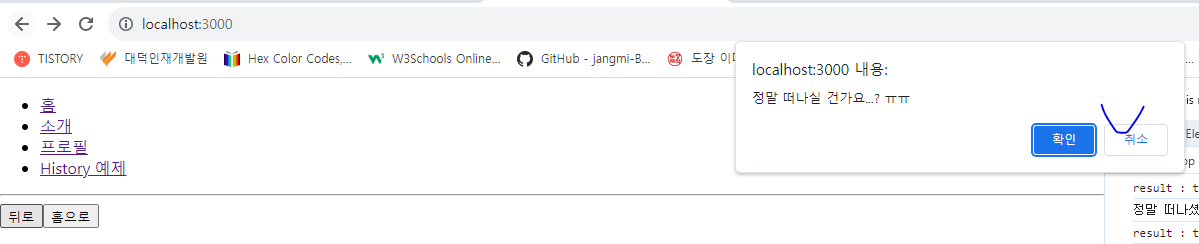
* 이제 하단의 주소 페이지로 들어가서 하단에 있는 버튼들이 잘 작동하는지 눌러 보자.
- http://localhost:3000/history
* 링크를 눌러서 현재 페이지를 이탈하려고 할 때 다음과 같은 브라우저 메시지 창이 잘 뜨는가?
(2) withRouter
* withRouter 함수는 HoC(Higher-order Component)이다. 라우트로 사용된 컴포넌트가 아니어도 match, location, history 객체를 접근할 수 있게 해준다.
* WithRouterSample 이라는 컴포넌트를 만들어서 withRouter 함수를 사용해 보겠다.
[WithRouterSample.js]
import React from "react";
import { withRouter } from "react-router-dom/cjs/react-router-dom";

const WithRouterSample = ({ location, match, history }) => {
  return (
    <div>
      <h4>location</h4>
      <textarea
        value={JSON.stringify(location, null, 2)}
        rows={7}
        readOnly={true}
      />
      <h4>match</h4>
      <textarea
        value={JSON.stringify(match, null, 2)}
        rows={7}
        readOnly={true}
      />
      <button onClick={() => history.push("/")}>홈으로</button>
    </div>
  );
};

export default withRouter(WithRouterSample);
* 이 코드처럼 withRouter를 사용할 때는 컴포넌트를 내보내 줄 때 함수로 감싸 준다. JSON.stringify의 두 번째 파라미터와 세 번째 파라미터를 위와 같이 null, 2로 설정해 주면 JSON에 들여쓰기가 적용된 상태로 문자열이 만들어 진다.
* React-Router v6 이후는 아래 접은 글을 참조하자.
import React from "react";
import { useLocation, useParams, useNavigate } from "react-router-dom";
const WithRouterSample = () => {
const location = useLocation();
const match = useParams();
const navigate = useNavigate();
return (
<div>
<h4>location</h4>
<textarea
value={JSON.stringify(location, null, 2)}
rows={7}
readOnly={true}
/>
<h4>match</h4>
<textarea
value={JSON.stringify(match, null, 2)}
rows={7}
readOnly={true}
/>
<button onClick={() => navigate("/")}>홈으로</button>
</div>
);
};
export default WithRouterSample;
* React Router v6 이후부터는 import { useLocation, useParams, useNavigate } from "react-router-dom"; 이런 식으로 직접 선언해서 만들어 준다...
* 다 만들었다면 이 컴포넌트를 Profiles 컴포넌트에 렌더링 해보자.
[Profiles.js]
import React from "react";
import Profile from "./Profile";
import { Link, Route } from "react-router-dom/cjs/react-router-dom";
import WithRouterSample from "./WithRouterSample";

const Profiles = () => {
  return (
    <div>
      <h3>사용자 목록</h3>
      <ul>
        <li>
          <Link to="/profiles/bbbb7788">거니</Link>
        </li>
        <li>
          <Link to="/profiles/gildong">gildong</Link>
        </li>
      </ul>

      <Route
        path="/profiles"
        exact
        render={() => <div>사용자를 선택해 주세요.</div>}
      />
      <Route path="/profiles/:username" component={Profile} />

      <WithRouterSample />
    </div>
  );
};

export default Profiles;
* React-Router v6 이후는 아래 접은 글을 참조하자.
import React from "react";
import { Link, Route, Routes } from "react-router-dom";
import Profile from "./Profile";
import WithRouterSample from "./WithRouterSample";
const Profiles = () => {
return (
<div>
<h3>사용자 목록</h3>
<ul>
<li>
<Link to="/profiles/bbbb7788">거니</Link>
</li>
<li>
<Link to="/profiles/gildong">gildong</Link>
</li>
</ul>
<Routes>
<Route path="/*" element={<div>유저를 선택해 주세요.</div>} />
<Route path=":username" element={<Profile />} />
</Routes>
<WithRouterSample />
</div>
);
};
export default Profiles;
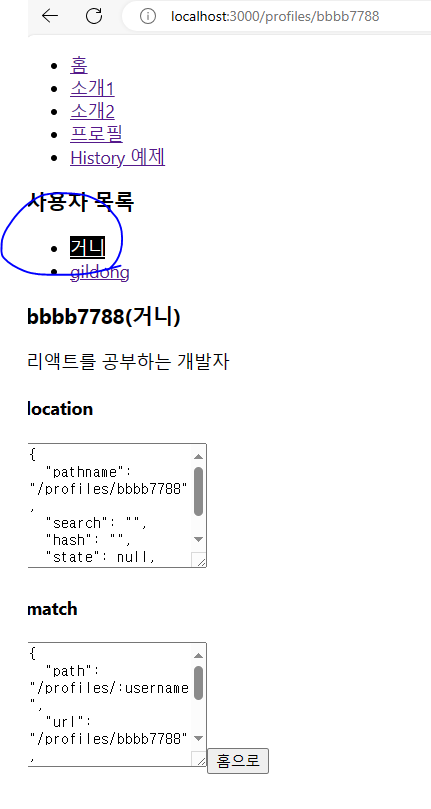
* 이제 아래 주소로 페이지에 들어가 보자. 하단에 location과 match 객체의 정보가 잘 나타나는가?
- http://localhost:3000/profiles

* textarea 의 크기 조정

- 브라우저에서 Textarea의 우측 하단 모서리를 드래그하면 Textarea의 크기를 조정할 수 있다.
* 그런데 여기서 match 객체를 보면 params 가 비어 있다. withRouter 를 사용하면 현재 자신을 보여 주고 있는 라우트 컴포넌트(현재 Profiles)를 기준으로 match가 전달된다. Profiles를 위한 라우트를 설정할 때 path="/profiles"라고만 입력했으므로 username 파라미터를 읽어 오지 못하는 상태이다.
* WithRouterSample 컴포넌트를 Profiles에서 지우고 Profile 컴포넌트에 넣으면 match 쪽에 URL 파라미터가 제대로 보일 것이다.
[ Profile.js ]
import React from "react";
import WithRouterSample from "./WithRouterSample";
import { withRouter } from "react-router-dom/cjs/react-router-dom";

const data = {
  bbbb7788: {
    name: "거니",
    description: "리액트를 공부하는 개발자",
  },
  gildong: {
    name: "길동",
    description: "고전 소설 홍길동전의 주인공",
  },
};

const Profile = ({ match }) => {
  const { username } = match.params;
  const profile = data[username];
  if (!profile) {
    return <div>존재하지 않는 사용자 입니다.</div>;
  }
  return (
    <div>
      <h3>
        {username}({profile.name})
      </h3>
      <p>{profile.description}</p>
      <WithRouterSample />
    </div>
  );
};

export default withRouter(Profile);
* React-Router v6 이후는 아래 접은 글을 참조하자.
import React from "react";
import { useParams } from "react-router-dom";
import WithRouterSample from "./WithRouterSample";
const data = {
bbbb7788: {
name: "거니",
description: "리액트를 공부하는 개발자",
},
gildong: {
name: "길동",
description: "고전 소설 홍길동전의 주인공",
},
};
const Profile = () => {
const params = useParams();
const profile = data[params.username];
return (
<div>
<h1>사용자 프로필</h1>
{profile ? (
<div>
<h2>{profile.name}</h2>
<p>{profile.description}</p>
</div>
) : (
<p>존재하지 않는 프로필입니다.</p>
)}
<WithRouterSample />
</div>
);
};
export default Profile;

* 이번에는 params.username을 제대로 보여 주고 있다.
(3) Switch
* Switch 컴포넌트는 여러 Route 를 감싸서 그 중 일치하는 단 하나의 라우트만을 렌더링시켜 준다. Switch 를 사용하면 모든 규칙과 일치하지 않을 때 보여 줄 Not Found 페이지도 구현할 수 있다.
[App.js]
import React from "react";
import { Link, Route, Switch } from "react-router-dom/cjs/react-router-dom";
import Home from "./Home";
import About from "./About";
import Profiles from "./Profiles";
import HistorySample from "./HistorySample";

const App = () => {
  return (
    <div>
      <ul>
        <li>
          <Link to="/">홈</Link>
        </li>
        <li>
          <Link to="/about">소개1</Link>
        </li>
        <li>
          <Link to="/info">소개2</Link>
        </li>
        <li>
          <Link to="/profiles">프로필</Link>
        </li>
        <li>
          <Link to="/history">History 예제</Link>
        </li>
      </ul>
      <Switch>
        <Route path="/" component={Home} exact={true} />
        <Route path={["/about", "/info"]} component={About} />
        <Route path="/profiles" component={Profiles} />
        <Route path="/history" component={HistorySample} />
        <Route
          // path를 따로 설정하지 않으면 모든 상황에 렌더링 됨
          render={({ location }) => (
            <div>
              <h2>이 페이지는 존재하지 않습니다.</h2>
              <p>{location.pathname}</p>
            </div>
          )}
        />
      </Switch>
    </div>
  );
};

export default App;
* 이제 존재하지 않는 페이지에 들어가 보자.
- http://localhost:3000/nowhere

* v6 이후부터 <Routes> 가 대신하는 역할이다.

[NotFound.js]
const NotFound = () => {
  return (
    <div
      style={{
        display: "flex",
        alignItems: "center",
        justifyContent: "center",
        fontSize: 64,
        position: "absolute",
        width: "100%",
        height: "100%",
      }}
    >
      404 Not Found
    </div>
  );
};

export default NotFound;
[App.js]
import React from "react";
import { Link, Route, Routes } from "react-router-dom";
import About from "./About";
import Home from "./Home";
import Profiles from "./Profiles";
import HistorySample from "./HistorySample";
import NotFound from "./NotFound";

const App = () => {
  return (
    <div>
      <ul>
        <li>
          <Link to="/">홈</Link>
        </li>
        <li>
          <Link to="/about">소개</Link>
        </li>
        <li>
          <Link to="/profiles">프로필</Link>
        </li>
        <li>
          <Link to="/history">History 예제</Link>
        </li>
      </ul>
      <hr />
      <Routes>
        <Route path="/" element={<Home />} />
        <Route path="/about" element={<About />} />
        <Route path="/info" element={<About />} />
        {/* 서브 라우팅 */}
        <Route path="/profiles/*" element={<Profiles />} />
        <Route path="/history" element={<HistorySample />} />
        <Route path="*" element={<NotFound />} />
      </Routes>
    </div>
  );
};

export default App;
* 이제 존재하지 않는 페이지에 들어가 보자.
- http://localhost:3000/nowhere

(4) NavLink
* NavLink 컴포넌트는 링크에서 사용하는 경로가 현재 라우트의 경로와 일치하는 경우 특정 스타일 또는 CSS 클래스를 적용하는 컴포넌트이다.
* NavLink에서 링크가 활성화되었을 때의 스타일을 적용할 때는 activeStyle의 값을, CSS 클래스를 적용할 때는 activeClassName 값을 props로 넣어 주면 된다.
* Profiles에서 사용하고 있는 컴포넌트에서 Link 대신 NavLink를 사용하게 하고, 현재 선택되어 있는 경우 검정색 배경에 흰색 글씨로 스타일을 보여 주게 끔 코드를 수정해 보자.
[Profiles.js]
import React from "react";
import Profile from "./Profile";
import { NavLink, Route } from "react-router-dom/cjs/react-router-dom";

const Profiles = () => {
  const activeStyle = {
    backgroundColor: "black",
    color: "white",
  };
  return (
    <div>
      <h3>사용자 목록</h3>
      <ul>
        <li>
          <NavLink activeStyle={activeStyle} to="/profiles/bbbb7788">
            거니
          </NavLink>
        </li>
        <li>
          <NavLink activeStyle={activeStyle} to="/profiles/gildong">
            gildong
          </NavLink>
        </li>
      </ul>

      <Route
        path="/profiles"
        exact
        render={() => <div>사용자를 선택해 주세요.</div>}
      />
      <Route path="/profiles/:username" component={Profile} />
    </div>
  );
};

export default Profiles;
* 코드를 다 작성했다면 각 프로필 페이지를 열어 보자.
* 사용자 목록에 있는 링크를 클릭했을 때 색상이 제대로 바뀌는지 확인할 수 있다.
* React-Router v6 이후는 아래 글을 참조하자.
* 이 컴포넌트를 사용할 때 style 또는 className을 설정할 때 { isActive: boolean } 을 파라미터로 전달받는 함수 타입의 값을 전달한다. 예시를 확인해 보자.
<NavLink
  style={({isActive}) => isActive ? activeStyle : undefined}
/>
<NavLink
  className={({isActive}) => isActive ? 'active' : undefined}
/>
* Profiles 페이지 컴포넌트에서 이 컴포넌트를 사용해 보자.
import React from "react";
import { NavLink, Route, Routes } from "react-router-dom";
import Profile from "./Profile";

const Profiles = () => {
  const activeStyle = {
    backgroundColor: "black",
    color: "white",
    fontSize: 21,
  };

  return (
    <div>
      <h3>사용자 목록</h3>
      <ul>
        <li>
          <NavLink
            style={({ isActive }) => (isActive ? activeStyle : undefined)}
            to="/profiles/bbbb7788"
          >
            거니
          </NavLink>
        </li>
        <li>
          <NavLink
            style={({ isActive }) => (isActive ? activeStyle : undefined)}
            to="/profiles/gildong"
          >
            gildong
          </NavLink>
        </li>
      </ul>

      <Routes>
        <Route path="/*" element={<div>유저를 선택해 주세요.</div>} />
        <Route path=":username" element={<Profile />} />
      </Routes>
    </div>
  );
};

export default Profiles;
* 코드를 작성했다면 각 프로필 페이지를 열어 보자.
- http://localhost:3000/profiles/bbbb7788

* 사용자 목록에 있는 링크를 클릭했을 때 색상이 제대로 잘 바뀌는 모습을 볼 수 있다.
7. 정리
* 이 장에서는 리액트 라우터를 사용하여 주소 경로에 따라 다양한 페이지를 보여 주는 방법을 알아 보았다. 큰 규모의 프로젝트를 진행하다 보면 한 가지 문제가 발생한다. 바로 웹 브라우저에서 사용할 컴포넌트, 상태 관리를 하는 로직, 그 외 여러 기능을 구현하는 함수들이 점점 쌓이면서 최종 결과물인 자바스크립트 파일의 크기가 매우 커진다는 점이다.
* 예를 들어 방금 만든 프로젝트는 사용자가 /about 페이지에 들어 왔을 때 지금 당장 필요하지 않은 Profile 컴포넌트까지 불러온다. 라우트에 따라 필요한 컴포넌트만 불러오고, 다른 컴포넌트는 다른 페이지를 방문하는 등의 필요한 시점에 불러오면 더 효율적이지 않을까? 이를 해결해 주는 기술이 바로 코드 스플리팅이다. 이에 대해서는 추후에 다루도록 하겠다.
* 이어지는 장에서는 지금까지 배웠던 지식들을 활용하여 최신 뉴스 목록을 보여 주는 프로젝트를 만들어 볼 것이다.
* 또한 자세히 다루지 못한 것들에 대해, 리액트 라우터에 대해서 더 알고 싶으시다면 꼭 공식문서를 참조하길 바란다.
https://reactrouter.com/en/main
Home v6.20.1
I'm on v5 The migration guide will help you migrate incrementally and keep shipping along the way. Or, do it all in one yolo commit! Either way, we've got you covered to start using the new features right away.
reactrouter.com
'React > React_리액트 응용' 카테고리의 다른 글
| (6) 리액트 라우터로 SPA 개발하기 2 (0) | 2023.12.11 |
|---|---|
| (5) 리액트 라우터로 SPA 개발하기 1 (1) | 2023.12.08 |
| (4) immer를 사용하여 더 쉽게 불변성 유지하기 (1) | 2023.12.08 |
| (3) 컴포넌트 성능 최적화 3 (0) | 2023.12.07 |
| (2) 컴포넌트 성능 최적화 2 (1) | 2023.12.07 |


