| 일 | 월 | 화 | 수 | 목 | 금 | 토 |
|---|---|---|---|---|---|---|
| 1 | 2 | 3 | 4 | 5 | ||
| 6 | 7 | 8 | 9 | 10 | 11 | 12 |
| 13 | 14 | 15 | 16 | 17 | 18 | 19 |
| 20 | 21 | 22 | 23 | 24 | 25 | 26 |
| 27 | 28 | 29 | 30 | 31 |
- GRANT VIEW
- abstract
- 예외미루기
- EnhancedFor
- 환경설정
- 생성자오버로드
- 참조형변수
- 자바
- 인터페이스
- 다형성
- 예외처리
- 한국건설관리시스템
- 오라클
- oracle
- 제네릭
- 컬렉션 타입
- 대덕인재개발원
- 메소드오버로딩
- 어윈 사용법
- 객체 비교
- exception
- 추상메서드
- NestedFor
- 집합_SET
- 정수형타입
- Java
- 자동차수리시스템
- cursor문
- 사용자예외클래스생성
- 컬렉션프레임워크
- Today
- Total
거니의 velog
(1) 외부 API를 연동하여 뉴스 뷰어 만들기 1 본문
* 지금까지 배운 것을 활용하여 카테고리 별로 최신 뉴스 목록을 보여 주는 뉴스 뷰어 프로젝트를 진행해 볼 것이다.
https://newsapi.org/
News API – Search News and Blog Articles on the Web
“Ascender AI has a mission to apply AI to the media, and NewsAPI is one of our most valuable resources. Ascender is redefining how users interact with complex information, and the NewsAPI feed is an essential showcase for our technologies.” Braddock Ga
newsapi.org
* 여기에서 제공하는 API를 사용하여 데이터를 받아 오고, 이전에 배운 styled-components를 활용하여 프로젝트를 스타일링 해 볼 것이다.
* 이번 실습은 다음과 같은 흐름으로 진행된다.

1. 비동기 작업의 이해
* 웹 애플리케이션을 만들다 보면 처리할 때 시간이 걸리는 작업이 있다. 예를 들어 웹 애플리케이션에서 서버 쪽 데이터가 필요할 때는 Ajax 기법을 사용하여 서버의 API를 호출함으로써 데이터를 수신한다. 이렇게 서버의 API를 사용해야 할 때는 네트워크 송수신 과정에서 시간이 걸리기 때문에 작업이 즉시 처리되는 것이 아니라, 응답을 받을 때까지 기다렸다가 전달받은 응답 데이터를 처리한다. 이 과정에서 해당 작업을 비동기적으로 처리하게 된다.

* 만약 작업을 동기적으로 처리한다면 요청이 끝날 때까지 기다리는 동안 중지 상태가 되기 때문에 다른 작업을 할 수 없다. 그리고 요청이 끝나야 비로소 그다음 예정된 작업을 할 수 있다. 하지만 이를 비동기적으로 처리한다면 웹 애플리케이션이 멈추지 않기 때문에 동시에 여러 가지 요청을 처리할 수도 있고, 기다리는 과정에서 다른 함수도 호출할 수 있다.
* 이렇게 서버 API를 호출할 때 외에도 작업을 비동기적으로 처리할 때가 있는데, 바로 setTimeout 함수를 사용하여 특정 작업을 예약할 때이다. 예를 들어 다음 코드는 3초 후에 printMe 함수를 호출한다.
function printMe(){
	console.log('Hello World!');
}

setTimeout(printMe, 3000);
console.log('대기 중...');
* setTimeout 이 사용되는 시점에서 코드가 3초 동안 멈추는 것이 아니라, 일단 코드가 위부터 아래까지 다 호출되고 3초 뒤에 우리가 지정해 준 printMe가 호출되고 있다.
* 자바스크립트에서 비동기 작업을 할 때 가장 흔히 사용하는 방법은 콜백 함수를 사용하는 것이다. 위 코드에서 printMe가 3초 뒤에 호출되도록 printMe 함수 자체를 setTimeout 함수의 인자로 전달해 주었는데, 이런 함수를 콜백 함수라고 부른다.
(1) 콜백 함수
* 자, 이번에는 다른 코드를 확인해 보자. 예를 들어 파라미터 값이 주어지면 1초 뒤에 10을 더해서 반환하는 함수가 있다고 가정해 보자. 그리고 해당 함수가 처리된 직후 어떠한 작업을 하고 싶다면 다음과 같이 콜백 함수를 활용해서 작업한다.
function increase(number, callback) {
    setTimeout(() => {
        const result = number + 10;
        if(callback) {
            callback(result);
        }
    }, 1000);
}

increase(0, result => {
    console.log(result);
});
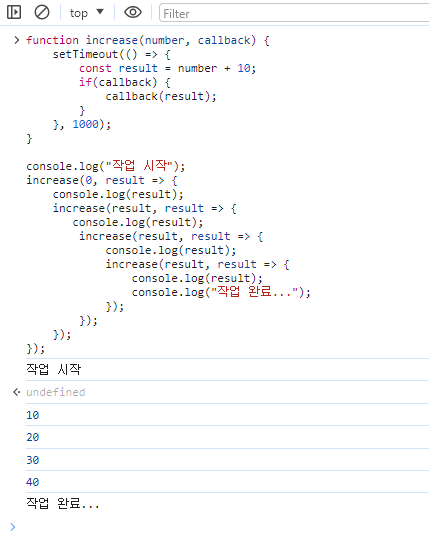
* 1초에 걸쳐서 10, 20, 30, 40과 같은 형태로 여러 번 순차적으로 처리하고 싶다면 콜백 함수를 중첩하여 구현할 수 있다.
function increase(number, callback) {
    setTimeout(() => {
        const result = number + 10;
        if(callback) {
            callback(result);
        }
    }, 1000);
}

console.log("작업 시작");
increase(0, result => {
    console.log(result);
    increase(result, result => {
       console.log(result);
        increase(result, result => {
            console.log(result);
            increase(result, result => {
                console.log(result);
                console.log("작업 완료...");
            });
        });
    });
});
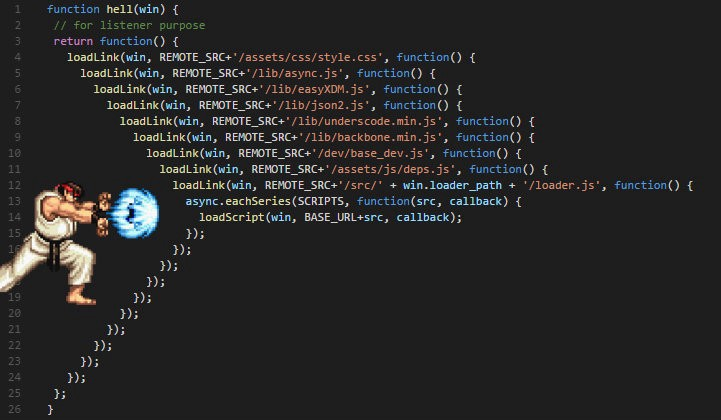
* 이렇게 콜백 안에 또 콜백을 넣어서 구현할 수 있는데, 너무 여러 번 중첩되니까 코드의 가독성이 나빠졌다. 이러한 형태의 코드를 '콜백 지옥'이라고 부른다.

* 왠만하면 지양해야 할 형태의 코드이다.
(2) Promise
* Promise는 콜백 지옥 같은 코드가 형성되지 않게 하는 방안으로 ES6에 도입된 기능이다. 앞에서 본 코드를 Promise를 사용하여 구현해 볼 것인데, 다음 예제를 만들어 보며 확인해 보자.
function increase(number, callback) {
    const promise = new Promise((resolve, reject) => {
        // resolve는 성공, reject는 실패
        setTimeout(() => {
            const result = number + 10;
            if(result > 50) {
                // 50보다 높으면 에러 발생시키기
                const e = new Error('NumberTooBig');
                return reject(e);
            }
            resolve(result); // number 값에 +10 후 성공 처리
        }, 1000);
    });
    return promise;
}

increase(0).then(number => {
    // Promise에서 resolve된 값은 .then을 통해 받아 올 수 있음
    console.log(number);
    return increase(number); // Promise를 리턴하면
})
.then(number => {
    // 또 .then으로 처리 가능
    console.log(number);
    return increase(number);
})
.then(number => {
    console.log(number);
    return increase(number);
})
.then(number => {
    console.log(number);
    return increase(number);
})
.then(number => {
    console.log(number);
    return increase(number);
})
.catch(e => {
    // 도중에 에러가 발생한다면 .catch를 통해 알 수 있음
    console.log(e);
});
* 여러 작업을 연달아 처리한다고 해서 함수를 여러 번 감싸는 것이 아니라 .then 을 사용하여 그다음 작업을 설정하기 때문에 콜백 지옥이 형성되지 않는다.

(3) async/await
* async/await는 Promise를 더욱 쉽게 사용할 수 있도록 해 주는 ES2017(ES8) 문법이다. 이 문법을 사용하려면 함수의 앞부분에 async 키워드를 추가하고, 해당 함수 내부에서 Promise의 앞부분에 await 키워드를 사용한다. 이렇게 하면 Promise가 끝날 때까지 기다리고, 결과 값을 특정 변수에 담을 수 있다.
function increase(number) {
    const promise = new Promise((resolve, reject) => {
        // resolve는 성공, reject는 실패
        setTimeout(() => {
            const result = number + 10;
            if(result > 50) {
                // 50보다 높으면 에러 발생시키기
                const e = new Error('NumberTooBig');
                return reject(e);
            }
            resolve(result); // number 값에 +10 후 성공 처리
        }, 1000);
    });
    return promise;
}

async function runTasks() {
    try { // try/catch 구문을 사용하여 에러를 처리한다.
        let result = await increase(0);
        console.log(result);
        result = await increase(result);
        console.log(result);
        result = await increase(result);
        console.log(result);
        result = await increase(result);
        console.log(result);
        result = await increase(result);
        console.log(result);
        result = await increase(result);
        console.log(result);
    }catch (e) {
        console.log(e);
    }
}

runTasks();
2. axios로 API 호출해서 데이터 받아오기
* axios는 현재 가장 많이 사용되고 있는 자바스크립트 HTTP 클라이언트이다. 이 라이브러리의 특징은 HTTP 요청을 Promise 기반으로 처리한다는 점이다. 리액트 프로젝트를 생성하여 이 라이브러리를 설치하고 사용하는 방법을 한번 알아보도록 하자.
$ yarn create react-app news-viewer
$ cd news-viewer
$ yarn add axios
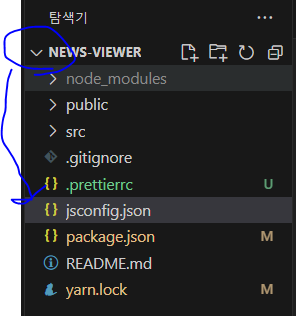
* Prettier로 코드 스타일을 자동으로 정리하고 싶다면, 프로젝트의 최상위 디렉터리에 .prettierrc 파일을 생성하여 다음 설정을 입력하자.

{
    "singleQuote": true,
    "semi": true,
    "useTabs": false,
    "tabWidth": 2,
    "trailingComma": "all",
    "printWidth": 80
}
* 그리고 VS Code에서 파일 자동 불러오기 기능을 잘 활용하고 싶다면 최상위 디렉터리에 jsconfig.json 파일도 만들어 주자.

{
    "compilerOptions": {
        "target": "es2020"
    }
}
* 이제 App.js 코드를 전부 지우고 다음과 같이 새로 작성해 보자.
import React, { useState } from 'react';
import axios from '../node_modules/axios/index';

const App = () => {
  const [data, setData] = useState(null);
  const onClick = () => {
    axios
      .get('https://jsonplaceholder.typicode.com/todos/1')
      .then((response) => {
        setData(response.data);
      });
  };
  return (
    <div>
      <div>
        <button onClick={onClick}>불러오기</button>
      </div>
      {data && (
        <textarea
          rows={7}
          value={JSON.stringify(data, null, 2)}
          readOnly={true}
        ></textarea>
      )}
    </div>
  );
};

export default App;
* 위 코드는 불러오기 버튼을 누르면 JSONPlaceholder(https://jsonplaceholder.typicode.com)에서 제공하는 가짜 API를 호출하고 이에 대한 응답을 컴포넌트 상태에 넣어서 보여 주는 예제이다.

* onClick 함수에서는 axios.get 함수를 사용했다. 이 함수는 파라미터로 전달된 주소에 GET 요청을 해 준다. 그리고 이에 대한 결과는 .then을 통해 비동기적으로 확인할 수 있다.
* 위 코드에 async를 적용하면 어떨까?
import React, { useState } from 'react';
import axios from '../node_modules/axios/index';

const App = () => {
  const [data, setData] = useState(null);
  const onClick = async () => {
    try {
      const response = await axios.get(
        'https://jsonplaceholder.typicode.com/todos/1',
      );
      setData(response.data);
    } catch (e) {
      console.log(e);
    }
  };
  return (
    <div>
      <div>
        <button onClick={onClick}>불러오기</button>
      </div>
      {data && (
        <textarea
          rows={7}
          value={JSON.stringify(data, null, 2)}
          readOnly={true}
        ></textarea>
      )}
    </div>
  );
};

export default App;
* 화살표 함수에 async/await를 적용할 때는 async () => {}와 같은 형식으로 적용한다. 불러오기 버튼을 눌렀을 때 이전과 똑같이 데이터가 잘 불려 오는가?
- http://localhost:3000/

'React > React_뉴스 뷰어 앱 만들기' 카테고리의 다른 글
| (4) 외부 API를 연동하여 뉴스 뷰어 만들기 4 (0) | 2023.12.12 |
|---|---|
| (3) 외부 API를 연동하여 뉴스 뷰어 만들기 3 (0) | 2023.12.12 |
| (2) 외부 API를 연동하여 뉴스 뷰어 만들기 2 (0) | 2023.12.12 |


