| 일 | 월 | 화 | 수 | 목 | 금 | 토 |
|---|---|---|---|---|---|---|
| 1 | 2 | 3 | 4 | 5 | 6 | 7 |
| 8 | 9 | 10 | 11 | 12 | 13 | 14 |
| 15 | 16 | 17 | 18 | 19 | 20 | 21 |
| 22 | 23 | 24 | 25 | 26 | 27 | 28 |
- 인터페이스
- 컬렉션프레임워크
- cursor문
- 사용자예외클래스생성
- exception
- 참조형변수
- 예외미루기
- 자바
- 예외처리
- 다형성
- 어윈 사용법
- 대덕인재개발원
- 환경설정
- 자동차수리시스템
- 메소드오버로딩
- 오라클
- NestedFor
- 집합_SET
- GRANT VIEW
- 생성자오버로드
- 정수형타입
- EnhancedFor
- 추상메서드
- abstract
- oracle
- 제네릭
- 컬렉션 타입
- 객체 비교
- Java
- 한국건설관리시스템
- Today
- Total
거니의 velog
(6) 프론트엔드 프로젝트 : 시작 및 회원 인증 구현 6 본문
(5) 로그인 구현
* 회원가입을 구현할 때와 비슷하게 로그인 기능도 구현해 보겠다. LoginForm 컴포넌트를 다음과 같이 수정해 보자.
[containers/auth/LoginForm.js]
import React, { useEffect } from 'react';
import { useDispatch, useSelector } from 'react-redux';
import { withRouter } from 'react-router-dom';
import { changeField, initializeForm, login } from '../../modules/auth';
import AuthForm from '../../components/auth/AuthForm';
import { check } from '../../modules/user';

const LoginForm = ({ history }) => {
  const dispatch = useDispatch();
  const { form, auth, authError, user } = useSelector(({ auth, user }) => ({
    form: auth.login,
    auth: auth.auth,
    authError: auth.authError,
    user: user.user,
  }));

  // 인풋 변경 이벤트 핸들러
  const onChange = (e) => {
    const { value, name } = e.target;
    dispatch(
      changeField({
        form: 'login',
        key: name,
        value,
      }),
    );
  };

  // 폼 등록 이벤트 핸들러
  const onSubmit = (e) => {
    e.preventDefault();
    const { username, password } = form;
    dispatch(login({ username, password }));
  };

  // 컴포넌트가 처음 렌더링될 때 form을 초기화함
  useEffect(() => {
    dispatch(initializeForm('login'));
  }, [dispatch]);

  useEffect(() => {
    if (authError) {
      console.log('오류 발생');
      console.log(authError);
      return;
    }
    if (auth) {
      console.log('로그인 성공');
      dispatch(check());
    }
  }, [auth, authError, dispatch]);

  useEffect(() => {
    if (user) {
      history.push('/');
    }
  }, [history, user]);

  return (
    <AuthForm
      type="login"
      form={form}
      onChange={onChange}
      onSubmit={onSubmit}
    />
  );
};

export default withRouter(LoginForm);
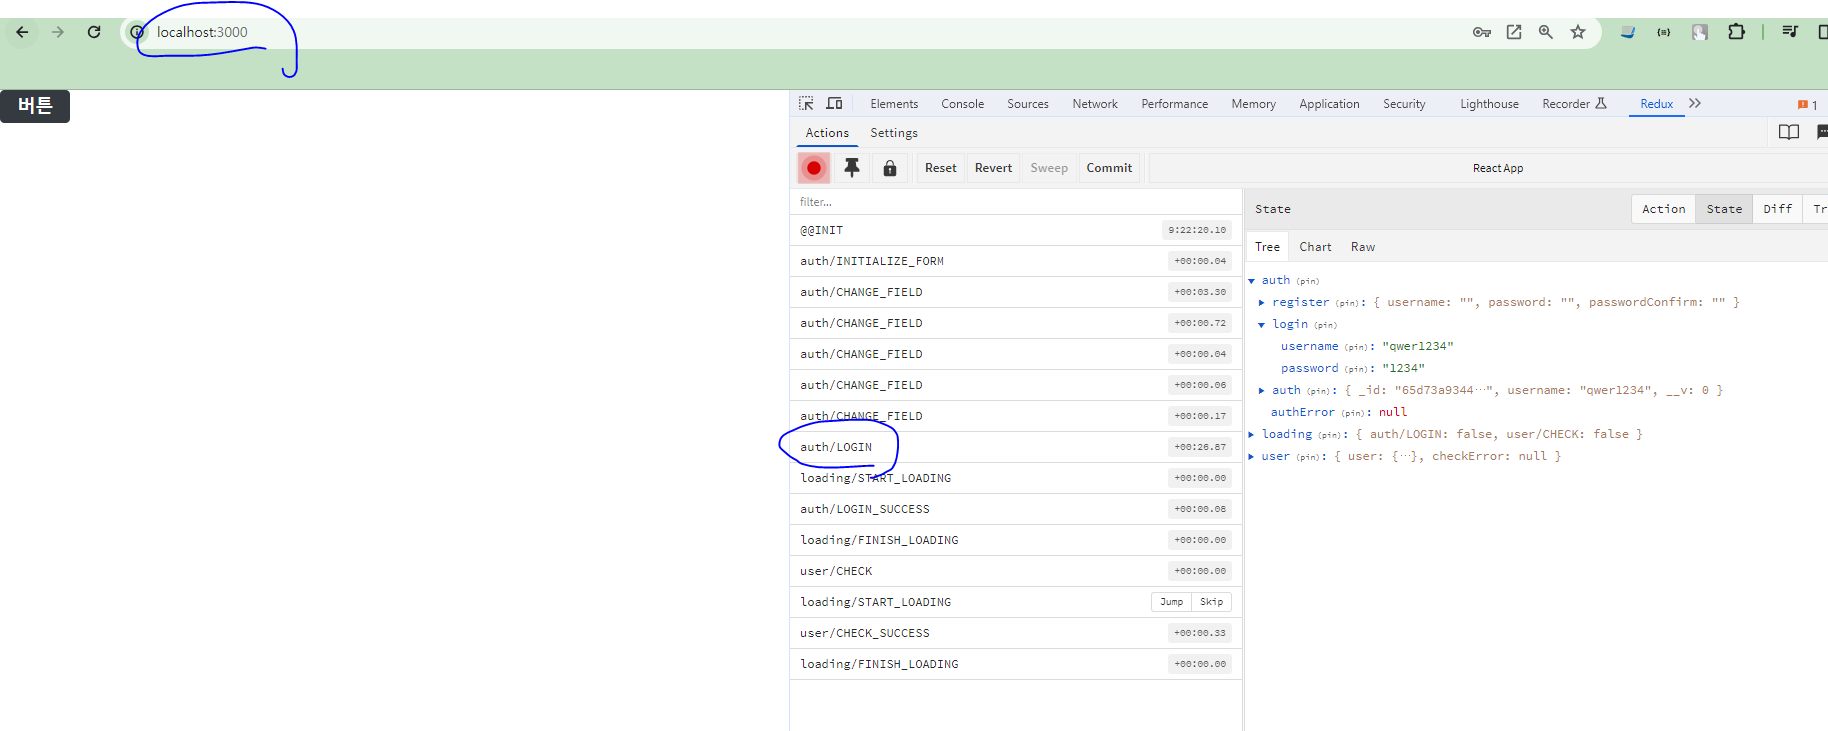
* 여기까지 다 작성했다면 http://localhost:3000/login에 들어가서 조금 전 회원가입에 성공한 계정으로 로그인해 보자. http://localhost:3000/ 경로로 잘 이동하는가?


(6) 회원 인증 에러 처리하기
* 회원 인증에서 중요한 기능은 거의 구현했다. 이제 요청이 실패했을 때 에러 메시지를 보여 주는 UI를 준비해 보자.
* 먼저 AuthForm 컴포넌트를 다음과 같이 수정해 주자.
[components/auth/AuthForm.js]
import React from 'react';
import styled from 'styled-components';
import { Link } from 'react-router-dom';
import palette from '../../lib/styles/palette';
import Button from '../common/Button';

(...)

/**
 * 에러를 보여줍니다
 */
const ErrorMessage = styled.div`
  color: red;
  text-align: center;
  font-size: 0.875rem;
  margin-top: 1rem;
`;

const AuthForm = ({ type, form, onChange, onSubmit }) => {
  const text = textMap[type]; // 타입(login, register)에 따라 출력되는 text의 값이 다르다.
  return (
    <AuthFormBlock>
      <h3>{text}</h3>
      <form onSubmit={onSubmit}>
        <StyledInput
          autoComplete="username"
          name="username"
          placeholder="아이디"
          onChange={onChange}
          value={form.username}
        />
        <StyledInput
          autoComplete="new-password"
          name="password"
          placeholder="비밀번호"
          type="password"
          onChange={onChange}
          value={form.password}
        />
        {type === 'register' && (
          <StyledInput
            autoComplete="new-password"
            name="passwordConfirm"
            placeholder="비밀번호 확인"
            type="password"
            onChange={onChange}
            value={form.passwordConfirm}
          />
        )}
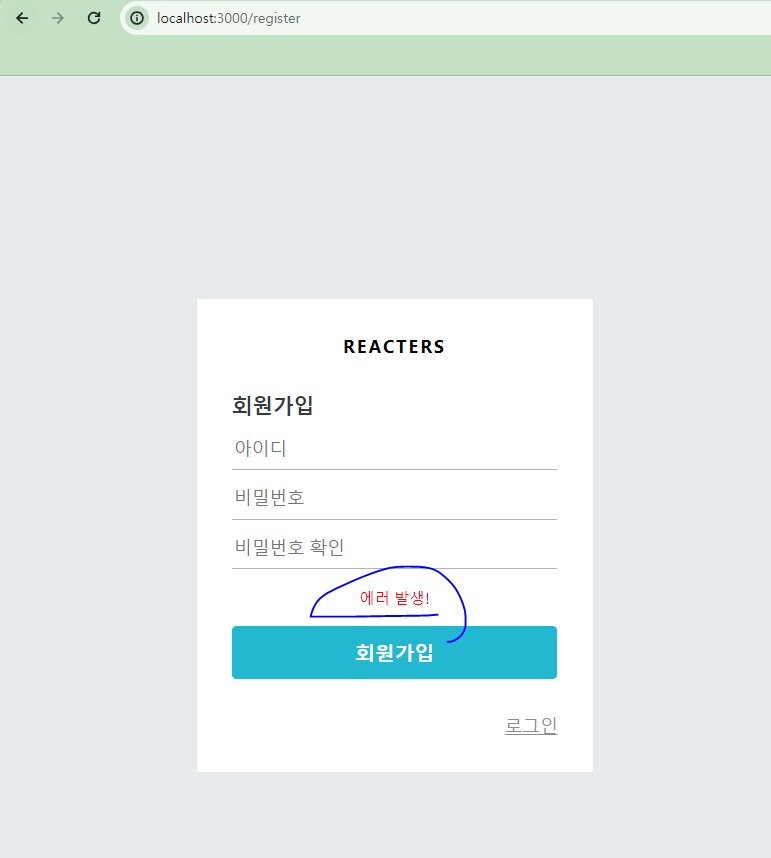
        <ErrorMessage>에러 발생!</ErrorMessage>
        <ButtonWithMarginTop cyan fullWidth style={{ marginTop: '1rem' }}>
          {text}
        </ButtonWithMarginTop>
      </form>
      <Footer>
        {type === 'login' ? (
          <Link to="/register">회원가입</Link>
        ) : (
          <Link to="/login">로그인</Link>
        )}
      </Footer>
    </AuthFormBlock>
  );
};

export default AuthForm;
* 이제 로그인 또는 회원가입 페이지에 들어가서 '에러 발생!' 문구가 잘 나타나는지 확인해 보자.

* 잘 스타일링된 것을 확인했다면, props로 error 값을 받아 왔을 때 이를 렌더링해 주도록 하겠다.
[components/auth/AuthForm.js]
const AuthForm = ({ type, form, onChange, onSubmit, error }) => {
  const text = textMap[type]; // 타입(login, register)에 따라 출력되는 text의 값이 다르다.
  return (
    <AuthFormBlock>
      <h3>{text}</h3>
      <form onSubmit={onSubmit}>
        <StyledInput
          autoComplete="username"
          name="username"
          placeholder="아이디"
          onChange={onChange}
          value={form.username}
        />
        <StyledInput
          autoComplete="new-password"
          name="password"
          placeholder="비밀번호"
          type="password"
          onChange={onChange}
          value={form.password}
        />
        {type === 'register' && (
          <StyledInput
            autoComplete="new-password"
            name="passwordConfirm"
            placeholder="비밀번호 확인"
            type="password"
            onChange={onChange}
            value={form.passwordConfirm}
          />
        )}
        {error && <ErrorMessage>{error}</ErrorMessage>}
        <ButtonWithMarginTop cyan fullWidth style={{ marginTop: '1rem' }}>
          {text}
        </ButtonWithMarginTop>
      </form>
      <Footer>
        {type === 'login' ? (
          <Link to="/register">회원가입</Link>
        ) : (
          <Link to="/login">로그인</Link>
        )}
      </Footer>
    </AuthFormBlock>
  );
};

export default AuthForm;
* AuthForm 에서 에러를 보여 주기 위한 준비를 마쳤다. 이제 상황에 따라 RegisterForm 컴포넌트와 LoginForm 컴포넌트에서 에러를 나타내 보자.
* Loginform에서 에러를 처리하는 것이 더 쉬우니 LoginForm부터 수정해 보자.
[containers/auth/LoginForm.js]
import React, { useEffect, useState } from 'react';
import { useDispatch, useSelector } from 'react-redux';
import { withRouter } from 'react-router-dom';
import { changeField, initializeForm, login } from '../../modules/auth';
import AuthForm from '../../components/auth/AuthForm';
import { check } from '../../modules/user';

const LoginForm = ({ history }) => {
  const [error, setError] = useState(null);

  (...)

  useEffect(() => {
    if (authError) {
      console.log('오류 발생');
      console.log(authError);
      setError('로그인 실패');
      return;
    }
    if (auth) {
      console.log('로그인 성공');
      dispatch(check());
    }
  }, [auth, authError, dispatch]);

  (...)

  return (
    <AuthForm
      type="login"
      form={form}
      onChange={onChange}
      onSubmit={onSubmit}
      error={error}
    />
  );
};

export default withRouter(LoginForm);
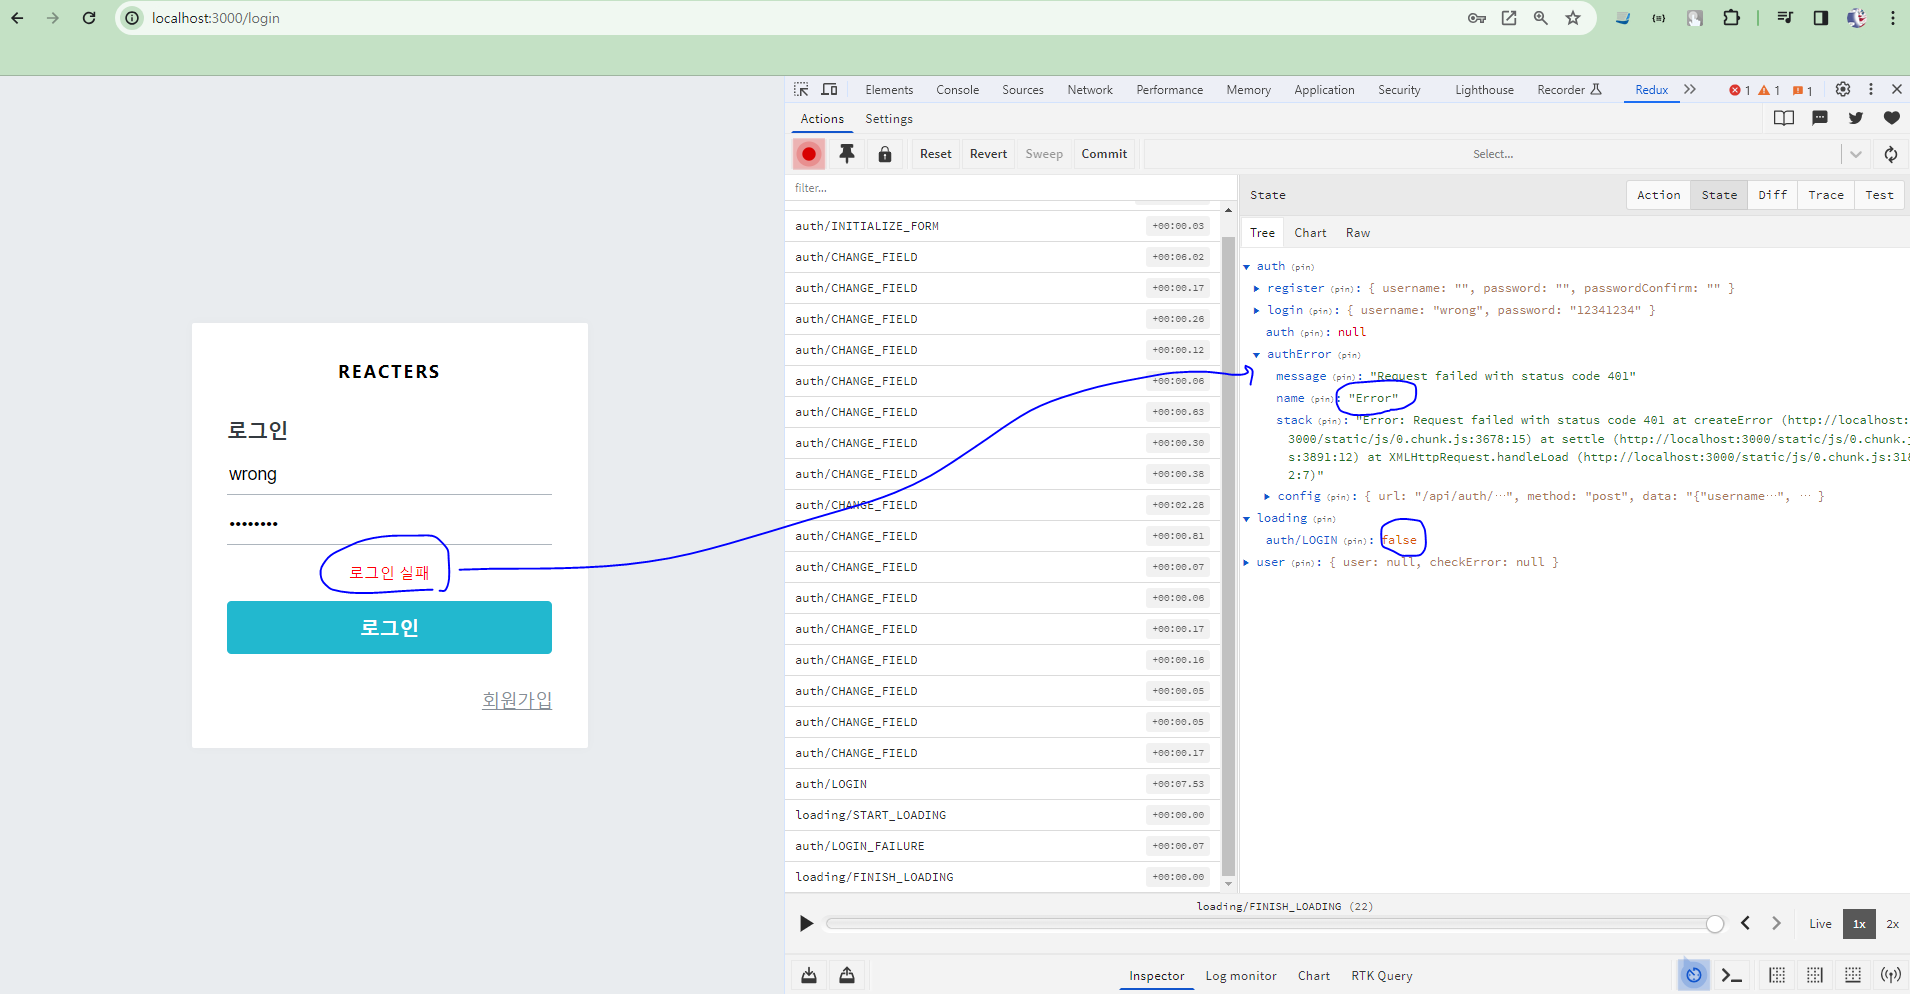
* 이렇게 코드 몇 줄만 바꿔주면 된다. 간단하다. 잘못된 계정 정보를 사용하여 한 번 로그인해 보자. 에러가 잘 나타나는가?

* 이번에는 회원가입 시 발생하는 에러를 처리해 보자. 회원가입은 에러 처리가 조금 까다롭다. 다음 상황에 대한 에러를 모두 처리해야 하기 때문이다.
(1) username, password, passwordConfirm 중 하나라도 비어 있을 때

(2) password와 passwordConfirm 값이 일치하지 않을 때

(3) username이 중복될 때
[containers/auth/RegisterForm.js]
import React, { useEffect, useState } from 'react';
import { useDispatch, useSelector } from 'react-redux';
import { changeField, initializeForm, register } from '../../modules/auth';
import AuthForm from '../../components/auth/AuthForm';
import { check } from '../../modules/user';
import { withRouter } from 'react-router-dom';

const RegisterForm = ({ history }) => {
  const [error, setError] = useState(null);
  const dispatch = useDispatch();
  const { form, auth, authError, user } = useSelector(({ auth, user }) => ({
    form: auth.register,
    auth: auth.auth,
    authError: auth.authError,
    user: user.user,
  }));

  // 인풋 변경 이벤트 핸들러
  const onChange = (e) => {
    const { value, name } = e.target;
    dispatch(
      changeField({
        form: 'register',
        key: name,
        value,
      }),
    );
  };

  // 폼 등록 이벤트 핸들러
  const onSubmit = (e) => {
    e.preventDefault();
    const { username, password, passwordConfirm } = form;
    // 하나라도 비어있다면
    if ([username, password, passwordConfirm].includes('')) {
      setError('빈 칸을 모두 입력하세요.');
      return;
    }
    // 비밀번호가 일치하지 않는다면
    if (password !== passwordConfirm) {
      setError('비밀번호가 일치하지 않습니다.');
      changeField({ form: 'register', key: 'password', value: '' });
      changeField({ form: 'register', key: 'passwordConfirm', value: '' });
      return;
    }
    dispatch(register({ username, password }));
  };

  // 컴포넌트가 처음 렌더링 될 때 form 을 초기화함
  useEffect(() => {
    dispatch(initializeForm('register'));
  }, [dispatch]);

  // 회원가입 성공 / 실패 처리
  useEffect(() => {
    if (authError) {
      // 계정명이 이미 존재할 때
      if (authError.response.status === 409) {
        setError('이미 존재하는 계정명입니다.');
        return;
      }
      // 기타 이유
      setError('회원가입 실패');
      return;
    }

    if (auth) {
      console.log('회원가입 성공');
      console.log(auth);
      dispatch(check());
    }
  }, [auth, authError, dispatch]);

  // user 값이 잘 설정되었는지 확인
  useEffect(() => {
    if (user) {
      console.log('check API 성공');
      console.log(user);
      history.push('/'); // 홈 화면으로 이동
    }
  }, [history, user]);

  return (
    <AuthForm
      type="register"
      form={form}
      onChange={onChange}
      onSubmit={onSubmit}
      error={error}
    />
  );
};

export default withRouter(RegisterForm);
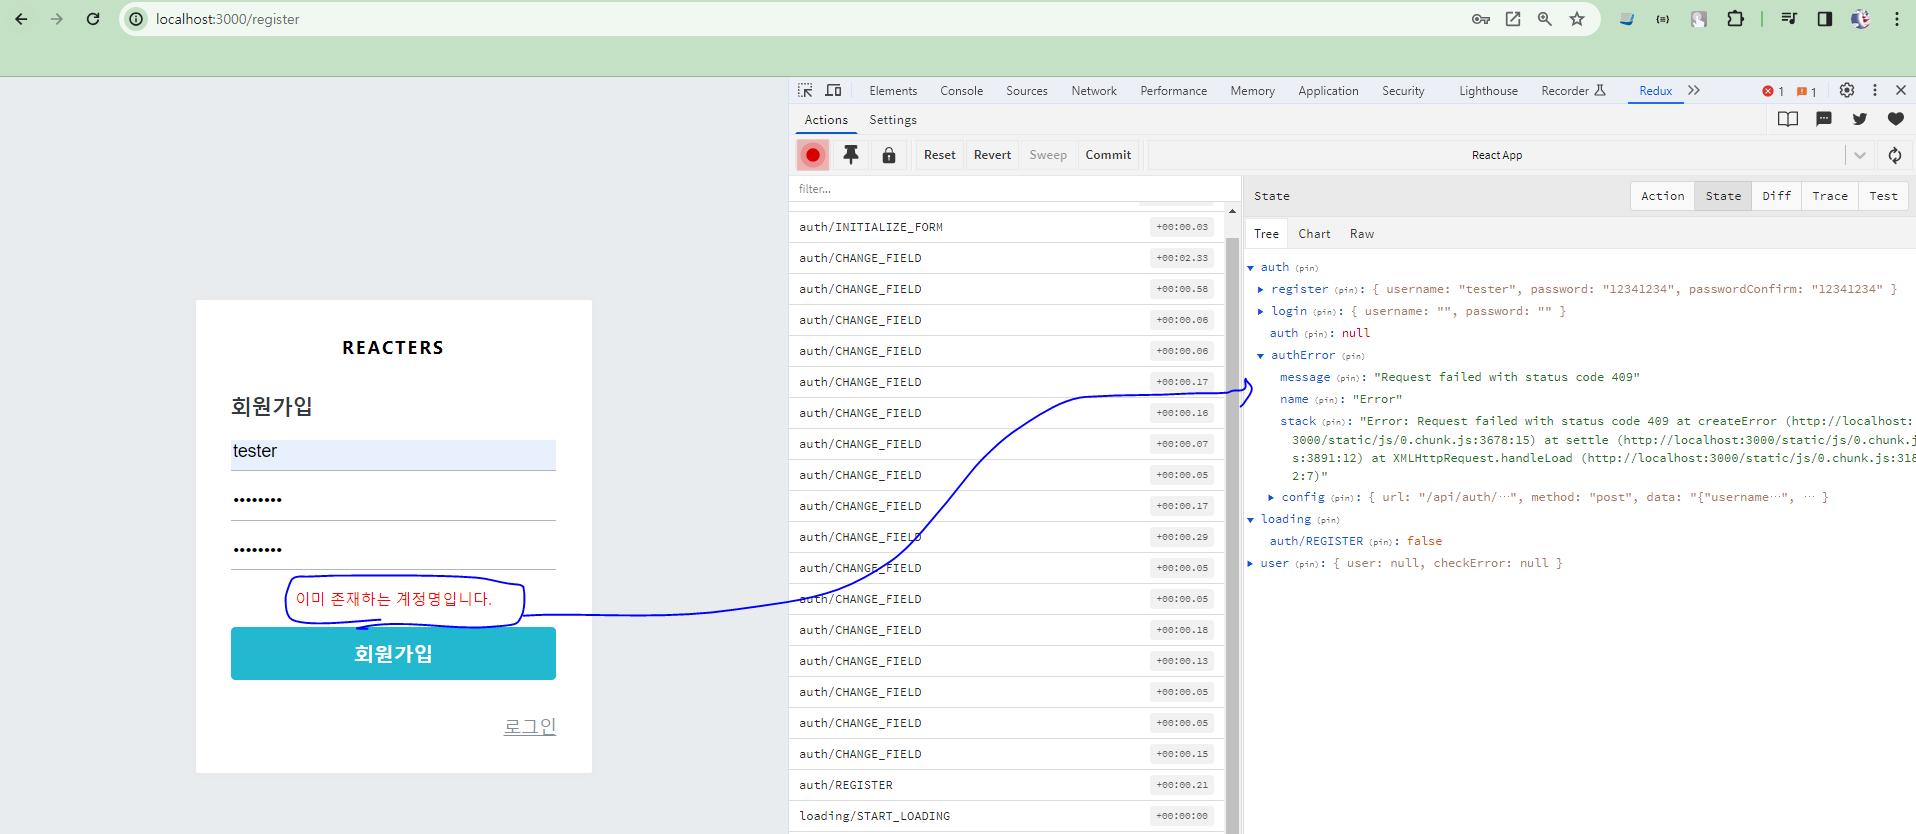
* 이제 다음 내용을 확인해 보자. 값을 다 채우지 않거나, 일치하지 않는 비밀번호 확인 값을 넣거나, 이미 가입한 계정명으로 가입을 시도하여 버튼을 눌러 보자. 알맞은 오류가 각각 잘 나타나고 있어야 한다.
(1) 값을 채우지 않은 채, 회원 가입 시도시 에러

(2) 일치하지 않은 비밀번호 확인 값을 넣을 시 에러

(3) 이미 가입한 계정명으로 회원 가입을 시도 시 에러

* 이제 로그인 및 회원가입 페이지에서 구현해야 할 기능을 거의 대부분 살펴보았다. 다음 절에서는 헤더 컴포넌트를 만들고, localStorage를 사용하여 사용자 로그인 정보를 기억하게 만들 때 loginForm과 RegisterForm을 다시 수정해 주겠다.
'React > React_프론트엔드 프로젝트' 카테고리의 다른 글
| (8) 프론트엔드 프로젝트 : 시작 및 회원 인증 구현 8 (0) | 2024.02.23 |
|---|---|
| (7) 프론트엔드 프로젝트 : 시작 및 회원 인증 구현 7 (0) | 2024.02.23 |
| (5) 프론트엔드 프로젝트 : 시작 및 회원 인증 구현 5 (0) | 2024.02.22 |
| (4) 프론트엔드 프로젝트 : 시작 및 회원 인증 구현 4 (0) | 2024.02.22 |
| (3) 프론트엔드 프로젝트 : 시작 및 회원 인증 구현 3 (0) | 2024.02.22 |


