| 일 | 월 | 화 | 수 | 목 | 금 | 토 |
|---|---|---|---|---|---|---|
| 1 | 2 | 3 | ||||
| 4 | 5 | 6 | 7 | 8 | 9 | 10 |
| 11 | 12 | 13 | 14 | 15 | 16 | 17 |
| 18 | 19 | 20 | 21 | 22 | 23 | 24 |
| 25 | 26 | 27 | 28 | 29 | 30 | 31 |
- 다형성
- 컬렉션프레임워크
- 제네릭
- 메소드오버로딩
- 어윈 사용법
- 예외처리
- NestedFor
- abstract
- 환경설정
- 사용자예외클래스생성
- 자바
- 생성자오버로드
- 추상메서드
- oracle
- 오라클
- 자동차수리시스템
- 예외미루기
- GRANT VIEW
- Java
- exception
- 컬렉션 타입
- EnhancedFor
- 정수형타입
- 객체 비교
- 대덕인재개발원
- 집합_SET
- 인터페이스
- 참조형변수
- 한국건설관리시스템
- cursor문
- Today
- Total
거니의 velog
(14) 프론트엔드 프로젝트 : 포스트 조회 기능 구현하기 1 본문
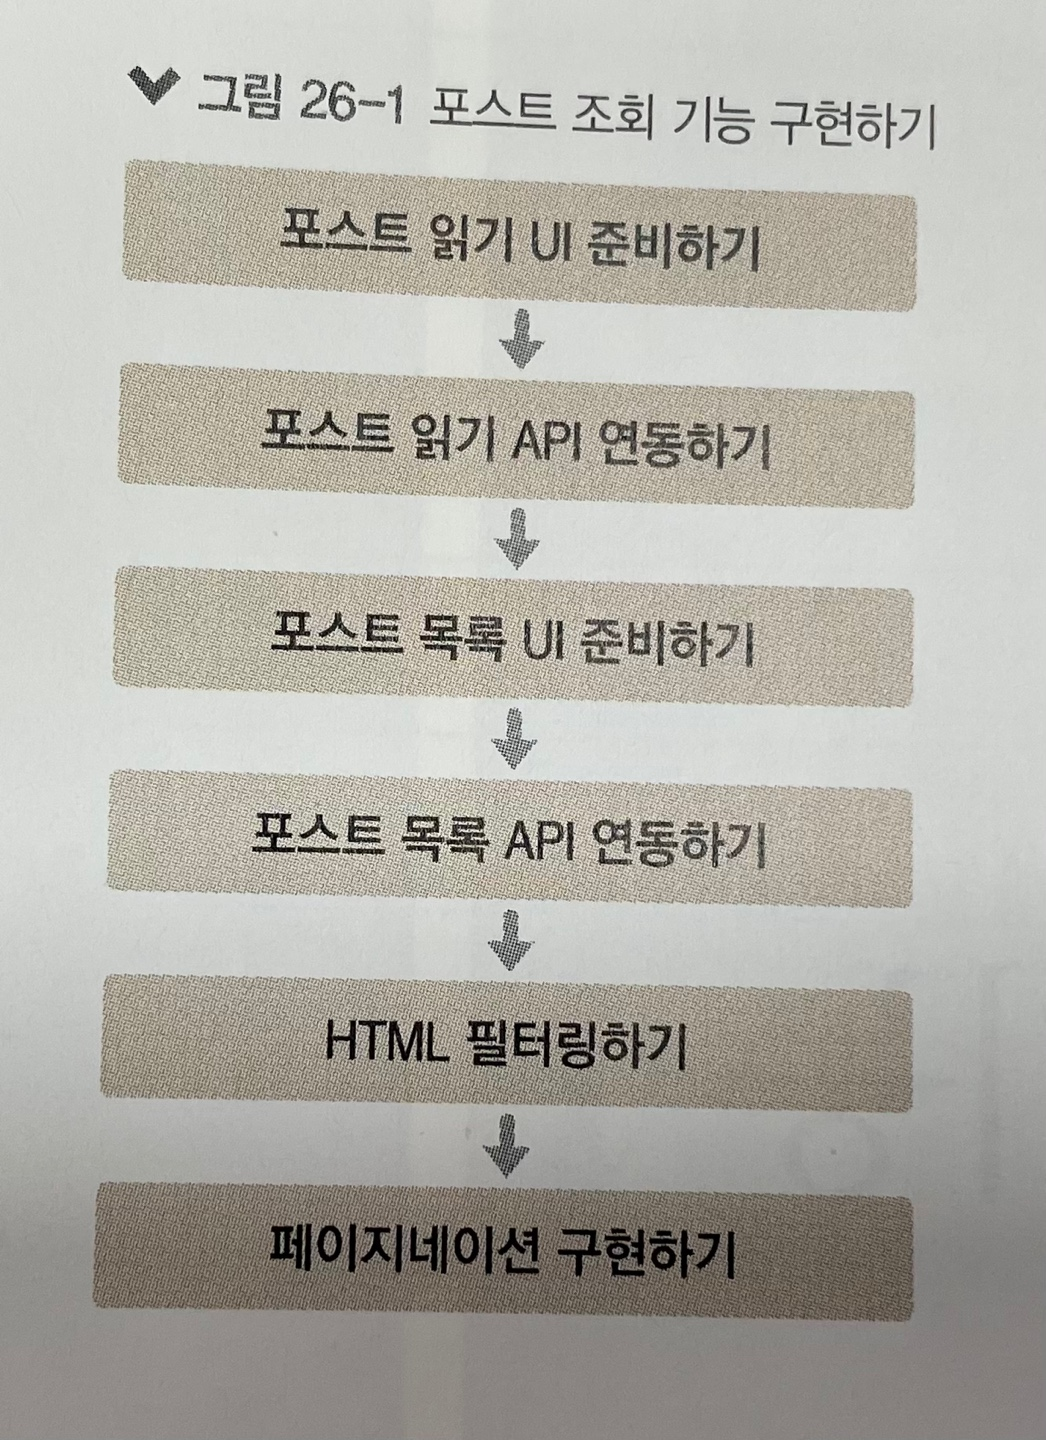
* 지금까지 회원 인증 시스템과 글쓰기 기능의 구현을 완료했다. 이번 장에서는 등록한 포스트를 조회할 수 있는 기능을 구현해 보자. 포스트를 조회하는 기능은 두 가지가 있다. 첫 번째는 포스트 하나를 읽는 포스트 읽기 기능이고, 두 번째는 여러 포스트를 조회하는 포스트 목록 기능이다.
* 이번 실습은 다음 흐름으로 진행된다.

1. 포스트 읽기 페이지 구현하기
* 작성한 포스트를 읽을 수 있는 페이지를 만들어 보자.
(1) PostViewer UI 준비하기
* 서버에서 데이터를 받아 오기 전에 먼저 UI를 완성하자. 구현할 UI는 다음 정보를 보여 줄 것이다.
* 포스트 제목					* 태그
* 작성자 계정명					* 제목
* 작성된 시간					* 내용
* PostViewer 라는 컴포넌트를 만들어 이 정보들을 보여 줄 것이다. components/post 디렉터리를 만들고, 그 안에 PostViewer 컴포넌트를 다음과 같이 작성해 보자.

import React from 'react';
import styled from 'styled-components';
import palette from '../../lib/styles/palette';
import Responsive from '../common/Responsive';

const PostViewerBlock = styled(Responsive)`
  margin-top: 4rem;
`;

const PostHead = styled.div`
  border-bottom: 1px solid ${palette.gray[2]};
  padding-bottom: 3rem;
  margin-bottom: 3rem;
  h1 {
    font-size: 3rem;
    line-height: 1.5;
    margin: 0;
  }
`;

const SubInfo = styled.div`
  margin-top: 1rem;
  color: ${palette.gray[6]};

  /* span 사이에 가운뎃점 문자 보여 주기 */
  span + span::before {
    color: ${palette.gray[5]};
    padding-left: 0.25rem;
    padding-right: 0.25rem;
    content: '\\B7'; /* 가운뎃점 문자 */
  }
`;

const Tags = styled.div`
  margin-top: 0.5rem;
  .tag {
    display: inline-block;
    color: ${palette.cyan[7]};
    text-decoration: none;
    margin-right: 0.5rem;
  }
  &:hover {
    color: ${palette.cyan[6]};
  }
`;

const PostContent = styled.div`
  font-size: 1.3125rem;
  color: ${palette.gray[8]};
`;

const PostViewer = () => {
  return (
    <PostViewerBlock>
      <PostHead>
        <h1>제목</h1>
        <SubInfo>
          <span>
            <b>tester</b>
          </span>
          <span>{new Date().toLocaleDateString()}</span>
        </SubInfo>
        <Tags>
          <div className="tag">#태그1</div>
          <div className="tag">#태그2</div>
          <div className="tag">#태그3</div>
        </Tags>
      </PostHead>
      <PostContent
        dangerouslySetInnerHTML={{ __html: '<p>HTML <b>내용</b>입니다...</p>' }}
      />
    </PostViewerBlock>
  );
};

export default PostViewer;
* 코드를 보면 PostContent 에 dangerouslySetInnerHTML 이라는 값을 설정해 주었다. 리액트에서는 <div>{html}</div> 와 같이 HTML을 그대로 렌더링하는 형태로 JSX를 작성하면 HTML 태그가 적용되지 않고 일반 텍스트 형태로 나타나 버린다. 따라서 HTML을 적용하고 싶다면 dangerouslySetInnerHTML 이라는 props를 설정해 주어야 한다.
* 그리고 지금은 태그를 렌더링하는 부분에 div 엘리먼트를 사용하고 있는데, 추후 포스트 목록 페이지를 구현한 뒤에는 이 부분을 div 가 아닌 Link 컴포넌트로 전환해 줄 것이다.
* 컴포넌트를 다 만들었으면 해당 컴포넌트를 PostPage에서 HeaderContainer와 함께 렌더링하자.
[pages/PostPage.js]
import React from 'react';
import HeaderContainer from '../containers/common/HeaderContainer';
import PostViewer from '../components/post/PostViewer';

const PostPage = () => {
  return (
    <>
      <HeaderContainer />
      <PostViewer />
    </>
  );
};

export default PostPage;
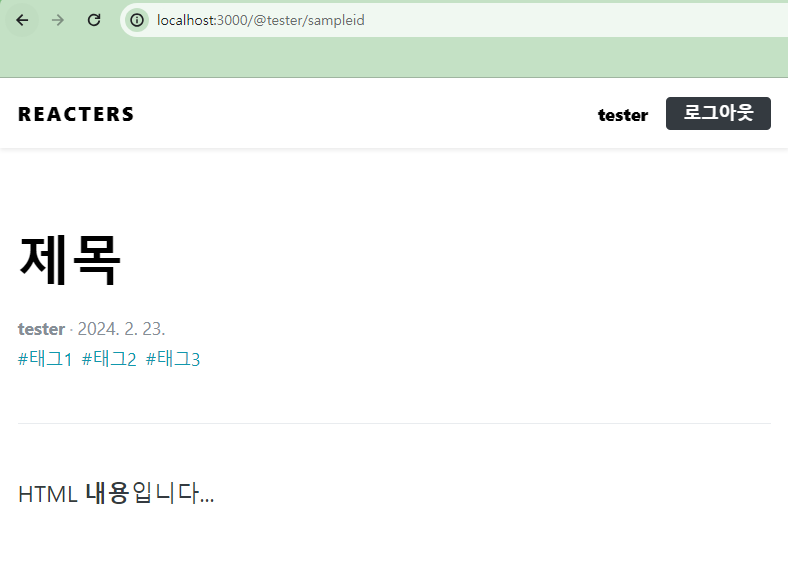
* 브라우저에서 http://localhost:3000/@tester/sampleid 주소를 입력한 후 다음과 같은 UI가 나타나는지 확인하자.

(2) API 연동하기
* UI가 모두 준비되었으니, API를 연동하여 실제 데이터를 보여 주도록 수정해 보자. lib/api/posts.js 파일을 열어서 포스트를 읽게 해 주는 readPost 라는 함수를 추가하자.
[lib/api/posts.js]
import client from './client';

export const writePost = ({ title, body, tags }) =>
  client.post('/api/posts', { title, body, tags });

export const readPost = (id) => client.get(`/api/posts/${id}`);
* 다음으로 post라는 리덕스 모듈을 작성하자.
[modules/post.js]

import { createAction, handleActions } from 'redux-actions';
import createRequestSaga, {
  createRequestActionTypes,
} from '../lib/createRequestSaga';
import * as postsAPI from '../lib/api/posts';
import { takeLatest } from 'redux-saga/effects';

const [READ_POST, READ_POST_SUCCESS, READ_POST_FAILURE] =
  createRequestActionTypes('post/READ_POST');
const UNLOAD_POST = 'post/UNLOAD_POST'; // 포스트 페이지에서 벗어날 때 데이터 비우기

export const readPost = createAction(READ_POST, (id) => id);
export const unloadPost = createAction(UNLOAD_POST);

const readPostSaga = createRequestSaga(READ_POST, postsAPI.readPost);
export function* postSaga() {
  yield takeLatest(READ_POST, readPostSaga);
}

const initialState = {
  post: null,
  error: null,
};

const post = handleActions(
  {
    [READ_POST_SUCCESS]: (state, { payload: post }) => ({
      ...state,
      post,
    }),
    [READ_POST_FAILURE]: (state, { payload: error }) => ({
      ...state,
      error,
    }),
    [UNLOAD_POST]: () => initialState,
  },
  initialState,
);

export default post;
* 이 리덕스 모듈에는 포스트를 불러오는 READ_POST 액션 외에도 UNLOAD_POST 라는 액션이 있는데, 이 액션의 용도는 포스트 페이지를 벗어날 때 리덕스 상태의 데이터를 비우는 것이다. 만약 포스트 페이지를 벗어날 때 데이터를 비우지 않으면, 나중에 사용자가 특정 포스트를 읽은 뒤 목록으로 돌아가서 또 다른 포스트를 읽을 때 아주 짧은 시간 동안 이전에 불러왔던 포스트가 나타나는 깜박임 현상이 나타난다.
* 리덕스 모듈을 작성한 후에는 루트 리듀서와 루트 사가에 등록해 주자.
[modules/index.js]
import { combineReducers } from 'redux';
import { all } from 'redux-saga/effects';
import auth, { authSaga } from './auth';
import loading from './loading';
import user, { userSaga } from './user';
import write, { writeSaga } from './write';
import post, { postSaga } from './post';

const rootReducer = combineReducers({
  auth,
  loading,
  user,
  write,
  post,
});

export function* rootSaga() {
  yield all([authSaga(), userSaga(), writeSaga(), postSaga()]);
}

export default rootReducer;
* 리덕스 모듈을 준비하는 과정을 모두 마쳤다. 이제 PostViewer를 위한 컨테이너 컴포넌트를 만들어 보자.
[containers/post/PostViewerContainer.js]

import React, { useEffect } from 'react';
import { useDispatch, useSelector } from 'react-redux';
import { withRouter } from 'react-router-dom';
import { readPost, unloadPost } from '../../modules/post';
import PostViewer from '../../components/post/PostViewer';

const PostViewerContainer = ({ match }) => {
  // 처음 마운트될 때 포스트 읽기 API 요청
  const { postId } = match.params;
  const dispatch = useDispatch();
  const { post, error, loading } = useSelector(({ post, loading }) => ({
    post: post.post,
    error: post.error,
    loading: loading['post/READ_POST'],
  }));

  useEffect(() => {
    dispatch(readPost(postId));
    // 언마운트될 때 리덕스에서 포스트 데이터 없애기
    return () => {
      dispatch(unloadPost());
    };
  }, [dispatch, postId]);

  return <PostViewer post={post} loading={loading} error={error} />;
};

export default withRouter(PostViewerContainer);
* 컨테이너 컴포넌트를 만드는 과정에서 URL 파라미터로 받아 온 id 값을 조회해야 하기 때문에 withRouter도 함께 사용했다. 그리고 언마운트될 때는 UNLOAD_POST 액션을 실행시키도록 코드를 작성했다.
* 컨테이너 컴포넌트를 다 만들었으면, PostPage 에서 기존 PostViewer 컴포넌트를 PostViewerContainer 컴포넌트로 대체하자.
[pages/PostPage.js]
import React from 'react';
import HeaderContainer from '../containers/common/HeaderContainer';
import PostViewerContainer from '../containers/post/PostViewerContainer';

const PostPage = () => {
  return (
    <>
      <HeaderContainer />
      <PostViewerContainer />
    </>
  );
};

export default PostPage;
* PostViewer 에 필요한 props를 넣어 주었으니, 해당 props를 PostViewer 컴포넌트에서 사용해 보자.
[components/post/PostViewer.js]
(...)

const PostViewer = ({ post, error, loading }) => {
  // 에러 발생 시
  if (error) {
    if (error.response && error.response.status === 404) {
      return <PostViewerBlock>존재하지 않는 포스트입니다.</PostViewerBlock>;
    }
    return <PostViewerBlock>오류 발생!</PostViewerBlock>;
  }

  // 로딩중이거나, 아직 포스트 데이터가 없을 시
  if (loading || !post) {
    return null;
  }

  const { title, body, user, publishedDate, tags } = post;

  return (
    <PostViewerBlock>
      <PostHead>
        <h1>{title}</h1>
        <SubInfo>
          <span>
            <b>{user.username}</b>
          </span>
          <span>{new Date(publishedDate).toLocaleDateString()}</span>
        </SubInfo>
        <Tags>
          {tags.map((tag) => (
            <div className="tag">#{tag}</div>
          ))}
        </Tags>
      </PostHead>
      <PostContent dangerouslySetInnerHTML={{ __html: body }} />
    </PostViewerBlock>
  );
};

export default PostViewer;
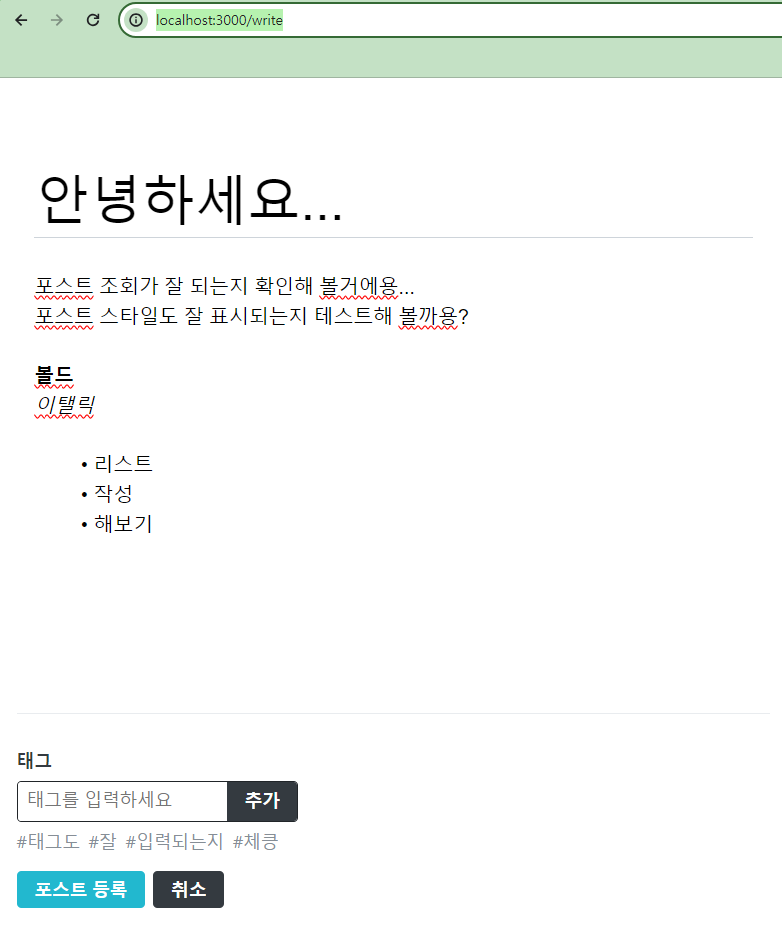
* 컴포넌트를 모두 수정한 뒤 http://localhost:3000/write 에서 새 포스트를 작성해 보자. 작성했던 결과가 브라우저에 잘 나타나는가?
- http://localhost:3000/write


* 포스트가 잘 나타났는가?
'React > React_프론트엔드 프로젝트' 카테고리의 다른 글
| (16) 프론트엔드 프로젝트 : 포스트 조회 기능 구현하기 3 (0) | 2024.02.23 |
|---|---|
| (15) 프론트엔드 프로젝트 : 포스트 조회 기능 구현하기 2 (0) | 2024.02.23 |
| (13) 프론트엔드 프로젝트 : 글쓰기 기능 구현하기 4 (0) | 2024.02.23 |
| (12) 프론트엔드 프로젝트 : 글쓰기 기능 구현하기 3 (0) | 2024.02.23 |
| (11) 프론트엔드 프로젝트 : 글쓰기 기능 구현하기 2 (0) | 2024.02.23 |


