
| 일 | 월 | 화 | 수 | 목 | 금 | 토 |
|---|---|---|---|---|---|---|
| 1 | 2 | 3 | 4 | 5 | 6 | 7 |
| 8 | 9 | 10 | 11 | 12 | 13 | 14 |
| 15 | 16 | 17 | 18 | 19 | 20 | 21 |
| 22 | 23 | 24 | 25 | 26 | 27 | 28 |
- oracle
- exception
- 한국건설관리시스템
- Java
- 어윈 사용법
- 생성자오버로드
- abstract
- cursor문
- 오라클
- 환경설정
- EnhancedFor
- 참조형변수
- 인터페이스
- GRANT VIEW
- 객체 비교
- 컬렉션프레임워크
- 추상메서드
- 사용자예외클래스생성
- 자바
- 다형성
- 제네릭
- 자동차수리시스템
- 대덕인재개발원
- 메소드오버로딩
- 컬렉션 타입
- 집합_SET
- 정수형타입
- 예외처리
- 예외미루기
- NestedFor
- Today
- Total
거니의 velog
(20) 프론트엔드 프로젝트 : 수정/삭제 기능 구현 및 마무리 2 본문
(2) 수정 버튼 클릭 시 글쓰기 페이지로 이동하기
* 이제 수정 버튼을 클릭하면 글쓰기 페이지로 이동하고, 현재 보고 있는 포스트가 나타나게 해 보자. 우선 write 리덕스 모듈에 SET_ORIGINAL_POST 라는 액션을 만들자. 이 액션은 현재 보고 있는 포스트 정보를 write 모듈에서 관리하는 상태에 넣는다.
[modules/write.js]
(...)
const SET_ORIGINAL_POST = 'write/SET_ORIGINAL_POST';

(...)
export const setOriginalPost = createAction(SET_ORIGINAL_POST, (post) => post);

// saga 생성
(...)

const initialState = {
  title: '',
  body: '',
  tags: [],
  post: null,
  postError: null,
  originalPostId: null,
};

const write = handleActions(
  {
    (...)
    // 포스트 수정 상태
    [SET_ORIGINAL_POST]: (state, { payload: post }) => ({
      ...state,
      title: post.title,
      body: post.body,
      tags: post.tags,
      originalPostId: post._id,
    }),
  },
  initialState,
);

export default write;
* 액션을 추가한 뒤에는 PostViewerContainer를 다음과 같이 수정해 보자.
[containers/post/PostViewerContainer.js]
import React, { useEffect } from 'react';
import { useDispatch, useSelector } from 'react-redux';
import { withRouter } from 'react-router-dom';
import { readPost, unloadPost } from '../../modules/post';
import PostViewer from '../../components/post/PostViewer';
import PostActionButtons from '../../components/post/PostActionButtons';
import { setOriginalPost } from '../../modules/write';

const PostViewerContainer = ({ match, history }) => {
  // 처음 마운트될 때 포스트 읽기 API 요청
  const { postId } = match.params;
  const dispatch = useDispatch();
  const { post, error, loading, user } = useSelector(
    ({ post, loading, user }) => ({
      post: post.post,
      error: post.error,
      loading: loading['post/READ_POST'],
      user: user.user,
    }),
  );

  useEffect(() => {
    dispatch(readPost(postId));
    // 언마운트될 때 리덕스에서 포스트 데이터 없애기
    return () => {
      dispatch(unloadPost());
    };
  }, [dispatch, postId]);

  const onEdit = () => {
    dispatch(setOriginalPost(post));
    history.push('/write');
  };

  const ownPost = (user && user._id) === (post && post.user._id);

  return (
    <PostViewer
      post={post}
      loading={loading}
      error={error}
      actionButtons={ownPost && <PostActionButtons onEdit={onEdit} />}
    />
  );
};

export default withRouter(PostViewerContainer);
* 기존에는 PostActionButtons가 무조건 나타났는데, 현재 사용자가 보고 있는 포스트가 자신의 포스트일 때만 PostActionButtons가 나타나게 설정했다. 그리고 onEdit 함수를 구현하여 PostActionButtons에 전달해 주었다.
* 이제 수정 버튼이 클릭되면 props로 전달받은 onEdit 을 호출하도록 PostActionButtons를 수정하자.
[components/post/PostActionButtons.js]
(...)

const PostActionButtons = ({ onEdit }) => {
  return (
    <PostActionButtonsBlock>
      <ActionButton onClick={onEdit}>수정</ActionButton>
      <ActionButton>삭제</ActionButton>
    </PostActionButtonsBlock>
  );
};

export default PostActionButtons;
* 이제 컴포넌트를 저장하고 수정 버튼을 누르면 글쓰기 페이지로 이동한다. 제목, 태그만 자동으로 입력되어 있고 내용은 공백으로 나타날 것이다.
* 내용의 초깃값도 설정되도록 Editor 컴포넌트를 수정해 보자.
[components/write/Editor.js]
(...)

const Editor = ({ title, body, onChangeField }) => {
  const quillElement = useRef(null); // Quill을 적용할 DivElement를 설정
  const quillInstance = useRef(null); // Quill 인스턴스를 설정

  useEffect(() => {
    quillInstance.current = new Quill(quillElement.current, {
      theme: 'bubble',
      placeholder: '내용을 작성하세요...',
      modules: {
        // 더 많은 옵션
        // https://quilljs.com/docs/modules/toolbar/ 참고
        toolbar: [
          [{ header: '1' }, { header: '2' }],
          ['bold', 'italic', 'underline', 'strike'],
          [{ list: 'ordered' }, { list: 'bullet' }],
          ['blockquote', 'code-block', 'link', 'image'],
        ],
      },
    });

    // quill에 text-change 이벤트 핸들러 등록
    // 참고: https://quilljs.com/docs/api/#events
    const quill = quillInstance.current;
    quill.on('text-change', (delta, oldDelta, source) => {
      if (source === 'user') {
        onChangeField({ key: 'body', value: quill.root.innerHTML });
      }
    });
  }, [onChangeField]);

  const mounted = useRef(false);
  useEffect(() => {
    if (mounted.current) return;
    mounted.current = true;
    quillInstance.current.root.innerHTML = body;
  }, [body]);

  const onChangeTitle = (e) => {
    onChangeField({ key: 'title', value: e.target.value });
  };

  return (
    <EditorBlock>
      <TitleInput
        placeholder="제목을 입력하세요"
        onChange={onChangeTitle}
        value={title}
      />
      <QuillWrapper>
        <div ref={quillElement} />
      </QuillWrapper>
    </EditorBlock>
  );
};

export default Editor;
* Editor 컴포넌트에서 받아 오는 body 값은 Quill 에디터에서 내용을 입력할 때마다 변경된다. body가 변경될 때마다 방금 작성한 useEffect에 등록한 함수가 호출된다. 하지만 우리는 컴포넌트가 화면에 마운트되고 나서 단 한 번만 useEffect에 등록한 작업이 실행되도록 설정해 주어야 한다. 따라서 useRef를 사용하여 mount 상태에 따라 작업을 처리하도록 설정했다.
* 물론 이 상황에서 useEffect의 두 번째 파라미터에 비어 있는 배열을 넣으면 해결될 수도 있다. 하지만 ESLint 규칙은 useEffect에서 사용하는 모든 외부 값을 두 번째 파라미터에 넣는 배열 안에 포함시킬 것을 권장하고 있으므로 이렇게 처리했다.
* 또 다른 방법으로 해당 줄만 ESLint 규칙을 비활성화할 수도 있다.
  useEffect(() => {
    quillInstance.current.root.innerHTML = body;
  }, []); /* eslint-disable-line */
* 취향에 따라 방법을 선택하면 된다.
* 이제 다시 수정 버튼을 눌러 보자, 에디터에서 제목, 내용, 태그가 전부 잘 나타나는가?
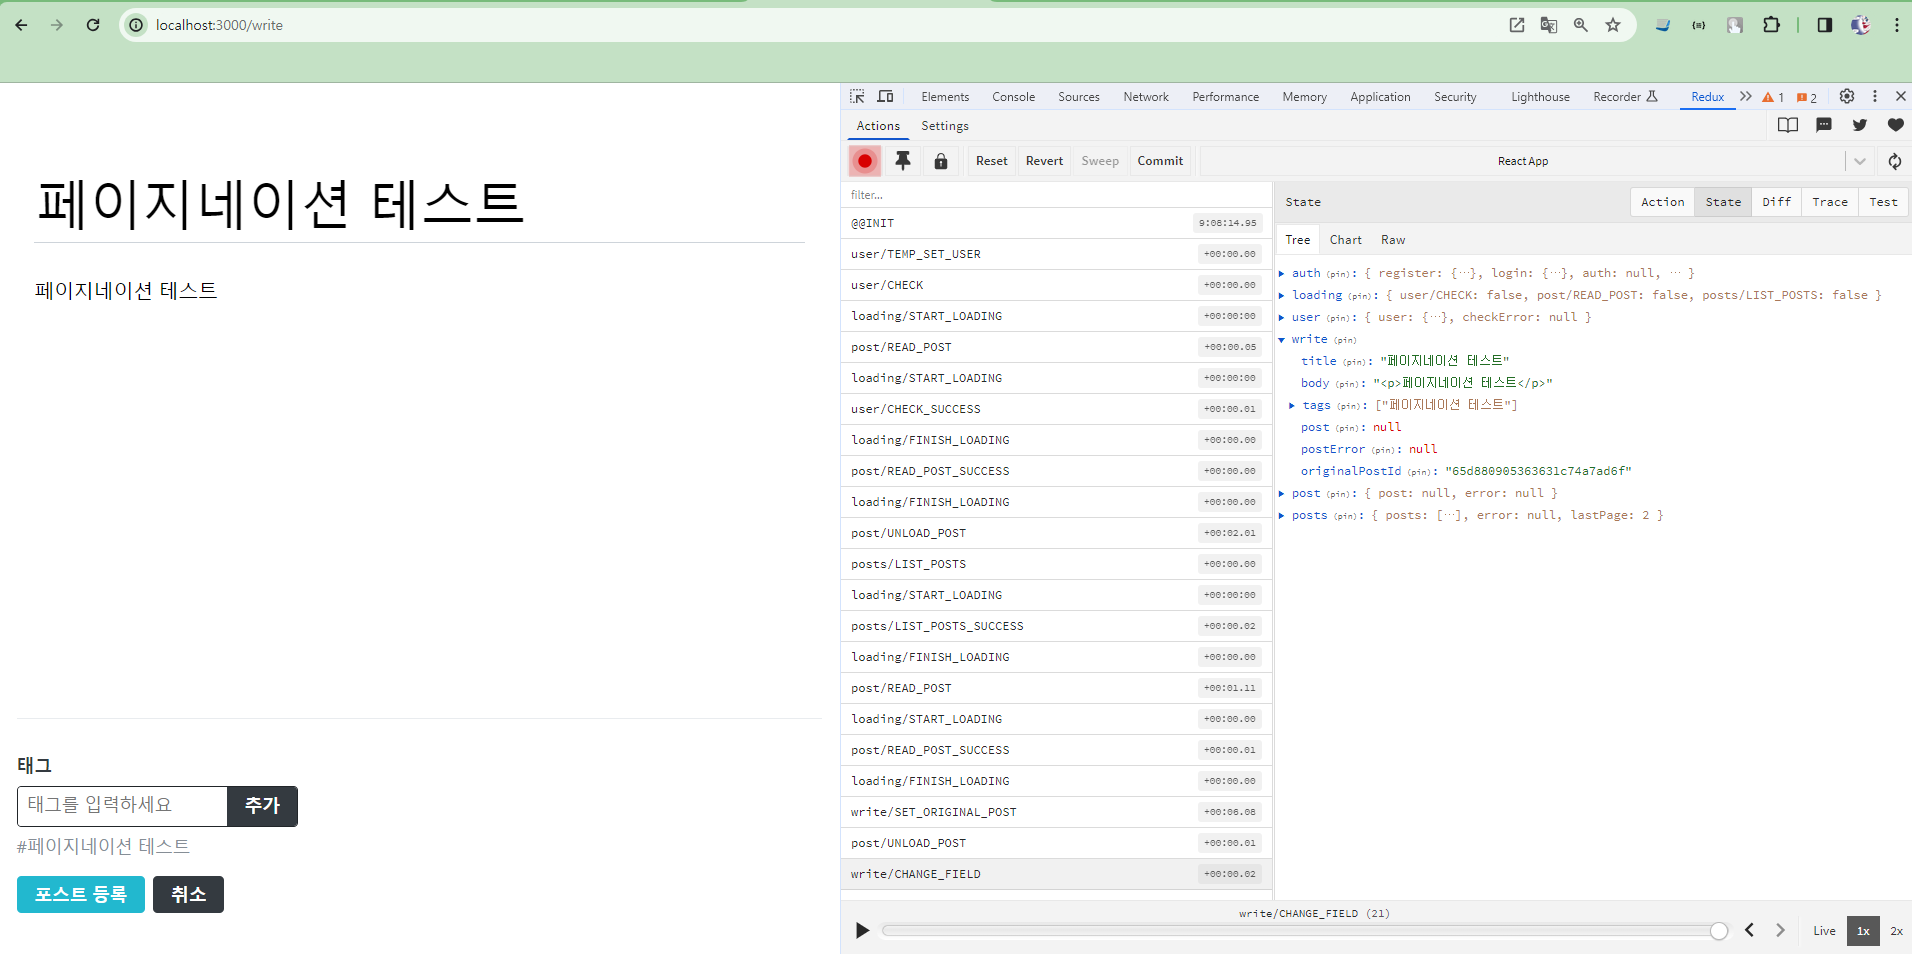
* 리덕스 스토어의 write 상태에 값이 제대로 들어가 있는지도 확인해 보자.
* 다음으로 write 상태에 originalPostId 값이 주어졌다면 포스트 작성 API 대신 수정 API를 사용하는 기능을 구현해 보자.
* lib/api/posts.js를 열어서 updatePost 함수를 작성해 보자.
[lib/api/posts.js]
(...)

export const updatePost = ({ id, title, body, tags }) =>
  client.patch(`/api/posts/${id}`, {
    title,
    body,
    tags,
  });
* 그리고 write 리덕스 모듈에서 UPDATE_POST 액션과 updatePostSaga를 만들자.
[modules/write.js]
import { createAction, handleActions } from 'redux-actions';
import createRequestSaga, {
  createRequestActionTypes,
} from '../lib/createRequestSaga';
import * as postsAPI from '../lib/api/posts';
import { takeLatest } from 'redux-saga/effects';

(...)
const [UPDATE_POST, UPDATE_POST_SUCCESS, UPDATE_POST_FAILURE] =
  createRequestActionTypes('write/UPDATE_POST'); // 포스트 수정

(...)
export const updatePost = createAction(
  UPDATE_POST,
  ({ id, title, body, tags }) => ({
    id,
    title,
    body,
    tags,
  }),
);

// saga 생성
const writePostSaga = createRequestSaga(WRITE_POST, postsAPI.writePost);
const updatePostSaga = createRequestSaga(UPDATE_POST, postsAPI.updatePost);

export function* writeSaga() {
  yield takeLatest(WRITE_POST, writePostSaga);
  yield takeLatest(UPDATE_POST, updatePostSaga);
}

(...)

const write = handleActions(
  {
    (...)
    // 포스트 수정 성공
    [UPDATE_POST_SUCCESS]: (state, { payload: post }) => ({
      ...state,
      post,
    }),
    // 포스트 수정 실패
    [UPDATE_POST_FAILURE]: (state, { payload: postError }) => ({
      ...state,
      postError,
    }),
  },
  initialState,
);

export default write;
* write 모듈에서 포스트 수정을 위한 코드를 작성한 후에는 WriteActionButtonsContainer 와 WriteActionButtons 컴포넌트를 차례대로 수정해 주자.
[containers/write/WriteActionButtonsContainer.js]
import React, { useEffect } from 'react';
import WriteActionButtons from '../../components/write/WriteActionButtons';
import { useSelector, useDispatch } from 'react-redux';
import { withRouter } from 'react-router-dom';
import { writePost, updatePost } from '../../modules/write';

const WriteActionButtonsContainer = ({ history }) => {
  const dispatch = useDispatch();
  const { title, body, tags, post, postError, originalPostId } = useSelector(
    ({ write }) => ({
      title: write.title,
      body: write.body,
      tags: write.tags,
      post: write.post,
      postError: write.postError,
      originalPostId: write.originalPostId,
    }),
  );

  // 포스트 등록
  const onPublish = () => {
    if (originalPostId) {
      dispatch(updatePost({ title, body, tags, id: originalPostId }));
      return;
    }
    dispatch(
      writePost({
        title,
        body,
        tags,
      }),
    );
  };

  (...)

  return (
    <WriteActionButtons
      onPublish={onPublish}
      onCancel={onCancel}
      isEdit={!!originalPostId}
    />
  );
};

export default withRouter(WriteActionButtonsContainer);
* WriteActionButtonsContainer 컴포넌트에서는 originalPostId 값이 존재하면 writePost 대신 updatePost 액션 생성 함수를 사용하도록 수정했다. 그리고 isEdit 이라는 props를 전달하여 originalPostId 값의 존재 유무에 따라 버튼 이름을 포스트 수정 또는 포스트 등록으로 설정해 주었다.
* 컨테이너 컴포넌트를 수정한 뒤에는 프레젠테이셔널 컴포넌트도 수정해 준다.
[components/write/WriteActionButtons.js]
(...)

const WriteActionButtons = ({ onCancel, onPublish, isEdit }) => {
  return (
    <WriteActionButtonsBlock>
      <StyledButton cyan onClick={onPublish}>
        포스트 {isEdit ? '수정' : '등록'}
      </StyledButton>
      <StyledButton onClick={onCancel}>취소</StyledButton>
    </WriteActionButtonsBlock>
  );
};

export default WriteActionButtons;
* 이제 포스트를 열고 수정 버튼을 누른 다음에 제목, 내용, 태그를 변경하고 포스트 수정 버튼을 눌러 보자. 변경된 정보가 잘 나타나는가?


'React > React_프론트엔드 프로젝트' 카테고리의 다른 글
| (22) 프론트엔드 프로젝트 : 프로젝트 마무리, 그 이후 개발 방향? (0) | 2024.02.24 |
|---|---|
| (21) 프론트엔드 프로젝트 : 수정/삭제 기능 구현 및 마무리 3 (0) | 2024.02.23 |
| (19) 프론트엔드 프로젝트 : 수정/삭제 기능 구현 및 마무리 1 (0) | 2024.02.23 |
| (18) 프론트엔드 프로젝트 : 포스트 조회 기능 구현하기 5 (0) | 2024.02.23 |
| (17) 프론트엔드 프로젝트 : 포스트 조회 기능 구현하기 4 (0) | 2024.02.23 |


