
| 일 | 월 | 화 | 수 | 목 | 금 | 토 |
|---|---|---|---|---|---|---|
| 1 | 2 | 3 | 4 | |||
| 5 | 6 | 7 | 8 | 9 | 10 | 11 |
| 12 | 13 | 14 | 15 | 16 | 17 | 18 |
| 19 | 20 | 21 | 22 | 23 | 24 | 25 |
| 26 | 27 | 28 | 29 | 30 |
- 대덕인재개발원
- NestedFor
- 정수형타입
- 인터페이스
- EnhancedFor
- 예외처리
- 집합_SET
- 자바
- 제네릭
- 오라클
- oracle
- 컬렉션프레임워크
- 다형성
- 컬렉션 타입
- 어윈 사용법
- 한국건설관리시스템
- 사용자예외클래스생성
- abstract
- 자동차수리시스템
- exception
- 환경설정
- GRANT VIEW
- 메소드오버로딩
- 참조형변수
- cursor문
- 추상메서드
- Java
- 객체 비교
- 생성자오버로드
- 예외미루기
- Today
- Total
거니의 velog
(2) 메이븐과 스프링 STS 사용법 2 본문
4. 메이븐 프로젝트의 구조와 구성 요소
* 메이븐은 프로젝트 구조와 내용을 기술하는 선언적 접근 방식의 오픈 소스 빌드 툴이다. 메이븐을 사용하면 프로젝트 종속 라이브러리들과 그 라이브러리에 의존하는 Dependency 자원까지 관리할 수 있다. 메이븐은 프로젝트 전반의 리소스 관리와 설정 파일 그리고 이와 관련된 표준 디렉터리 구조를 처음부터 일관된 형태로 구성하여 관리한다.
* 일반적인 애플리케이션은 단지 코드를 컴파일했다고 해서 동작하는 것이 아니다.
  우리가 사용한 오픈 소스 라이브러리들은 컴파일할 때 합쳐져 하나의 기능을 이룬다.
  그리고 컴파일 과정 외에 테스팅, 배포 같은 과정도 거쳐야 한다.
  즉, 애플리케이션을 만들 때는 컴파일보다 더 많은 과정을 거치게 된다.
  이런 과정을 '빌드'라고 하고 이런 작업을 자동으로 수행해주는 툴을 '빌드 툴'이라고 한다.
  이런 빌드 툴에는 Ant, Apache Ivy, Maven, Gradle 등이 있다.
* 메이븐을 사용하면 컴파일과 동시에 빌드를 수행할 수 있을 뿐만 아니라 관련된 라이브러리도 일관성 있게 관리할 수 있어 편리하다.
* 지금까지 스프링 실습에서는 라이브러리 관련 jar 파일을 내려 받아 프로젝트에 추가할 경우 이하 연관된 종속 라이브러리까지 다 찾아서 추가해 주어야 했다. 그러나 메이븐을 사용하면 이런 의존 관계를 자동으로 관리할 수 있다.
* 다음 그림은 메이븐에서 만든 웹 애플리케이션 프로젝트의 구조이다. 이클립스의 프로젝트 구조와는 약간 다르다는 것을 알 수 있다.
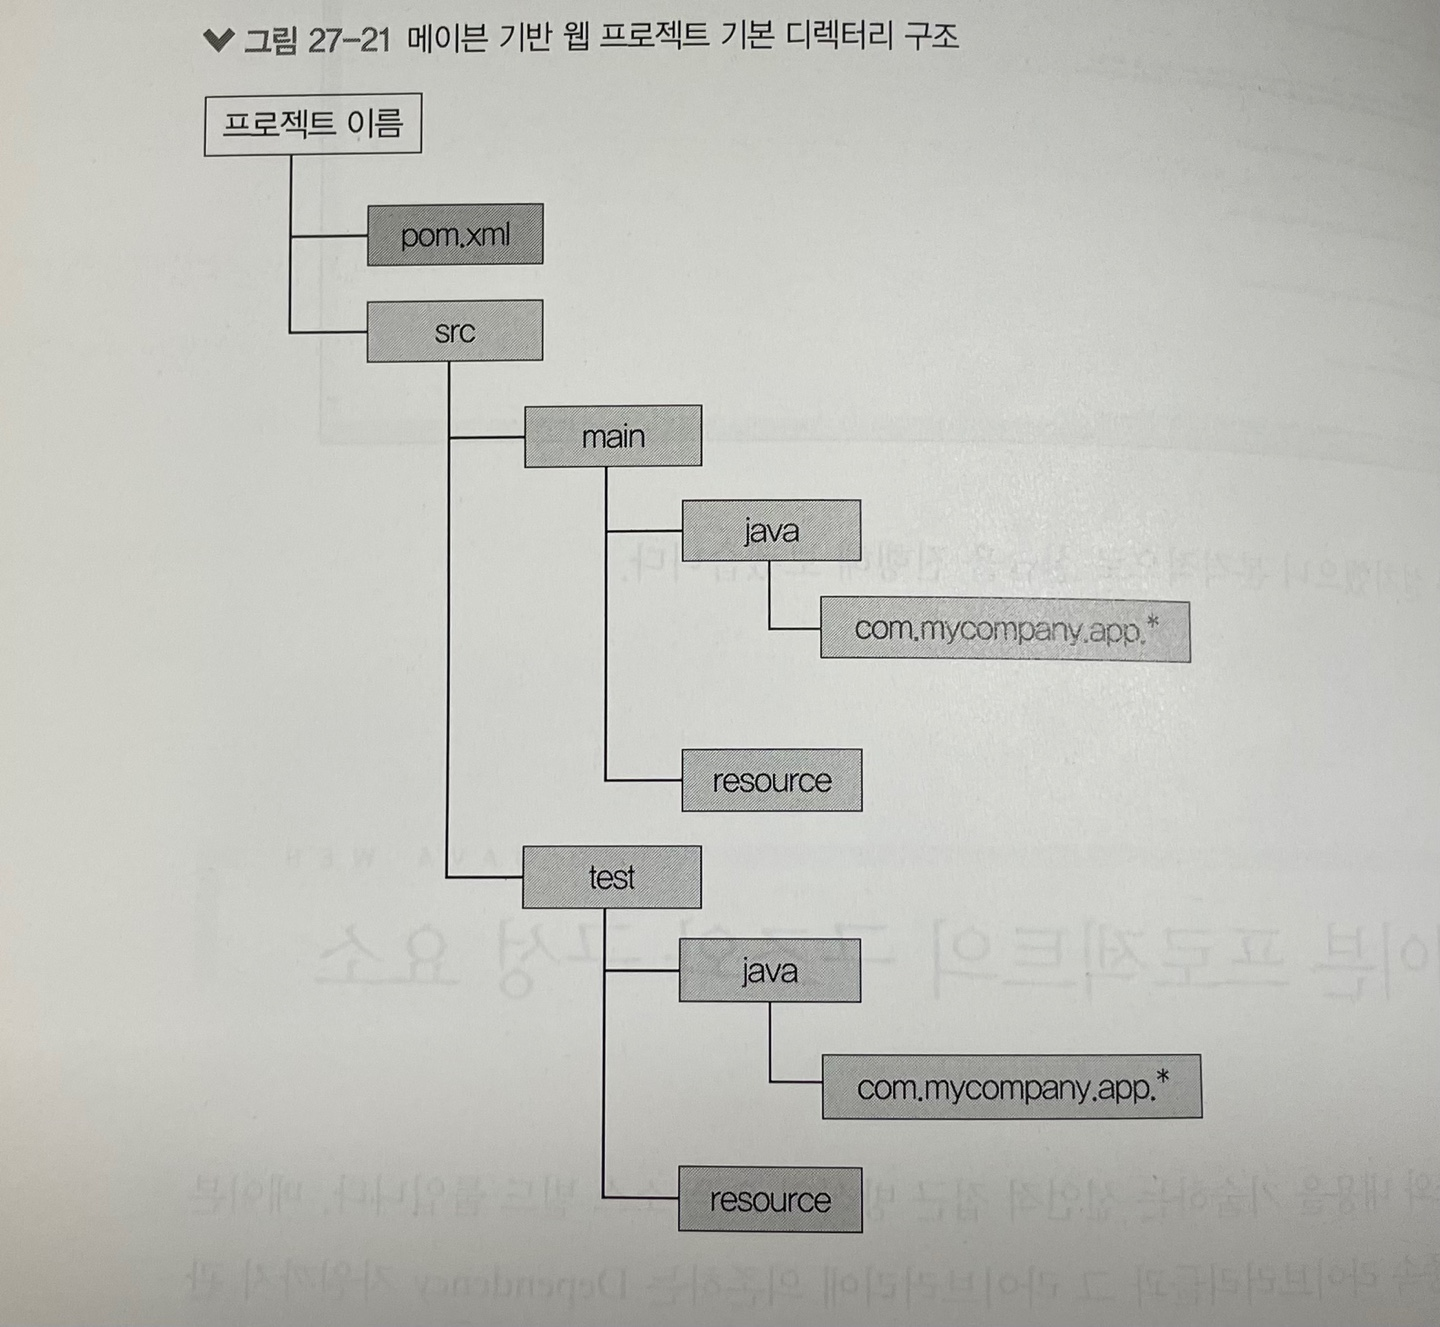
* 다음 표는 메이븐에서 생성한 웹 애플리케이션 프로젝트의 각 구성 요소들을 정리한 것이다.
< 메이븐 프로젝트 구성 요소들 >
| 구성 요소 | 설명 |
| pom.xml | 프로젝트 정보가 표시되며 스프링에서 사용되는 여러 가지 라이브러리를 설정해 다운로드 할 수 있다. |
| src/main/java | 자바 소스 파일이 위치한다. |
| src/main/resources | 프로퍼티 파일이나 XML 파일 등 리소스 파일이 위치한다. |
| src/main/webapp | WEB_INF 등 웹 애플리케이션 리소스가 위치한다. |
| src/test/java | JUnit 등 테스트 파일이 위치한다. |
| src/test/resources | 테스트 시에 필요한 resource 파일이 위치한다. |
* 다음은 메이븐 프로젝트의 pom.xml 파일이다.
<?xml version="1.0" encoding="UTF-8"?>
<project xmlns="http://maven.apache.org/POM/4.0.0" xmlns:xsi="http://www.w3.org/2001/XMLSchema-instance"
	xsi:schemaLocation="http://maven.apache.org/POM/4.0.0 https://maven.apache.org/maven-v4_0_0.xsd">
	<modelVersion>4.0.0</modelVersion>
	<groupId>com.tistory</groupId>
	<artifactId>web</artifactId>
	<name>tistory</name>
	<packaging>war</packaging>
	<version>1.0.0-BUILD-SNAPSHOT</version>
	<properties>
		<java-version>1.6</java-version>
		<org.springframework-version>3.1.1.RELEASE</org.springframework-version>
		<org.aspectj-version>1.6.10</org.aspectj-version>
		<org.slf4j-version>1.6.6</org.slf4j-version>
	</properties>
	<dependencies>
		<!-- Spring -->
		<dependency>
			<groupId>org.springframework</groupId>
			<artifactId>spring-context</artifactId>
			<version>${org.springframework-version}</version>
			<exclusions>
				<!-- Exclude Commons Logging in favor of SLF4j -->
				<exclusion>
					<groupId>commons-logging</groupId>
					<artifactId>commons-logging</artifactId>
				 </exclusion>
			</exclusions>
		</dependency>
		<dependency>
			<groupId>org.springframework</groupId>
			<artifactId>spring-webmvc</artifactId>
			<version>${org.springframework-version}</version>
		</dependency>

		<!-- AspectJ -->
		<dependency>
			<groupId>org.aspectj</groupId>
			<artifactId>aspectjrt</artifactId>
			<version>${org.aspectj-version}</version>
		</dependency>

		<!-- Logging -->
		<dependency>
			<groupId>org.slf4j</groupId>
			<artifactId>slf4j-api</artifactId>
			<version>${org.slf4j-version}</version>
		</dependency>
		<dependency>
			<groupId>org.slf4j</groupId>
			<artifactId>jcl-over-slf4j</artifactId>
			<version>${org.slf4j-version}</version>
			<scope>runtime</scope>
		</dependency>
		<dependency>
			<groupId>org.slf4j</groupId>
			<artifactId>slf4j-log4j12</artifactId>
			<version>${org.slf4j-version}</version>
			<scope>runtime</scope>
		</dependency>
		<dependency>
			<groupId>log4j</groupId>
			<artifactId>log4j</artifactId>
			<version>1.2.15</version>
			<exclusions>
				<exclusion>
					<groupId>javax.mail</groupId>
					<artifactId>mail</artifactId>
				</exclusion>
				<exclusion>
					<groupId>javax.jms</groupId>
					<artifactId>jms</artifactId>
				</exclusion>
				<exclusion>
					<groupId>com.sun.jdmk</groupId>
					<artifactId>jmxtools</artifactId>
				</exclusion>
				<exclusion>
					<groupId>com.sun.jmx</groupId>
					<artifactId>jmxri</artifactId>
				</exclusion>
			</exclusions>
			<scope>runtime</scope>
		</dependency>

		<!-- @Inject -->
		<dependency>
			<groupId>javax.inject</groupId>
			<artifactId>javax.inject</artifactId>
			<version>1</version>
		</dependency>

		<!-- Servlet -->
		<dependency>
			<groupId>javax.servlet</groupId>
			<artifactId>servlet-api</artifactId>
			<version>2.5</version>
			<scope>provided</scope>
		</dependency>
		<dependency>
			<groupId>javax.servlet.jsp</groupId>
			<artifactId>jsp-api</artifactId>
			<version>2.1</version>
			<scope>provided</scope>
		</dependency>
		<dependency>
			<groupId>javax.servlet</groupId>
			<artifactId>jstl</artifactId>
			<version>1.2</version>
		</dependency>

		<!-- Test -->
		<dependency>
			<groupId>junit</groupId>
			<artifactId>junit</artifactId>
			<version>4.7</version>
			<scope>test</scope>
		</dependency>
	</dependencies>
    <build>
        <plugins>
            <plugin>
                <artifactId>maven-eclipse-plugin</artifactId>
                <version>2.9</version>
                <configuration>
                    <additionalProjectnatures>
                        <projectnature>org.springframework.ide.eclipse.core.springnature</projectnature>
                    </additionalProjectnatures>
                    <additionalBuildcommands>
                        <buildcommand>org.springframework.ide.eclipse.core.springbuilder</buildcommand>
                    </additionalBuildcommands>
                    <downloadSources>true</downloadSources>
                    <downloadJavadocs>true</downloadJavadocs>
                </configuration>
            </plugin>
            <plugin>
                <groupId>org.apache.maven.plugins</groupId>
                <artifactId>maven-compiler-plugin</artifactId>
                <version>2.5.1</version>
                <configuration>
                    <source>1.6</source>
                    <target>1.6</target>
                    <compilerArgument>-Xlint:all</compilerArgument>
                    <showWarnings>true</showWarnings>
                    <showDeprecation>true</showDeprecation>
                </configuration>
            </plugin>
            <plugin>
                <groupId>org.codehaus.mojo</groupId>
                <artifactId>exec-maven-plugin</artifactId>
                <version>1.2.1</version>
                <configuration>
                    <mainClass>org.test.int1.Main</mainClass>
                </configuration>
            </plugin>
        </plugins>
    </build>
</project>
* 이 파일은 프로젝트의 전반적인 정보를 다음의 표에 나온 태그를 이용해 나타낸다. 그리고 <dependencies> 태그를 이용해 이 프로젝트가 의존하는 여러 가지 라이브러리를 설정한다
< pom.xml 의 프로젝트 정보 설정 태그 구성 요소 >
| 속성 | 설명 |
| groupId | 프로젝트 그룹 ID를 나타내며 일반적으로 도메인 이름을 사용해 설정한다. |
| artifactId | 프로젝트 아티팩트 ID를 설정한다. 대개는 패키지 이름으로 설정한다. |
| version | 프로젝트의 버전을 설정한다. |
| packaging | 애플리케이션 배포 시 패키징 타입을 설정한다. 이 경우는 war 파일로 패키징된다. |
* 다음은 <dependencies> 태그 안에서 사용되는 여러 가지 태그들이다.
< pom.xml 의 dependencies 정보 설정 태그 구성 요소 >
| 속성 | 설명 |
| dependency | 해당 프로젝트에서 의존하는 다른 라이브러리 정보를 기술한다. |
| groupId | 의존하는 프로젝트의 그룹 id |
| artifactId | 의존하는 프로젝트의 artifact id |
| version | 의존하는 프로젝트의 버전 정보 |
* pom.xml에 대해서는 실습을 통해 구체적으로 알아보자.
5. 스프링 프로젝트 만들기
* 메이븐 단독으로 프로젝트를 생성해서 실습해도 되지만 실제로는 개발 환경이 편리한 STS에서 프로젝트를 만들어 메이븐을 사용한다. 그럼 STS에서 스프링 프로젝트를 생성해 보자.
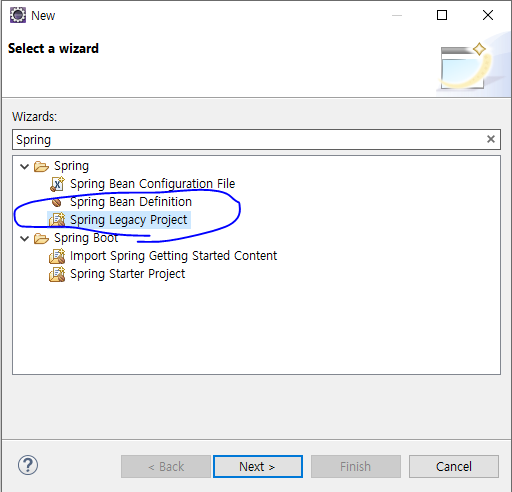
1. 메뉴에서 New > project 항목을 선택하고 Spring 항목의 Spring Legact Project를 선택한 후 Next를 클릭한다.
2. 프로젝트 이름으로 pro27을 입력한 후 Templates를 Spring MVC Project로 선택한다.

3. 다운로드 메시지창이 나타나면 Yes를 클릭한다.

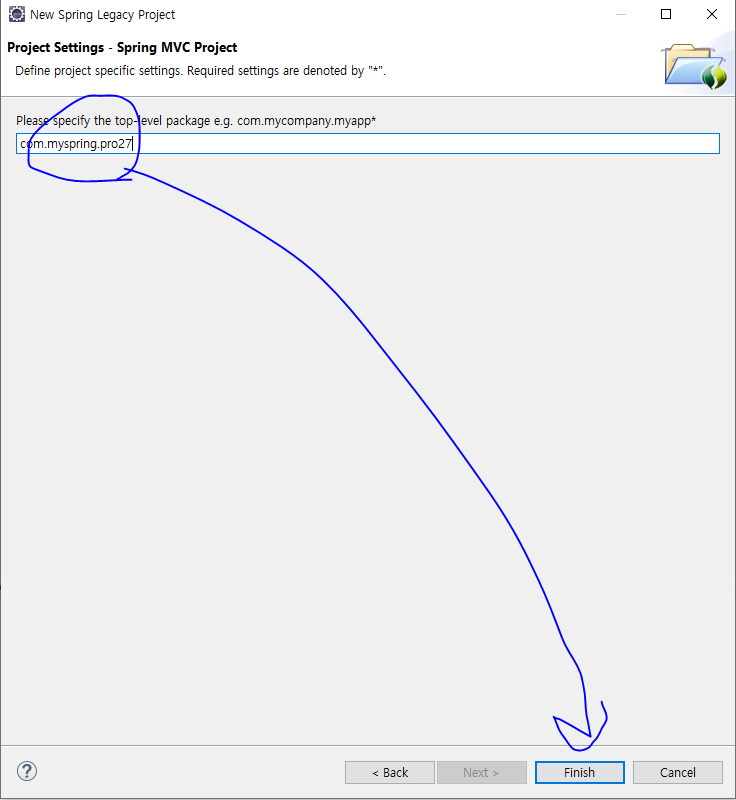
4. 패키지 이름으로 com.myspring.pro27(세 번째 단계의 패키지 이름, 즉 pro27이 브라우저에서 요청하는 컨텍스트 이름이다)을 입력하고 Finish를 클릭한다.
5. 이클립스에서 프로젝트가 생성된 것을 확인할 수 있다.

6. 프로젝트의 Maven Dependencies 폴더를 클릭하면 자동으로 다운로드된 스프링 관련 라이브러리들이 보인다.
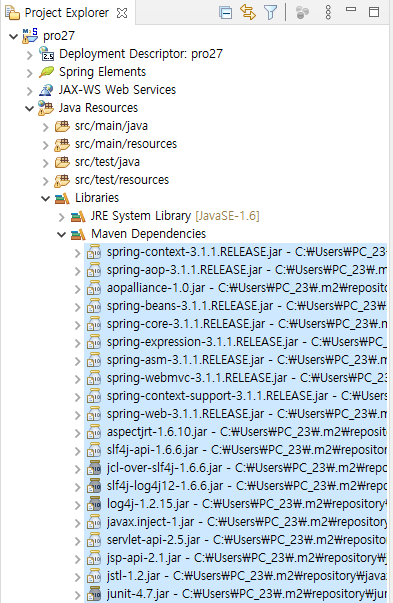
7. 라이브러리 옆에 표시된 경로를 통해 설치된 라이브러리 파일들을 볼 수 있다.

6. STS 프로젝트 실행하기
* 다음 그림은 프로젝트 pro27의 소스 파일 구조이다.
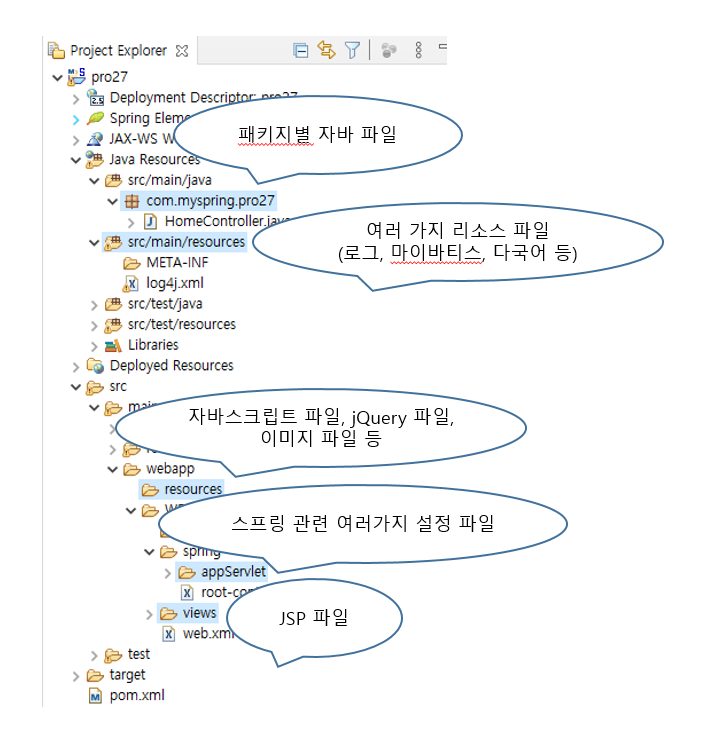
* 이처럼 STS에서는 프로젝트 생성 시 미리 각 기능에 대한 폴더를 자동으로 만들어 준다. 우선 생성된 프로젝트에 대해 알아본 후 프로젝트를 실행해 보자.
(1) XML 파일 설정하기
* 프로젝트를 만들면 다음과 같이 XML 설정 파일이 자동으로 생성된다.
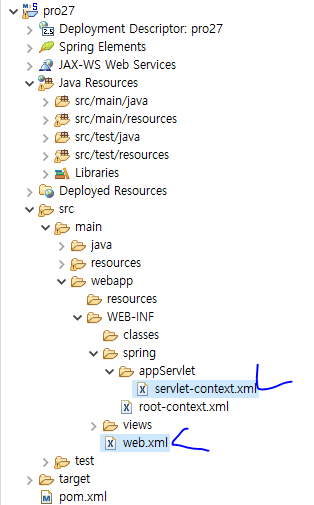
* web.xml을 다른 설정 파일을 읽어 들이는 부분과 DispatcherServlet을 매핑하는 부분이 자동으로 만들어진다.
<?xml version="1.0" encoding="UTF-8"?>
<web-app version="2.5" xmlns="http://java.sun.com/xml/ns/javaee"
	xmlns:xsi="http://www.w3.org/2001/XMLSchema-instance"
	xsi:schemaLocation="http://java.sun.com/xml/ns/javaee https://java.sun.com/xml/ns/javaee/web-app_2_5.xsd">

	<!-- The definition of the Root Spring Container shared by all Servlets and Filters -->
	<context-param>
		<param-name>contextConfigLocation</param-name>
		<param-value>/WEB-INF/spring/root-context.xml</param-value>
	</context-param>

	<!-- Creates the Spring Container shared by all Servlets and Filters -->
	<listener>
		<listener-class>org.springframework.web.context.ContextLoaderListener</listener-class>
	</listener>

	<!-- Processes application requests -->
	<servlet>
		<servlet-name>appServlet</servlet-name>
		<servlet-class>org.springframework.web.servlet.DispatcherServlet</servlet-class>
		<init-param>
			<param-name>contextConfigLocation</param-name>
			<param-value>/WEB-INF/spring/appServlet/servlet-context.xml</param-value> <!-- 스프링 실행 시 servlet-context.xml의 설정 정보를 읽어 들인다. -->
		</init-param>
		<load-on-startup>1</load-on-startup>
	</servlet>

	<servlet-mapping>
		<servlet-name>appServlet</servlet-name>
		<url-pattern>/</url-pattern>
	</servlet-mapping>

</web-app>
* 또한 servlet-context.xml에는 JSP의 위치를 지정하는 뷰리졸버와 JSP에서 사용하는 자바스크립트 파일 또는 이미지 같은 리소스 경로, 애너테이션 설정 등이 프로젝트 생성 시 자동으로 만들어진다.
<?xml version="1.0" encoding="UTF-8"?>
<beans:beans xmlns="http://www.springframework.org/schema/mvc"
	xmlns:xsi="http://www.w3.org/2001/XMLSchema-instance"
	xmlns:beans="http://www.springframework.org/schema/beans"
	xmlns:context="http://www.springframework.org/schema/context"
	xsi:schemaLocation="http://www.springframework.org/schema/mvc https://www.springframework.org/schema/mvc/spring-mvc.xsd
		http://www.springframework.org/schema/beans https://www.springframework.org/schema/beans/spring-beans.xsd
		http://www.springframework.org/schema/context https://www.springframework.org/schema/context/spring-context.xsd">

	<!-- DispatcherServlet Context: defines this servlet's request-processing infrastructure -->

	<!-- Enables the Spring MVC @Controller programming model -->
	<annotation-driven />

	<!-- Handles HTTP GET requests for /resources/** by efficiently serving up static resources in the ${webappRoot}/resources directory -->
	<resources mapping="/resources/**" location="/resources/" /> <!-- JSP에서 사용할 자바스크립트나 이미지 파일 경로를 지정한다. -->

	<!-- Resolves views selected for rendering by @Controllers to .jsp resources in the /WEB-INF/views directory -->
	<beans:bean class="org.springframework.web.servlet.view.InternalResourceViewResolver">
		<beans:property name="prefix" value="/WEB-INF/views/" />
		<beans:property name="suffix" value=".jsp" />
	</beans:bean> <!-- 뷰리졸버 빈을 생성하면서 응답할 JSP의 경로를 지정한다. -->

	<context:component-scan base-package="com.myspring.pro27" /> <!-- 패키지와 애너테이션을 지정한다. -->


</beans:beans>
(2) 자바 클래스와 JSP 파일 만들기
1. 프로젝트를 만들면 다음과 같이 자동으로 자바 클래스와 JSP 파일이 생성된다. 일일이 추가했던 이전 실습과 비교하면 참 편리하다.
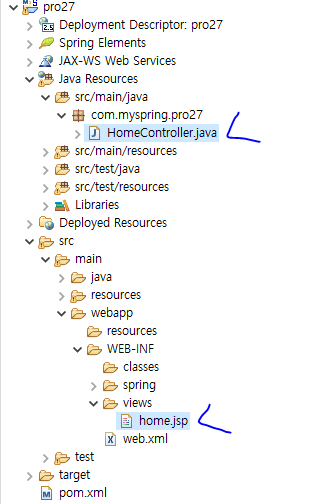
2. HomeController 클래스를 다음과 같이 작성한다. 모든 요청에 대해 home() 메서드를 호출하여 요청 시각을 home.jsp로 포워딩한다.
package com.myspring.pro27;

import java.text.DateFormat;
import java.util.Date;
import java.util.Locale;

import org.slf4j.Logger;
import org.slf4j.LoggerFactory;
import org.springframework.stereotype.Controller;
import org.springframework.ui.Model;
import org.springframework.web.bind.annotation.RequestMapping;
import org.springframework.web.bind.annotation.RequestMethod;


@Controller // @Controller를 적용한다.
public class HomeController {

	private static final Logger logger = LoggerFactory.getLogger(HomeController.class);

	@RequestMapping(value = "/", method = RequestMethod.GET) // 모든 요청에 대해 home() 메서드를 호출한다.
	public String home(Locale locale, Model model) {
		logger.info("Welcome home! The client locale is {}.", locale);

		Date date = new Date();
		DateFormat dateFormat = DateFormat.getDateTimeInstance(DateFormat.LONG, DateFormat.LONG, locale);

		String formattedDate = dateFormat.format(date);

		model.addAttribute("serverTime", formattedDate ); // 브라우저에서 요청한 시각을 JSP로 전달한다.

		return "home"; // 뷰리졸버로 JSP 이름을 반환한다.
	}

}
3. home.jsp는 컨트롤러에서 전달된 요청 시각을 출력하도록 작성한다.
<%@ taglib uri="http://java.sun.com/jsp/jstl/core" prefix="c" %>
<%@ page session="false" %>
<!DOCTYPE html>
<html lang="ko">
    <head>
        <title>Home</title>
    </head>
    <body>
        <h1>
            Hello world!
        </h1>
        <!-- 브라우저에서 요청한 시각을 브라우저에 출력한다. -->
        <p> The time on the server is ${serverTime}. </p>
    </body>
</html>
4. 톰캣에 pro27을 등록해서 실행한 후 브라우저에서 다음의 주소로 요청하면 요청 시각이 표시된다.
- http://localhost:8090/pro27/

'Java > Java_Spring Framework part2' 카테고리의 다른 글
| (6) 메이븐과 스프링 STS 사용법 6 (0) | 2023.11.15 |
|---|---|
| (5) 메이븐과 스프링 STS 사용법 5 (0) | 2023.11.15 |
| (4) 메이븐과 스프링 STS 사용법 4 (0) | 2023.11.14 |
| (3) 메이븐과 스프링 STS 사용법 3 (0) | 2023.11.14 |
| (1) 메이븐과 스프링 STS 사용법 1 (0) | 2023.11.14 |


