
| 일 | 월 | 화 | 수 | 목 | 금 | 토 |
|---|---|---|---|---|---|---|
| 1 | 2 | 3 | 4 | 5 | 6 | 7 |
| 8 | 9 | 10 | 11 | 12 | 13 | 14 |
| 15 | 16 | 17 | 18 | 19 | 20 | 21 |
| 22 | 23 | 24 | 25 | 26 | 27 | 28 |
| 29 | 30 | 31 |
- NestedFor
- 정수형타입
- 예외처리
- 다형성
- oracle
- 어윈 사용법
- 예외미루기
- 생성자오버로드
- GRANT VIEW
- 집합_SET
- 참조형변수
- 사용자예외클래스생성
- 한국건설관리시스템
- Java
- 인터페이스
- exception
- 자바
- cursor문
- 메소드오버로딩
- 컬렉션 타입
- 자동차수리시스템
- 컬렉션프레임워크
- 추상메서드
- 오라클
- 대덕인재개발원
- 제네릭
- 환경설정
- EnhancedFor
- abstract
- 객체 비교
- Today
- Total
거니의 velog
(9) 보강 6 본문

<!DOCTYPE html>
<html lang="en">
    <head>
        <meta charset="UTF-8">
        <meta name="viewport" content="width=device-width, initial-scale=1.0">
        <title>무한스크롤</title>
        <script src="./jsp.js"></script>
    </head>
    <body>
        <h1>모바일에서 많이 쓰이는 무한스크롤</h1>
        <h1>점점 데스크톱에서도 많이 쓰여용</h1>
        <h1>난 최고의 프로그래머당</h1>
        <h1>난 최고의 프로그래머당</h1>
        <h1>난 최고의 프로그래머당</h1>
        <h1>난 최고의 프로그래머당</h1>
        <h1>난 최고의 프로그래머당</h1>
        <h1>난 최고의 프로그래머당</h1>
        <h1>난 최고의 프로그래머당</h1>
        <h1>난 최고의 프로그래머당</h1>
        <h1>난 최고의 프로그래머당</h1>
        <h1>난 최고의 프로그래머당</h1>
        <h1>난 최고의 프로그래머당</h1>
        <h1>난 최고의 프로그래머당</h1>
        <h1>난 최고의 프로그래머당</h1>
        <h1>난 최고의 프로그래머당</h1>
        <h1>난 최고의 프로그래머당</h1>
        <h1>난 최고의 프로그래머당</h1>
        <h1>난 최고의 프로그래머당</h1>
        <h1>난 최고의 프로그래머당</h1>
        <h1>난 최고의 프로그래머당</h1>
        <h1>난 최고의 프로그래머당</h1>
        <h1>난 최고의 프로그래머당</h1>
        <h1>난 최고의 프로그래머당</h1>
        <h1>난 최고의 프로그래머당</h1>
        <h1>난 최고의 프로그래머당</h1>
        <h1>난 최고의 프로그래머당</h1>
        <h1>난 최고의 프로그래머당</h1>
        <script>
            // 스크롤 이벤또!
            // 안 외워도 됨, 거의 이런식으로 밖에 사용 안되니, 샘플만 잘 가지고 있으면 OK!
            function f_scroll(){
                console.log("scrollTop :", document.documentElement.scrollTop);
                console.log("clientHeight :", document.documentElement.clientHeight);
                console.log("scrollHeight :", document.documentElement.scrollHeight);
            }
            window.addEventListener("scroll", f_scroll);
        </script>
    </body>
</html>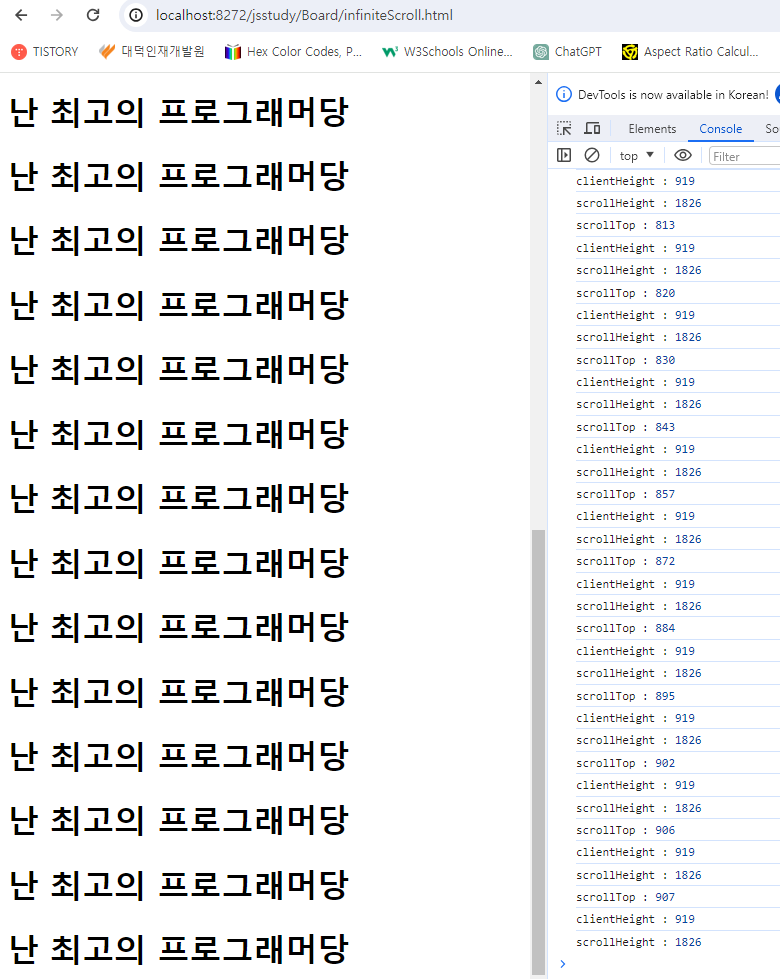
<!DOCTYPE html>
<html lang="en">
    <head>
        <meta charset="UTF-8">
        <meta name="viewport" content="width=device-width, initial-scale=1.0">
        <title>무한스크롤</title>
        <script src="./jsp.js"></script>
    </head>
    <body>
        <h1>모바일에서 많이 쓰이는 무한스크롤</h1>
        <h1>점점 데스크톱에서도 많이 쓰여용</h1>
        <h1>난 최고의 프로그래머당</h1>
        <h1>난 최고의 프로그래머당</h1>
        <h1>난 최고의 프로그래머당</h1>
        <h1>난 최고의 프로그래머당</h1>
        <h1>난 최고의 프로그래머당</h1>
        <h1>난 최고의 프로그래머당</h1>
        <h1>난 최고의 프로그래머당</h1>
        <h1>난 최고의 프로그래머당</h1>
        <h1>난 최고의 프로그래머당</h1>
        <h1>난 최고의 프로그래머당</h1>
        <h1>난 최고의 프로그래머당</h1>
        <h1>난 최고의 프로그래머당</h1>
        <h1>난 최고의 프로그래머당</h1>
        <h1>난 최고의 프로그래머당</h1>
        <h1>난 최고의 프로그래머당</h1>
        <h1>난 최고의 프로그래머당</h1>
        <h1>난 최고의 프로그래머당</h1>
        <h1>난 최고의 프로그래머당</h1>
        <h1>난 최고의 프로그래머당</h1>
        <h1>난 최고의 프로그래머당</h1>
        <h1>난 최고의 프로그래머당</h1>
        <h1>난 최고의 프로그래머당</h1>
        <h1>난 최고의 프로그래머당</h1>
        <h1>난 최고의 프로그래머당</h1>
        <h1>난 최고의 프로그래머당</h1>
        <h1>난 최고의 프로그래머당</h1>
        <script>
            // 스크롤 이벤또!
            // 안 외워도 됨, 거의 이런식으로 밖에 사용 안되니, 샘플만 잘 가지고 있으면 OK!
            function f_scroll(){
                console.log("scrollTop :", document.documentElement.scrollTop);
                console.log("clientHeight :", document.documentElement.clientHeight);
                console.log("scrollHeight :", document.documentElement.scrollHeight);

                var myScrollTop = document.documentElement.scrollTop;           // 얼마나 위로 올렸냥?
                var myClientHeight = document.documentElement.clientHeight;     // 눈에 보이는 윈도우 높이
                var myScrollHeight = document.documentElement.scrollHeight;     // 문서 전체 높이

                var tunningVal = 50; // 실제로는 맨끝에 가기 전(살짝 위)에 처리
                // 스크롤바를 끝까지 내렸을 경우
                if( (myScrollTop + myClientHeight) >= (myScrollHeight - tunningVal) ) {
                    alert("스크롤 거의 끝꺼정 왔어용!!! 뭔가 해주세용");
                }
            }
            window.addEventListener("scroll", f_scroll);
        </script>
    </body>
</html>
<!DOCTYPE html>
<html lang="en">
    <head>
        <meta charset="UTF-8">
        <meta name="viewport" content="width=device-width, initial-scale=1.0">
        <title>무한스크롤</title>
        <script src="./jsp.js"></script>
    </head>
    <body>
        <h1>모바일에서 많이 쓰이는 무한스크롤</h1>
        <h1>점점 데스크톱에서도 많이 쓰여용</h1>
        <div id="list">
            <h1>난 최고의 프로그래머당</h1>
            <h1>난 최고의 프로그래머당</h1>
            <h1>난 최고의 프로그래머당</h1>
            <h1>난 최고의 프로그래머당</h1>
            <h1>난 최고의 프로그래머당</h1>
            <h1>난 최고의 프로그래머당</h1>
            <h1>난 최고의 프로그래머당</h1>
            <h1>난 최고의 프로그래머당</h1>
            <h1>난 최고의 프로그래머당</h1>
            <h1>난 최고의 프로그래머당</h1>
            <h1>난 최고의 프로그래머당</h1>
            <h1>난 최고의 프로그래머당</h1>
            <h1>난 최고의 프로그래머당</h1>
            <h1>난 최고의 프로그래머당</h1>
            <h1>난 최고의 프로그래머당</h1>
            <h1>난 최고의 프로그래머당</h1>
            <h1>난 최고의 프로그래머당</h1>
            <h1>난 최고의 프로그래머당</h1>
            <h1>난 최고의 프로그래머당</h1>
            <h1>난 최고의 프로그래머당</h1>
            <h1>난 최고의 프로그래머당</h1>
            <h1>난 최고의 프로그래머당</h1>
            <h1>난 최고의 프로그래머당</h1>
            <h1>난 최고의 프로그래머당</h1>
            <h1>난 최고의 프로그래머당</h1>
            <h1>난 최고의 프로그래머당</h1>
        </div>
        <script>
            // 스크롤바 이동!
            //window.scrollTo(0,0);   // 구글 너네들 버그당, 요거 안 움직인당, 짜증 지대로당!
                                    // 우리 브라우저가 너무 성능이 좋아서 생기는 문제닝, 시간을 쪼매 줘랑

            setTimeout(function(){ // 대표적 비동기함수, 브라우져가 지원하는 것이 아니고, OS가 제공함
                window.scrollTo(0,0); // 스크롤바 이동!
            }, 30);

            // 스크롤 이벤또!
            // 안 외워도 됨, 거의 이런식으로 밖에 사용 안되니, 샘플만 잘 가지고 있으면 OK!
            function f_scroll(){
                console.log("scrollTop :", document.documentElement.scrollTop);
                console.log("clientHeight :", document.documentElement.clientHeight);
                console.log("scrollHeight :", document.documentElement.scrollHeight);

                var myScrollTop = document.documentElement.scrollTop;           // 얼마나 위로 올렸냥?
                var myClientHeight = document.documentElement.clientHeight;     // 눈에 보이는 윈도우 높이
                var myScrollHeight = document.documentElement.scrollHeight;     // 문서 전체 높이

                var tunningVal = 50; // 실제로는 맨끝에 가기 전(살짝 위)에 처리
                // 스크롤바를 끝까지 내렸을 경우
                var myList = document.querySelector("#list");
                if( (myScrollTop + myClientHeight) >= (myScrollHeight - tunningVal) ) {
                    //alert("스크롤 거의 끝꺼정 왔어용!!! 뭔가 해주세용");

                    // 보통 요기에 AJAX가 옴!
                    // 일부는 처음에 로컬스토리지에 필요한 데이터를 다 가져다 놓고, 서버와의 통신없이
                    // 로컬스토리지에서 꺼내오기도 함!

                    for(var i=1; i<=6; i++) {
                        var myH1 = document.createElement("h"+i);
                        myH1.innerHTML = "난 최고의 프로그래머당!" + i;
                        myList.appendChild(myH1);
                    }
                }
            }
            window.addEventListener("scroll", f_scroll);
        </script>
    </body>
</html>

<!DOCTYPE html>
<html lang="en">
    <head>
        <meta charset="UTF-8">
        <meta name="viewport" content="width=device-width, initial-scale=1.0">
        <title>무한스크롤2</title>
        <style>
            #list {
                height: 300px; /* 높이를 제한 */
                border: 1px solid black;
                overflow: auto;
            }
        </style>
    </head>
    <body>
        <h1>DIV에 무한스크롤 걸기</h1>
        <div id="list">
            <h1>난 최고의 개발자당! 안 졸리당!</h1>
            <h1>난 최고의 개발자당! 안 졸리당!</h1>
            <h1>난 최고의 개발자당! 안 졸리당!</h1>
            <h1>난 최고의 개발자당! 안 졸리당!</h1>
            <h1>난 최고의 개발자당! 안 졸리당!</h1>
            <h1>난 최고의 개발자당! 안 졸리당!</h1>
        </div>
        <script>
            // 결론은 그냥 열심히 하면 잘 된당! 인생 고생 총합의 법칙
            var myList = document.querySelector("#list");

            myList.scrollTo(0,0); // 스크롤바 이동!

            function f_scroll(){
                var scrollTop = myList.scrollTop;
                var clientHeight = myList.clientHeight;
                var scrollHeight = myList.scrollHeight;

                var tunningVal = 50;

                if( (scrollTop + clientHeight) >= (scrollHeight - tunningVal) ) {
                    // 요기에 못생긴 게시판 10개씩 가져오기 해보면 아주 좋음!

                    for(var i=1; i<=6; i++) {
                        var hTag = document.createElement("h"+i);
                        hTag.innerHTML = "무한스크롤";
                        myList.appendChild(hTag);
                    }
                }
            }

            myList.addEventListener("scroll", f_scroll);
        </script>
    </body>
</html>
Chart.js
Simple yet flexible JavaScript charting library for the modern web
www.chartjs.org
D3 by Observable | The JavaScript library for bespoke data visualization
D3 The JavaScript library for bespoke data visualization Create custom dynamic visualizations with unparalleled flexibility
d3js.org
- 과학 계통 그림, 사기꾼들도 많이 씀.
C3.js | D3-based reusable chart library
Comfortable C3 makes it easy to generate D3-based charts by wrapping the code required to construct the entire chart. We don't need to write D3 code any more. Customizable C3 gives some classes to each element when generating, so you can define a custom st
c3js.org
* 경량화 버전.
https://www.chartjs.org/docs/latest/getting-started/
Getting Started | Chart.js
Getting Started Let's get started with Chart.js! Alternatively, see the example below or check samples. Create a Chart In this example, we create a bar chart for a single dataset and render it on an HTML page. Add this code snippet to your page: You should
www.chartjs.org
<!DOCTYPE html>
<html lang="en">
    <head>
        <meta charset="UTF-8">
        <meta name="viewport" content="width=device-width, initial-scale=1.0">
        <title>차트</title>
        <script src="https://cdn.jsdelivr.net/npm/chart.js"></script>
    </head>
    <body>
        <!-- 차트의 크기는 부모 사이즈에 의해 결정됨 -->
        <div style="width: 800px;">
            <canvas id="myChart"></canvas>
        </div>
        <script>
            const ctx = document.querySelector('#myChart');

            new Chart(ctx, {
              type: 'bar', /* bar, line, pie, doughnut, radar */
              data: {
                labels: ['Red', 'Blue', 'Yellow', 'Green', 'Purple', 'Orange'],
                datasets: [{
                  label: '# of Votes',
                  data: [12, 19, 3, 5, 2, 3],
                  borderWidth: 1
                }]
              },
              options: {
                scales: {
                  y: {
                    beginAtZero: true
                  }
                }
              }
            });
          </script>
    </body>
</html>
<!DOCTYPE html>
<html lang="en">
    <head>
        <meta charset="UTF-8">
        <meta name="viewport" content="width=device-width, initial-scale=1.0">
        <title>차트</title>
        <script src="https://cdn.jsdelivr.net/npm/chart.js"></script>
    </head>
    <body>
        <!-- 차트의 크기는 부모 사이즈에 의해 결정됨 -->
        <div style="width: 800px;">
            <canvas id="myChart"></canvas>
        </div>
        <script>
            const ctx = document.querySelector('#myChart');

            var youChart = new Chart(ctx, {
              type: 'bar', /* bar, line, pie, doughnut, radar */
              data: {
                labels: ['Red', 'Blue', 'Yellow', 'Green', 'Purple', 'Orange'],
                datasets: [{
                  label: '# of Votes',
                  data: [12, 19, 3, 5, 2, 3],
                  borderWidth: 1
                }]
              },
              options: {
                scales: {
                  y: {
                    beginAtZero: true
                  }
                }
              }
            });

            // chart.js를 개발자들이 좋아하는 이유, 아래처럼 접근이 용이
            console.log(youChart.data.datasets[0].data[3]);
          </script>
    </body>
</html>
<!DOCTYPE html>
<html lang="en">
    <head>
        <meta charset="UTF-8">
        <meta name="viewport" content="width=device-width, initial-scale=1.0">
        <title>차트</title>
        <script src="https://cdn.jsdelivr.net/npm/chart.js"></script>
    </head>
    <body>
        <!-- 차트의 크기는 부모 사이즈에 의해 결정됨 -->
        <div style="width: 800px;">
            <canvas id="myChart"></canvas>
        </div>
        <button type="button" onclick="f_reDraw()">다시그령</button>
        <script>
            // chart.js를 개발자들이 좋아하는 이유, 아래처럼 접근이 용이
            function f_reDraw(){
                youChart.data.datasets[0].data = [12, 22, 32, 42, 52, 62]; // 데이터 주깅
                console.log(youChart.data.datasets[0].data);
                // chart.js에서 가장 중요한 메소드 update() => 다시 그려랑(rendering)
                youChart.update();
            }

            const ctx = document.querySelector('#myChart');

            var youChart = new Chart(ctx, {
              type: 'bar', /* bar, line, pie, doughnut, radar */
              data: {
                labels: ['Red', 'Blue', 'Yellow', 'Green', 'Purple', 'Orange'],
                datasets: [{
                  label: '# of Votes',
                  data: [12, 19, 3, 5, 2, 3],
                  borderWidth: 1
                }]
              },
              options: {
                scales: {
                  y: {
                    beginAtZero: true
                  }
                }
              }
            });
          </script>
    </body>
</html>
<!DOCTYPE html>
<html lang="en">
    <head>
        <meta charset="UTF-8">
        <meta name="viewport" content="width=device-width, initial-scale=1.0">
        <title>차트</title>
        <script src="https://cdn.jsdelivr.net/npm/chart.js"></script>
    </head>
    <body>
        <!-- 차트의 크기는 부모 사이즈에 의해 결정됨 -->
        <div style="width: 800px;">
            <canvas id="myChart"></canvas>
        </div>
        <button type="button" onclick="f_reDraw()">다시그령</button>
        <script>
            function f_randArr(){
                var randArr = [];
                for(var i=0; i<=6; i++) {
                    randArr.push(Math.round(Math.random() * 40) + 60); // 60~100까지 랜덤 숫자
                }
                return randArr;
            }

            // chart.js를 개발자들이 좋아하는 이유, 아래처럼 접근이 용이
            function f_reDraw(){
                youChart.data.datasets[0].label = "홍길동은 남주인공!";

                //youChart.data.datasets[0].data = [12, 22, 32, 42, 52, 62]; // 데이터 주깅
                youChart.data.datasets[0].data = f_randArr(); // 데이터 주깅
                console.log(youChart.data.datasets[0].data);
                // chart.js에서 가장 중요한 메소드 update() => 다시 그려랑(rendering)
                youChart.update();
            }

            const ctx = document.querySelector('#myChart');

            var youChart = new Chart(ctx, {
              type: 'bar', /* bar, line, pie, doughnut, radar */
              data: {
                labels: ['Red', 'Blue', 'Yellow', 'Green', 'Purple', 'Orange'],
                datasets: [{
                  label: '# of Votes',
                  data: [12, 19, 3, 5, 2, 3],
                  borderWidth: 1
                }]
              },
              options: {
                scales: {
                  y: {
                    beginAtZero: true
                  }
                }
              }
            });
          </script>
    </body>
</html>
<!DOCTYPE html>
<html lang="en">
    <head>
        <meta charset="UTF-8">
        <meta name="viewport" content="width=device-width, initial-scale=1.0">
        <title>차트</title>
        <script src="https://cdn.jsdelivr.net/npm/chart.js"></script>
    </head>
    <body>
        <!-- 차트의 크기는 부모 사이즈에 의해 결정됨 -->
        <div style="width: 800px;">
            <canvas id="myChart"></canvas>
        </div>
        <button type="button" onclick="f_reDraw()">다시그령</button>
        <script>
            function f_randArr(){
                var randArr = [];
                for(var i=0; i<=6; i++) {
                    randArr.push(Math.round(Math.random() * 40) + 60); // 60~100까지 랜덤 숫자
                }
                return randArr;
            }

            // chart.js를 개발자들이 좋아하는 이유, 아래처럼 접근이 용이
            function f_reDraw(){
                youChart.data.datasets[0].label = "홍길동은 남주인공!";
                youChart.data.labels = ["흥", "치", "뿡", "쿵", "짝", "홀"];

                //youChart.type = 'line'; // 요게 안 바뀜!, 짜증
                youChart.data.datasets[1].type = "line"; // 이렇게 해야 바뀜.

                //youChart.data.datasets[0].data = [12, 22, 32, 42, 52, 62]; // 데이터 주깅
                youChart.data.datasets[0].data = f_randArr(); // 데이터 주깅
                youChart.data.datasets[1].data = f_randArr(); // 데이터 주깅
                console.log(youChart.data.datasets[0].data);
                // chart.js에서 가장 중요한 메소드 update() => 다시 그려랑(rendering)
                youChart.update();

                setTimeout(f_reDraw, 1000);
            }

            const ctx = document.querySelector('#myChart');

            var youChart = new Chart(ctx, {
              type: 'bar', /* bar, line, pie, doughnut, radar */
              data: {
                labels: ['Red', 'Blue', 'Yellow', 'Green', 'Purple', 'Orange'],
                datasets: [
                    {
                        label: '# 작년 데이터',
                        data: [12, 19, 3, 5, 2, 3],
                        borderWidth: 1,
                    },
                    {
                        label: '# 올해 데이터',
                        data: [12, 42, 34, 22, 5, 6],
                        borderWidth: 1
                    },
                ]
              },
              options: {
                scales: {
                  y: {
                    beginAtZero: true
                  }
                }
              }
            });
          </script>
    </body>
</html>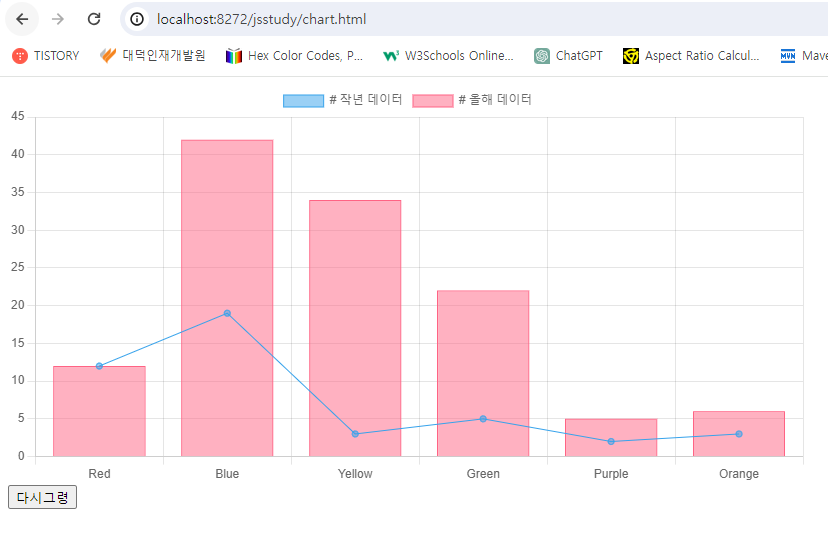
<!DOCTYPE html>
<html lang="en">
    <head>
        <meta charset="UTF-8">
        <meta name="viewport" content="width=device-width, initial-scale=1.0">
        <title>차트</title>
        <script src="https://cdn.jsdelivr.net/npm/chart.js"></script>
    </head>
    <body>
        <!-- 차트의 크기는 부모 사이즈에 의해 결정됨 -->
        <div style="width: 800px;">
            <canvas id="myChart"></canvas>
        </div>
        <button type="button" onclick="f_reDraw()">다시그령</button>
        <script>
            function f_randArr(){
                var randArr = [];
                for(var i=0; i<=6; i++) {
                    randArr.push(Math.round(Math.random() * 40) + 60); // 60~100까지 랜덤 숫자
                }
                return randArr;
            }

            // chart.js를 개발자들이 좋아하는 이유, 아래처럼 접근이 용이
            function f_reDraw(){
                youChart.data.datasets[0].label = "홍길동은 남주인공!";
                youChart.data.labels = ["흥", "치", "뿡", "쿵", "짝", "홀"];

                //youChart.type = 'line'; // 요게 안 바뀜!, 짜증
                youChart.data.datasets[1].type = "line"; // 이렇게 해야 바뀜.

                //youChart.data.datasets[0].data = [12, 22, 32, 42, 52, 62]; // 데이터 주깅
                youChart.data.datasets[0].data = f_randArr(); // 데이터 주깅
                youChart.data.datasets[1].data = f_randArr(); // 데이터 주깅
                console.log(youChart.data.datasets[0].data);
                // chart.js에서 가장 중요한 메소드 update() => 다시 그려랑(rendering)
                youChart.update();

                setTimeout(f_reDraw, 1000);
            }

            const ctx = document.querySelector('#myChart');

            var youChart = new Chart(ctx, {
              type: 'bar', /* bar, line, pie, doughnut, radar */
              data: {
                labels: ['Red', 'Blue', 'Yellow', 'Green', 'Purple', 'Orange'],
                datasets: [
                    {
                        label: '# 작년 데이터',
                        data: [12, 19, 3, 5, 2, 3],
                        borderWidth: 1,
                    },
                    {
                        label: '# 올해 데이터',
                        data: [12, 42, 34, 22, 5, 6],
                        borderWidth: 1
                    },
                ]
              },
              options: {
                indexAxis:'y', // 요것만 넣으면 수평차트가 됨!
                scales: {
                  y: {
                    beginAtZero: true
                  }
                }
              }
            });
          </script>
    </body>
</html>

<!DOCTYPE html>
<html lang="en">
    <head>
        <meta charset="UTF-8">
        <meta name="viewport" content="width=device-width, initial-scale=1.0">
        <title>클래스</title>
    </head>
    <body>
        <script>
            // 자바스크립트에도 class 키워드가 추가됨!
            // 하지만 원래 function 키워드가 하던 일이고, 내부적으로 function 키워드로 바뀌어
            // 처리된다는 말에 순수 자바스크립트(바닐라)에선 그냥 function 키워드를 더 많이 씀!
            // 만약 마이크로소프트의 typescript를 쓴다면 이야기가 다름(class 키워드를 써야 유리)

            // function 키워드를 class의 의미로 사용하기
            // (중요, 연봉도 오르공, 최신 프론트엔드 프레임워크 사용에 남들보다 빨리 진출)

            // 클래스란? [사용자 정의 DataType] 이라고 하면 된다.
            function Saram(pName, pAge){ // 생성자(constructor)라고도 부름
                this.name = pName;
                this.age = pAge;
                /* 메소드를 요렇게 만들면 각자 메소드를 가짐, 상황에 따라 메모리 낭비라고도 볼 수 있음.
                this.getAge = function(){
                    return this.age;
                }
                return this; // 요거이 생략되어 있음, 그냥 function으로 쓸 때와 차이?
                */
            }

            // 메소드 선언은 명시적으로 prototype에 넣어주어야
            // 해당 class에서 생성된 객체끼리 공유됨.
            // Ecma International의 프로토타입 기반의 프로그래밍 언어로, 스크립트 언어에 해당
            Saram.prototype.getAge = function(){ // 요걸 받아들이면 이야기가 많이 쉬워짐
                return this.age;
            }

            var 송시운 = new Saram("서운", 20);
            console.log(송시운);
            console.log(송시운.getAge());

            var 강민택 = new Saram("민택", 25);
            console.log(강민택);
            console.log(강민택.getAge());
        </script>
    </body>
</html>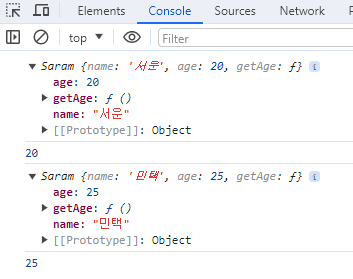

<!DOCTYPE html>
<html lang="en">
    <head>
        <meta charset="UTF-8">
        <meta name="viewport" content="width=device-width, initial-scale=1.0">
        <title>Document</title>
    </head>
    <body>
        <script>
            // 자바의 ArrayList 맹글어 보깅
            function ArrayList(){
                this.length = 0;
                return this; // 생략해도 무방, new를 써서 생성되는 것은 이거이 생략되어 있음.
            }

            // add 메소드
            ArrayList.prototype.add = function(pArg){
                this[this.length] = pArg; // 배열식 접근법
                this.length++;
                return this; // 메소드 체이닝 완성!
            }

            var myList = new ArrayList();
            // 디버깅(참조변수 출력시)에 사용하면, 아주 유용한 전역함수 structuredClone()
            console.log(structuredClone(myList));

            myList.add("민지현").add("한동욱").add("김영진"); // 메소드 체이닝을 쓰고싶당!
            // myList.add("한동욱");
            console.log(structuredClone(myList));
        </script>
    </body>
</html>
<!DOCTYPE html>
<html lang="en">
    <head>
        <meta charset="UTF-8">
        <meta name="viewport" content="width=device-width, initial-scale=1.0">
        <title>Document</title>
    </head>
    <body>
        <script>
            // 자바의 ArrayList 맹글어 보깅
            function ArrayList(){
                this.length = 0;
                return this; // 생략해도 무방, new를 써서 생성되는 것은 이거이 생략되어 있음.
            }

            // add 메소드
            ArrayList.prototype.add = function(pArg){
                this[this.length] = pArg; // 배열식 접근법
                this.length++;
                return this; // 메소드 체이닝 완성!
            }

            // 읽기
            ArrayList.prototype.get = function(pIndex){
                return this[pIndex]; // 보통 읽기 동작에는 메소드 체이닝을 구현하지 않음, 당연한 이야깅!
            }

            // 덮어쓰기
            ArrayList.prototype.set = function(pIndex, pVal){
                this[pIndex] = pVal;
                return this; // 메소드 체이닝 구현, 쓰기 동작에 해당하기 때문
            }

            // 갯수 구하기
            ArrayList.prototype.size = function(){
                return this.length;
            }

            // 졸음을 쫓아낼 문제!
            ArrayList.prototype.remove = function(pIndex){
                delete this[pIndex];
                this.length--; // 1개 지웠으므로, 1개 감소
                return this; // 메소드 체이닝
            }

            var myList = new ArrayList();
            // 디버깅(참조변수 출력시)에 사용하면, 아주 유용한 전역함수 structuredClone()
            console.log(structuredClone(myList));

            // 메소드 체이닝을 쓰고싶당!
            alert(myList.add("민지현").add("한동욱").add("김영진").set(1, "메롱").get(1)); // 메롱
            // myList.add("한동욱");

            console.log(structuredClone(myList));
        </script>
    </body>
</html>

<!DOCTYPE html>
<html lang="en">
    <head>
        <meta charset="UTF-8">
        <meta name="viewport" content="width=device-width, initial-scale=1.0">
        <title>Document</title>
    </head>
    <body>
        <script>
            // 자바의 ArrayList 맹글어 보깅
            function ArrayList(){
                this.length = 0;
                return this; // 생략해도 무방, new를 써서 생성되는 것은 이거이 생략되어 있음.
            }

            // add 메소드
            ArrayList.prototype.add = function(pArg){
                this[this.length] = pArg; // 배열식 접근법
                this.length++;
                return this; // 메소드 체이닝 완성!
            }

            // 읽기
            ArrayList.prototype.get = function(pIndex){
                return this[pIndex]; // 보통 읽기 동작에는 메소드 체이닝을 구현하지 않음, 당연한 이야깅!
            }

            // 덮어쓰기
            ArrayList.prototype.set = function(pIndex, pVal){
                this[pIndex] = pVal;
                return this; // 메소드 체이닝 구현, 쓰기 동작에 해당하기 때문
            }

            // 갯수 구하기
            ArrayList.prototype.size = function(){
                return this.length;
            }

            // 졸음을 쫓아낼 문제!
            ArrayList.prototype.remove = function(pIndex){
                delete this[pIndex];
                this.length--; // 1개 지웠으므로, 1개 감소
                return this; // 메소드 체이닝
            }

            var myList = new ArrayList();
            // 디버깅(참조변수 출력시)에 사용하면, 아주 유용한 전역함수 structuredClone()
            console.log(structuredClone(myList));

            // 메소드 체이닝을 쓰고싶당!
            //alert(myList.add("민지현").add("한동욱").add("김영진").set(1, "메롱").get(1)); // 메롱
            // myList.add("한동욱");

            myList.add("민지현").add("한동욱").add("김영진");

            console.log(structuredClone(myList));

            myList.remove(1); // 잠을 많이 잔 동욱 삭제
            console.log(structuredClone(myList));
        </script>
    </body>
</html>
<!DOCTYPE html>
<html lang="en">
    <head>
        <meta charset="UTF-8">
        <meta name="viewport" content="width=device-width, initial-scale=1.0">
        <title>Document</title>
    </head>
    <body>
        <script>
            // 자바의 ArrayList 맹글어 보깅
            function ArrayList(){
                this.length = 0;
                return this; // 생략해도 무방, new를 써서 생성되는 것은 이거이 생략되어 있음.
            }

            // add 메소드
            ArrayList.prototype.add = function(pArg){
                this[this.length] = pArg; // 배열식 접근법
                this.length++;
                return this; // 메소드 체이닝 완성!
            }

            // 읽기
            ArrayList.prototype.get = function(pIndex){
                return this[pIndex]; // 보통 읽기 동작에는 메소드 체이닝을 구현하지 않음, 당연한 이야깅!
            }

            // 덮어쓰기
            ArrayList.prototype.set = function(pIndex, pVal){
                this[pIndex] = pVal;
                return this; // 메소드 체이닝 구현, 쓰기 동작에 해당하기 때문
            }

            // 갯수 구하기
            ArrayList.prototype.size = function(){
                return this.length;
            }

            // 졸음을 쫓아낼 문제! 인덱스 속성을 순서대로 정비할 필요가 생김
            // 중간이 비면 반복문 쓰는 데 어려움, 빨랑 해보세용
            ArrayList.prototype.remove = function(pIndex){
                var temp = this[pIndex];
                this[pIndex] = this[this.length - 1];
                this[this.length - 1] = temp;
                delete this[this.length - 1];
                this.length--; // 1개 지웠으므로, 1개 감소
                return this; // 메소드 체이닝
            }

            var myList = new ArrayList();
            // 디버깅(참조변수 출력시)에 사용하면, 아주 유용한 전역함수 structuredClone()
            console.log(structuredClone(myList));

            // 메소드 체이닝을 쓰고싶당!
            //alert(myList.add("민지현").add("한동욱").add("김영진").set(1, "메롱").get(1)); // 메롱
            // myList.add("한동욱");

            myList.add("민지현").add("한동욱").add("김영진").add("홍창용천재").add("자바스크립트");

            console.log(structuredClone(myList));

            myList.remove(1).remove(3); // 잠을 많이 잔 동욱 삭제
            console.log(structuredClone(myList));
        </script>
    </body>
</html>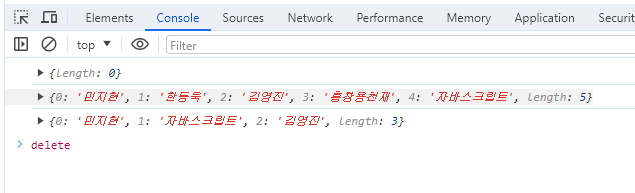
'대덕인재개발원 > 대덕인재개발원_final project' 카테고리의 다른 글
| (11) 토요일 수업 2 (0) | 2023.12.30 |
|---|---|
| (10) 보강 7 (5) | 2023.12.29 |
| (8) 보강 5 (0) | 2023.12.27 |
| (7) 보강 4 (0) | 2023.12.26 |
| (6) 토요일 수업 1 (0) | 2023.12.23 |


